Microsoft Azure provides various resources and services to provide us with a scalable environment for development and testing processes. Azure provides a virtual machine service, which allows us to leverage the resources virtually. We may have more than one virtual machine as a resource, according to our requirements. To manage and monitor our virtual machines, Microsoft Azure provides a service called Virtual Network. In this article, let us discuss how to create a virtual network in Azure using PowerShell. Before diving into the topic, let us briefly overview the Virtual Network (Vnet) and PowerShell.
What is a Virtual Network (Vnet) in Azure?
Let’s say we have two resources, such as two virtual machines. Because virtual machines represent the physical hardware on the cloud, they also need to be placed into a representation of the physical network infrastructure. This representation of a physical network infrastructure in Azure is called an Azure Virtual Network.
- Azure Virtual Network allows its customers to create, manage, monitor, and secure connectivity between Azure resources and their on-premise environments.
- Virtual networks can be segmented into smaller pieces called subnets. The main purpose of having subnets is:
- They allow customers to manage their IP address allocation efficiently.
- With the help of subnets, we can group the resources so that it is easy to apply the filters and security rules between the multiple resources within the same subnet.
What is Azure PowerShell?
- Azure PowerShell is a tool by which we can automate things in Azure.
- Besides the classic approach of using Azure through the browser, it also allows us to use a terminal and enter commands to get things done.
- This works with different operating systems, such as Windows, Linux, macOS, etc. All we need to do is install the PowerShell modules and connect to Azure to access the Azure resources.
Step by step approach to Creating a Virtual Network in Azure using PowerShell
Step 1: Setting up Azure PowerShell
- Locate the Windows PowerShell application on your system.
- Right-click on the Windows PowerShell icon.
- From the context menu, select “Run as Administrator.”
- If prompted by User Account Control (UAC), click “Yes” to confirm.
- The Windows PowerShell window will open with elevated privileges, allowing you to perform administrative tasks.

Now, enter the following commands to install all the necessary packages required to set up Azure. Below command installs all the modules of Azure services.
Install-Module Az
Now, enter the following command to check whether you are an Authorized user or not
Get-ExecutionPolicy
If the above command returns as ‘Restricted‘, You need to modify some rules to get access to Azure services.
Set-ExecutionPolicy RemoteSigned
Below command changes the execution policy from ‘Restricted‘ to ‘RemoteSigned‘.

Now we are all set to access the Azure Services.
Step 2: Connect to your Azure Account
Navigate to the Azure portal and Find ‘tenant properties‘. Copy the Tenant ID.


Now, enter the following command to connect to your Azure account.
Connect-AzAccount -TenantId <Copy-your-tenantid-here>
This command prompts up and asks for the login credentials of your account once confirmed. You can navigate back to the PowerShell terminal.

Step 3: Create a Virtual Network
Before creating a Virtual Network, let us create a Resource group to store the Virtual Network.
- Creation of Resource Group: Enter the following command to create your resource group
New-AzResourceGroup -ResourceGroupName <your-resource-group-name> -Location <your-resource-group-location>
- New-AzResourceGroup: This is the command we need to specify inorder to create a resource group in azure.
- ResourceGroupName: This parameter specifies the name of the Resource group
- Location: This Paramter specifies the location of the resource group
Below command creates a resource group.

Now, enter the following command to create a virtual network in the resource group you created.
$<your-vnet-name> = New-AzVirtualNetwork -ResourceGroupName <your-resource-group-name> -Location <your-resource-group-location> -Name <yTour-vnet-name> -AddressPrefix <address-prefix-of-your-vnet>
- New-AzVirtualNetwork: This command is used to create a new virtual network in the specified resource group.
- ResourceGroupName: This parameter specifies the name of the resource group
- Location: This parameter specifies the location of the resource
- Name: This parameter specifies the name of the virtual network
To check whether, the virtual network is created or not, enter the following command.
Get-AzVirtualNetwork -Name myVnet001
- Get-AzVirtualNetwork: This command is used to get the data of the specified virtual network
- Name: This parameter specifies the name of the virtual network.

By following this way, we have created Virtual Network in Azure using PowerShell.
Also, we can ensure that it was created in Azure portal as well.

Step 4: Deploying the Virtual Network in Azure Bastion
Azure Bastion acts as a jump server or bastion host, providing a secure gateway to access virtual machines in Azure virtual networks.It eliminates the need to expose virtual machines to the public internet, reducing the surface area for potential attacks.
New-AzBastion -ResourceGroupName $resourceGroupName -Name $bastionName -VirtualNetwork $vnet
- New-AzBastion: This command is used to create a new Bastion instance for the Virtual Newtork to deploy
- ResourceGroupName: This parameter specifies the name of the Resource group for the bastion instance
- Name: This parameter specifies the name of the Bastion
- VirtualNetwork: This parameter is the object of Virtual network where we want to the deploy the bastion For that, we can used the following command.
To get the details of Virtual Network, we can use the following command:
Get-AzVirtualNetwork -ResourceGroupName $resourceGroupName -Name $virtualNetworkName
- Get-AzVirtualNetwork: This command is used to get the details of specific Virtual network
- ResourceGroupName: This parameter specifies the Resource group name
- Name: This parameter specifies the name of the virtual network
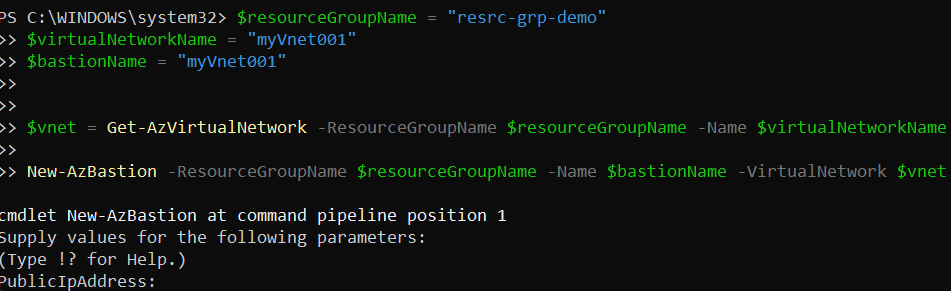
For the PublicIpAddress prompt, click enter inorder to get a IP address allocated automatically or if we want to specify an IP address we can also mention here.
Step 5: Creating Subnet and Virtual Network Interface
To create a virtual machine in the virtual network, we can use the following command.
Before creating the virtual machine, we need to create the following resources.
- Subnet: We can create a subnet in the virtual network using the following command:
New-AzVirtualNetworkSubnetConfig -Name $subnetName -AddressPrefix $subnetAddressPrefix
- New-AzVirtualNetworkSubnetConfig: This command is used to create a new subnet in the specified virtual network
- Name: This parameter specifies the name of the subnet
- AddressPrefix: This parameter specifies the Address of the subnet
Network interface:
New-AzNetworkInterface -ResourceGroupName $resourceGroupName -Name “MyNIC” -Location $location -SubnetId $subnetId
- New-AzNetworkInterface: This command is used to create a new Virtual network interface
- ResourceGroupName: This parameter specifies the name of the resource group
- Name: This parameter specifies the name of the network interface
- Location: This parameter specifies the location
- SubnetId: This parameter specifies the id of the subnet
Step 6: Configuring and creating the virtual machine
In the Virtual network, we can create and configure resources like virtual machines using the following commands.
Configuring the Virtual machine:
New-AzVMConfig -VMName $vmName -VMSize “Standard_DS1_v2” | `
Set-AzVMOperatingSystem -Windows -ComputerName $vmName -Credential (New-Object PSCredential $adminUsername, (ConvertTo-SecureString $adminPassword -AsPlainText -Force)) | `
Set-AzVMSourceImage -PublisherName $imagePublisher -Offer $imageOffer -Skus $imageSku -Version $imageVersion | `
Add-AzVMNetworkInterface -Id $nic.Id
- New-AzVMConfig -VMName $vmName -VMSize “Standard_DS1_v2”: This creates a new VM configuration object with the specified name and size.
- Set-AzVMOperatingSystem -Windows -ComputerName $vmName -Credential (New-Object PSCredential $adminUsername, (ConvertTo-SecureString $adminPassword -AsPlainText -Force)): This sets the operating system configuration for the VM. It specifies that the VM is running Windows
- Set-AzVMSourceImage -PublisherName $imagePublisher -Offer $imageOffer -Skus $imageSku -Version $imageVersion: This sets the source image for the VM.
- Add-AzVMNetworkInterface -Id $nic.Id: This adds a network interface to the VM.
Creating Virtual Machine: To create a Virtual machine with the above configuration, we can use the following command
New-AzVM -ResourceGroupName $resourceGroupName -Location $location -VM $vmConfig
- New-AzVM: This command is used to create a new virtual machine with a specified configuration
- ResourceGroupName: This parameter specifies the name of the resource group
- Location: This parameter specifies the location of the virtual machine
- VM: This parameter specifies the configuration of the Virtual Machine.

Also, we can ensure that, it is created in Azure portal as well.

Step 7: Cleaning up Resources
Now, let’s clean up the resources we created one by one using the following commands
- Removing the Virtual Machine:
Remove-AzVM -ResourceGroupName $resourceGroupName -Name $vmName
- Remove-AzVM: This command is used to remove the Virtual machine of specified name and resource group
- ResourceGroupName: This parameter is used to specify the resource group name.
- Name: This parameter is used to specify the name of the virtual machine
This command removes the Virtual machine of specified name in the specified resource group

- Removing the Virtual Network Interface(NIC):
Remove-AzNetworkInterface -ResourceGroupName $resourceGroupName -Name “MyNIC”
- Remove-AzNetworkInterface: This command is used to remove the virtual network interface of specified name and resource group
- ResourceGroupName: This parameter is used to specify the name of the resource group
- Name: This parameter is used to specify the name of the virtual network interface

- This command removes the Network Interface.
- Removing the Azure Bastion: To remove the Azure bastion, we can use the following command:
Remove-AzBastion -ResourceGroupName $resourceGroupName -Name $bastionName
- Remove-AzBastion: This command is used to remove the Azure Bastion of specified name and resource group
- ResourceGroupName: This parameter is used to specify the name of resource group
- Name: This parameter is used to specify the name of the bastion

Removing the Virtual network: To remove the entire Virtual network, we can use the following command
Remove-AzVirtualNetwork -ResourceGroupName $resourceGroupName -Name $virtualNetworkName
- Remove-AzVirtualNetwork: This command is used to remove the virtual network of specified name and resource group
- ResourceGroupName: This parameter is used to specify the name of the resource group
- Name: This parameter is used to specify the name of the virtual network

Virtual Network in Azure using PowerShell – FAQs
What are the ways to create Virtual network in Azure?
We can create Azure Virtual network in various ways including:
- Azure CLI
- Azure portal
- Azure PowerShell
- Azure Resource Management
- Azure SDK
How can I list all the Virtual networks in have in associated with my account?
We can list all the Virtual networks accosicated with your account using the command
“Get-AzVirtualNetwork”
Can I modify an existing virtual network?
Yes, we can Modify the existing virtual network using the command
“Set-AzVirtualNetwork” and we can add the properties and corresponding values which we want to modify
Can I automate the creation of virtual networks?
Yes, we can automate the creation of Virtual networks with the help of creating a pipeline or using Azure Automation.
Share your thoughts in the comments
Please Login to comment...