Create A Chrome Extension in HTML CSS & JavaScript
Last Updated :
19 Feb, 2024
We are going to use HTML, CSS, and JavaScript to create a Chrome extension. Whether you’re a beginner or an experienced developer, this article will walk you through the process, from conceptualization to coding and testing. By the end, you’ll have the skills to craft personalized Chrome extensions, enhancing your browsing experience in the way you prefer.
What is a Chrome Extension?
A Chrome Extension is a combination of web technologies like HTML, CSS, and JavaScript resulting in a type of short and simple web application that enhances the browsing experience by customizing the user interface, observing browser events, and modifying the web. You can visit the Chrome Web Store for more examples of what extensions can do and download the ones you require for yourself.
How are they built?
You can build a Chrome extension using the same web technologies that are used to create web applications: HTML, CSS, and JavaScript. It is as easy as creating a simple web application.
What can they do?
In addition to Web APIs, Chrome extensions also have access to Chrome Extension APIs to accomplish different tasks. These extensions add a new feature to your browser while you are surfing on the internet like auto captcha solving, a to-do list, and many more. For a more detailed overview, take a look at the Develop guide.
Prerequisites:
Project Structure:
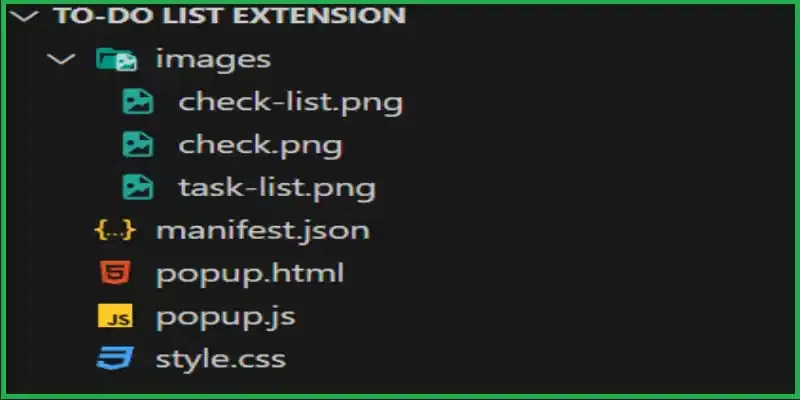
Project Structure
Step 1: Create an empty folder on your device
First, we need to create an empty folder where we would be storing all the files i.e. the HTML, CSS, JavaScript, and Manifest.json files and the images for the extension icon.
Step 2 : Create an manifest.json file
Note: As mentioned in the beginning of the article that creating a chrome extension is exactly same as creating a simple web application but there is an only difference that chrome extension requires a manifest.json file where we make some configurations indicating all the necessary information . It is like an index page of a book that gives all the necessary information about the contents of the book . This file is the first file we need to create while creating a chrome extension .
{
    "manifest_version": 2,
    "name": "Todo List Extension",
    "version": "1.0",
    "description": "A simple to-do list extension",
    "permissions": ["storage"],
    "browser_action": {
      "default_popup": "popup.html",
      "default_icon": {
        "16": "images/task-list.png",
        "48": "images/check.png",
        "128": "images/check-list.png"
      }
    },
    "icons": {
      "16": "images/task-list.png",
      "48": "images/check.png",
      "128": "images/check-list.png"
    },
    "permissions": ["storage"]
  }
Explanation : This code snippet represents a manifest file for a Chrome extension, defining the basic configuration and features. The manifest file specifies essential details such as the extension’s name, version, and description. It declares the required permissions, indicating that the extension needs access to storage. The extension includes a browser action, with a default popup defined in “popup.html” and icons for different sizes. The icons are associated with the extension’s appearance in various contexts, like the toolbar. Overall, this manifest sets up the foundation for a simple “Todo List Extension” that manages tasks and utilizes browser storage.
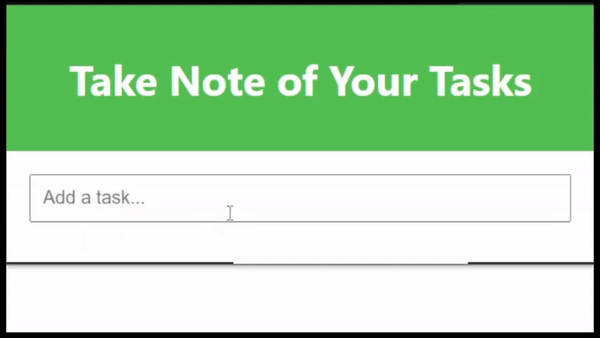
Step 3: Create a popup.html file
The provided popup.html file is a user interface for the Chrome extension’s popup. It consists of a simple structure with a header displaying the main title, a content section containing an input field for adding tasks, and an unordered list (<ul>) with the id “todoList” where tasks are expected to be displayed. The file references an external stylesheet (style.css) for styling purposes and includes a script tag pointing to an external JavaScript file (popup.js). The JavaScript file contains functionality to handle dynamic behavior, such as adding and displaying tasks in response to user interactions. In simple words , this HTML file serves as the visual representation of the extension’s popup, allowing users to manage their tasks conveniently.
HTML
<!DOCTYPE html>
<html>
<head>
<title>Take Note of Your Tasks</title>
<link rel="stylesheet" type="text/css" href="style.css" />
</head>
<body>
<div class="header">
<h1>Take Note of Your Tasks</h1>
</div>
<div class="content">
<div class="input-container">
<input type="text" id="taskInput" placeholder="Add a task..." />
</div>
<ul id="todoList"></ul>
</div>
<script src="popup.js"></script>
</body>
</html>
|
Step 4: Create a style.css file
CSS
body {
font-family: 'Segoe UI', Tahoma, Geneva, Verdana, sans-serif;
margin: 0;
padding: 0;
}
.header {
background-color: #4CAF50;
color: white;
text-align: center;
padding: 15px;
font-size: 1.5em;
width: 30rem;
}
.content {
padding: 20px;
}
.input-container {
margin-bottom: 15px;
}
input[type="text"] {
width: 100%;
padding: 10px;
box-sizing: border-box;
font-size: 16px;
}
ul {
list-style-type: none;
padding: 0;
margin: 0;
}
li {
margin: 10px 0;
display: flex;
align-items: center;
font-size: 1.2em;
}
.completed {
text-decoration: line-through;
color: #999;
}
.checkbox {
margin-right: 10px;
cursor: pointer;
}
|
Step 5: Create a popup.js file
Javascript
document.addEventListener('DOMContentLoaded', function () {
chrome.storage.sync.get(['tasks'], function (result) {
const tasks = result.tasks || [];
updateTodoList(tasks);
});
document.getElementById('todoList').addEventListener('change',
function (event) {
const checkbox = event.target;
const taskId = checkbox.dataset.id;
chrome.storage.sync.get(['tasks'], function (result) {
const tasks = result.tasks || [];
const updatedTasks = tasks.map(task => {
if (task.id === taskId) {
task.completed = checkbox.checked;
}
return task;
});
chrome.storage.sync.set({ 'tasks': updatedTasks });
if (checkbox.checked) {
setTimeout(function () {
const updatedTasks = tasks
.filter(task => task.id !== taskId);
chrome.storage.sync.set({ 'tasks': updatedTasks });
updateTodoList(updatedTasks);
}, 2000);
}
});
});
document.addEventListener('keypress', function (event) {
if (event.key === 'Enter') {
const input = document.getElementById('taskInput');
const taskText = input.value.trim();
if (taskText !== '') {
chrome.storage.sync.get(['tasks'], function (result) {
const tasks = result.tasks || [];
const newTask = {
id: Date.now().toString(),
text: taskText, completed: false
};
const updatedTasks = [...tasks, newTask];
chrome.storage.sync.set({ 'tasks': updatedTasks });
updateTodoList(updatedTasks);
input.value = '';
});
}
}
});
function updateTodoList(tasks) {
const todoList = document.getElementById('todoList');
todoList.innerHTML = '';
tasks.forEach(task => {
const listItem = document.createElement('li');
listItem.innerHTML = `
<input type="checkbox" class="checkbox" data-id="${task.id}"
${task.completed ? 'checked' : ''}>
<span class="${task.completed ? 'completed' : ''}">
${task.text}</span>`;
todoList.appendChild(listItem);
});
}
});
|
Step 6: Create a sub folder as images
Upload the images you would like to use as icons .To find the ones i have used , click here .
Step 7: Enable Developer Mode in Chrome browser
Open Chrome browser and go to Three dots>Extensions>Manage Extensions from the browser menu .On being redirected to the extensions page , enable Developer Mode.

Enable Developer Mode
Step 8: Upload the project folder
This is the last step . Click on Load unpacked button and and select the project folder containing all the files from your device .On fulfilling this step , you will find your extension visible in your browser. You can also pin the extension in the browser for easy access.
Output: Click on the extension
Output
Share your thoughts in the comments
Please Login to comment...