Create a Crypto Currency Price Tracking Chrome Extension
Last Updated :
28 Mar, 2021
Building a Chrome extension requires you to have a knowledge of HTML, CSS, JavaScript, and Bootstrap. In this article, we will be making an extension that tracks the prices of various cryptocurrencies. For fetching the data regarding the prices of cryptocurrencies, we will be using an API known as CryptoCompare.
What is an API?
API stands for application programming interface. Basically, it is a messenger that takes a request from us and return a response accordingly. An API also has something known as endpoints. An endpoint is a URL that allows an API to gain access to some part of the server and retrieve data accordingly. An API returns data in the form of JSON (JavaScript Object Notation) which is in the form of key-value pairs.
Let’s start building the Crypto Currency Price Tracker!!!
Building the User Interface-
First, we will be creating two files with the name popup.html and popup.js (why we have named them popup will be clear later. Now inside the popup.html, we will be creating the basic UI of our extension. First add the basic boilerplate code of HTML than in the body section add the code as shown below:-
HTML
<!DOCTYPE html>
<html lang="en">
<head>
<meta charset="UTF-8">
<meta name="viewport" content=
"width=device-width, initial-scale=1.0">
<title>CryptoCount</title>
<style>
html,
body {
font-family: "Open Sans", sans-serif;
font-size: 14px;
margin: 0;
min-height: 600px;
padding: 0;
width: 500px;
}
</style>
</head>
<body>
<div class="container">
<h2 class="text-center">CryptoCount</h2>
<div class="text-right pb-4">
<select id="select1">
<option value="INR">INR</option>
<option value="USD">USD</option>
<option value="EUR">EUR</option>
<option value="BTC">BTC</option>
</select>
<button class="btn btn-dark changeData">
Fetch Data
</button>
</div>
<table class="table table-striped
table-dark data-back">
</table>
</div>
<script src="popup.js"></script>
</body>
</html>
|
This code will add the title CryptoCount ( this is what we named it, you can name as you wish) and a dropdown list which contains 4 options to change the currency of the data which we will be fetching from CryptoCompare API. A button is added which will bring data from the API, and we will be adding the brought data dynamically using JavaScript to the table element.
Adding some JavaScript –
In our popup.js file we will be adding an IFFE function basically this function is invoked as soon the DOM is loaded. The API that we will be using to get data is:- https://min-api.cryptocompare.com/data/top/totalvolfull?limit=10&tsym=INR&api_key={your_API_KEY goes here}. This IFFI function will render the data you can check by doing a console.log(response).
Javascript
document.querySelector(".changeData")
.addEventListener("click", changeData);
const getDataAndRender =
(function getData(currency = "INR") {
const xhr = new XMLHttpRequest();
const url =
"min-api.cryptocompare.com/data/top/totalvolfull";
xhr.open("GET",
`https:
true);
let output = "<tr>
<td>
<b></b>
</td>
<td>
<b>Coin</b>
</td>
<td>
<b>PRICE</b>
</td>
<td>
<b>HIGH DAY</b>
</td>
<td>
<b>LOW DAY</b>
</td>
</tr>";
xhr.onload = function () {
if (this.status === 200) {
const response = JSON.parse(this.responseText);
const dataArr = response.Data;
dataArr.forEach(function (data) {
const name = data.CoinInfo.FullName;
const imgURL = data.CoinInfo.ImageUrl;
const price = data.DISPLAY.INR.PRICE;
console.log(typeof data.CoinInfo.FullName);
const img =
`https:
const highDay = data.DISPLAY.INR.HIGHDAY;
const lowDay = data.DISPLAY.INR.LOWDAY;
output +=
` <tr><td><img src=${img} width="30" height="30"></td>
<td>${name}</td>
<td>${price}</td>
<td>${highDay}</td>
<td>${lowDay}</td></tr>`
})
document.querySelector(
".data-back").innerHTML = output;
}
}
xhr.send();
}) ();
|
Now as we have logged the data into the console, and we can see that we are successfully able to fetch data from the API. Now it’s time to reflect this data into the UI of our extension. For that, we will be selecting the DOM element with the class name of data-back. Now we will be inserting the output variable that contains<td></td> element with parameters like image, name, price (You can get tons of information from the API but for the sake of simplicity we will be just using image URL, name, price of the coin). Now add this to the DOM using the line of code as – document.querySelector(“.data-back”).innerHTML=output;
This is what our UI will be looking like –
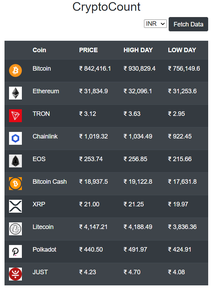
UI
Now we will be implementing the functionality to change the type of currency dynamically. For implementing this we will get the value of the field present in the drop-down list. By default, the type of currency would be rupee. For getting the type of currency present in the dropdown list we will be making a function named getCurrency().
Javascript
function getCurrency() {
const selectElement =document.querySelector('#select1');
const output = selectElement.value;
return output;
}
|
When someone selects the type of currency, getCurrency method will return whether it is “INR”, “USD”, “BTC” or “EUR”. Now we will make a new API call by changing the endpoint from INR(default endpoint) to the value selected from the list.
Javascript
function changeData(){
const newOutput=getCurrency();
console.log(newOutput);
document.querySelector(".data-back").innerHTML="";
getDataNew(newOutput);
}
|
The button Fetch’s the data when clicked and will trigger the method changeData , which will first clear the contents already present in the DOM and will insert a new table element with a new currency type into the DOM and also it will further call two functions one will tell the type of currency and other will do insertion of a new table with changed currency type into the DOM. The implementation of the function getDataNew is the same as that of getData function discussed above. The development part of this CryptoCurrency Price Tracker is over. Now we will be making a chrome extension out of it.
Making a Chrome extension – For making a Chrome extension we will need a manifest.json file and the creation of this file is as shown below –
Javascript
{
"manifest_version":2,
"name":"CryptoCount",
"description":"CryptoCount tells you
the current price of top cryptocurrencies",
"version":"1.0.0",
"icons":{"128":"favicon.png"},
"browser_action":{
"default_icon":"favicon.png",
"default_popup":"popup.html"
},
"permissions":["activeTab"]
}
|
This is the way to create the manifest file as per the documentation of https://developer.chrome.com/extensions/manifest. Add place this file along with the popup.html, popup.js into a folder. We named them popup.js and popup.html as per documentation. Create a folder called images and place the image that you would like to be shown in the Chrome extension bar of Google Chrome.
Now there are two ways to upload to chrome store –
1. One way is by paying a $5 fee and creating a developer account.
2. The other is a free way of uploading to chrome store which is as follows –
- In the URL of your Chrome browser type chrome://extensions/
- Now turn on the developer mode.
- Now click on the button in the top left corner saying Load Unpacked.
- A popup bar will appear and will ask you to upload the files created above.
- Upload the files and you are good to go

This is what you will see once you are done uploading the files. Now go to the Chrome extension bar and you will be able to see your own Chrome extension and will be able to access it.

Like Article
Suggest improvement
Share your thoughts in the comments
Please Login to comment...