Build an E-Commerce Web Application using HTML CSS PHP and hosted using XAMPP
Last Updated :
07 May, 2023
In this article, we will see know how to develop a simple e-commerce Web application that offers a seamless and user-friendly experience for customers, allowing them to register and login into their accounts, easily browse for products, add items to their cart, and also allow them to add their delivery address, with the help of HTML, CSS & PHP, & host the application with the help of the XAMPP server.
An e-commerce web application facilitates the platform that allows the interaction between customers with businesses that sell their products or services online with the help of the application. With the help of an application, the user can access various functionalities such as Register, Login, Add to Cart, Billing, Payment, etc. To design a simple e-commerce web application, the various concept of PHP, HTML, and CSS will be used, along with connecting the database using MySQL.
We will follow the below approach to develop the simple web application, which is described below.
Approach: First, we will create a database & the required number of tables that will be used to store the user data & their credential for login into the app. Then, we will create a simple registration form for registering the new users & their data & will store their data using PHP.
- Registration: For registering, create a database shp(you may give any name) & then create a table users using the following command:
CREATE TABLE users (
    name TEXT NOT NULL ,
     username VARCHAR(18) NOT NULL PRIMARY KEY,
     email VARCHAR(21) NOT NULL UNIQUE,
     password TEXT NOT NULL );
Table Structure: The following table structure will be generated with the help of the above SQL Query:
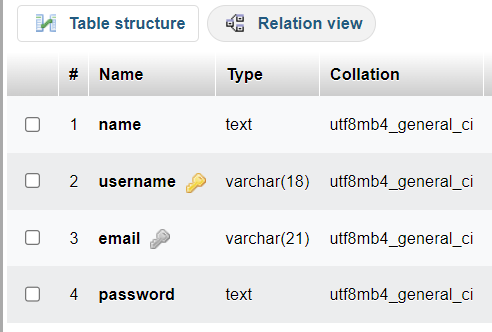
User table
Now, create files “register.html” and “register.php“, which will be utilized to add the new user & their respective data to the table. The codes are given below:
HTML
<!DOCTYPE html>
<html>
<head>
<title>Registration Page</title>
<link rel="stylesheet"
type="text/css"
href="style.css">
</head>
<body>
<div class="container">
<h1>Registration Page</h1>
<form method="post" action="register.php">
<label for="name">
Name:
</label>
<input type="text"
id="name"
name="name" required>
<label for="username">
Username:
</label>
<input type="text"
id="username"
name="username" required>
<label for="email">Email:</label>
<input type="email"
id="email"
name="email" required>
<label for="password">Password:</label>
<input type="password"
id="password"
name="password" required>
<input type="submit"
value="Register">
</form>
<p> Already have an account?</p>
<a href="login.html">Click Here</a>
</div>
<br>
</body>
</html>
|
PHP
<?php
if ($_SERVER["REQUEST_METHOD"] == "POST") {
$name = $_POST["name"];
$username = $_POST["username"];
$email = $_POST["email"];
$password = $_POST["password"];
$hashed_password = password_hash($password, PASSWORD_BCRYPT);
$host = "localhost";
$dbname = "shp";
$username_db = "root";
$password_db = "";
try {
$db = new PDO(
"mysql:host=$host;dbname=$dbname",
$username_db, $password_db);
$db->setAttribute(PDO::ATTR_ERRMODE, PDO::ERRMODE_EXCEPTION);
$stmt = $db->prepare(
"INSERT INTO users (name,username,email, password)
VALUES (:name, :username, :email,:password)");
$stmt->bindParam(":name", $name);
$stmt->bindParam(":username", $username);
$stmt->bindParam(":email", $email);
$stmt->bindParam(":password", $hashed_password);
$stmt->execute();
echo "<h2>Registration Successful</h2>";
echo "Thank you for registering, " . $name . "!<br>";
echo "You'll be redirected to login page in 3 seconds";
header("refresh:3;url=login.html");
}
catch(PDOException $e) {
echo "Connection failed: " . $e->getMessage();
}
}
?>
|
After this, we will add some styling properties to decorate the form by creating the file “style.css” which will be the same for Registration Page as well as Login Page.
CSS
body {
background-color: green;
}
.container {
display: flex;
flex-direction: column;
justify-content: center;
align-items: center;
height: 100vh;
}
form {
display: flex;
flex-direction: column;
align-items: center;
}
label {
display: block;
margin-bottom: 5px;
}
input[type="text"],
input[type="email"],
input[type="password"] {
width: 100%;
padding: 10px;
margin-bottom: 20px;
border: 1px solid #ccc;
border-radius: 5px;
}
input[type="submit"] {
background-color: #4caf50;
color: white;
padding: 10px 20px;
border: none;
border-radius: 5px;
cursor: pointer;
}
input[type="submit"]:hover {
background-color: #45a049;
}
|
Output: After creating the above files, the output is as follows:

Registration Page
- Login: To make the Login page, create ‘login.html’ and ‘login.php’, which will hold the login credentials for the user & will be matched with details that are stored by the user while registering the specific user. Here, the CSS code will be the same as the above-created file (“style.css”).
HTML
<!DOCTYPE html>
<html>
<head>
<title>Login Page</title>
<link rel="stylesheet"
type="text/css"
href="style.css">
</head>
<body>
<div class="container">
<h1>Login Page</h1>
<form method="post"
action="login.php">
<label for="username">Username:</label>
<input type="text"
id="username"
name="username" required>
<label for="password">Password:</label>
<input type="password"
id="password"
name="password" required>
<input type="submit"
value="Login">
</form>
<br><br>
<p> Does not have an account?
<a href="register.html">Click Here</a>
</p>
</div>
</body>
</html>
|
PHP
<?php
if ($_SERVER["REQUEST_METHOD"] == "POST") {
$username = $_POST["username"];
$password = $_POST["password"];
$host = "localhost";
$dbname = "shp";
$username_db = "root";
$password_db = "";
try {
$db = new PDO(
"mysql:host=$host;dbname=$dbname",
$username_db,
$password_db
);
$db->setAttribute(PDO::ATTR_ERRMODE, PDO::ERRMODE_EXCEPTION);
$stmt = $db->prepare("SELECT * FROM users WHERE username = :username");
$stmt->bindParam(":username", $username);
$stmt->execute();
$user = $stmt->fetch(PDO::FETCH_ASSOC);
if ($user) {
if (password_verify($password, $user["password"])) {
session_start();
$_SESSION["user"] = $user;
echo '<script type="text/javascript">
window.onload = function () {
alert("Welcome to GFG shopping website");
window.location.href = "shop.php";
};
</script>
';
} else {
echo "<h2>Login Failed</h2>";
echo "Invalid email or password.";
}
} else {
echo "<h2>Login Failed</h2>";
echo "User doesn't exist";
}
} catch (PDOException $e) {
echo "Connection failed: " . $e->getMessage();
}
}
?>
|
Output: After creating the above files, the output will be shown below:

Login Page
- Shop: Once the Login is successful, the user is redirected to the “shop.php” page. Create ‘shop.php’, and ‘shop.css’ files. (Add product photos according to the shop you are wishing to create).
PHP
<?php
session_start();
if (isset($_POST["add_to_cart"])) {
$product_id = $_POST["product_id"];
$product_quantity = $_POST["product_quantity"];
if (!isset($_SESSION["cart"])) {
$_SESSION["cart"] = [];
header("location:cart.php");
}
$_SESSION["cart"][$product_id] = $product_quantity;
header("location:cart.php");
}
?>
<!DOCTYPE html>
<html>
<head>
<title>GFG Shopping Web Application</title>
<link rel="stylesheet"
href="shop.css">
</head>
<body>
<header>
<h1>Welcome <?php
$user = $_SESSION["user"];
echo $user["name"];
?> to GFG Shopping Web Application</h1>
</header>
<nav>
<ul>
<li><a href="shop.html">Home</a></li>
<li><a href="shop.html">Shop</a></li>
<li><a href="cart.php">Cart</a></li>
<li><a href="logout.php">Logout</a></li>
</ul>
</nav>
<main>
<section>
<h2>Products</h2>
<ul>
<li>
<h3>GFG Bag</h3>
<img src=
alt="Product 1">
<p>Bag with 2 Extra pockets</p>
<p><span>$12</span></p>
<form method="post" action="shop.php">
<input type="hidden"
name="product_id"
value="1">
<label for="product1_quantity">
Quantity:
</label>
<input type="number"
id="product1_quantity"
name="product_quantity"
value=""
min="0"
max="10">
<button type="submit"
name="add_to_cart">
Add to Cart</button>
</form>
</li>
<li>
<h3>GFG T-Shirt</h3>
<img src=
alt="Product 2">
<p>100% cotton t-shirts</p>
<p>
<span>$20</span>
</p>
<form method="post" action="shop.php">
<input type="hidden"
name="product_id"
value="2">
<label for="product2_quantity">
Quantity:
</label>
<input type="number"
id="product2_quantity"
name="product_quantity"
value=""
min="0"
max="10">
<button type="submit"
name="add_to_cart">
Add to Cart
</button>
</form>
</li>
<li>
<h3>GFG Hoodie</h3>
<img src=
alt="Product 3">
<p>Black Color Stylish Hoodie</p>
<p>
<span>$50</span>
</p>
<form method="post" action="shop.php">
<input type="hidden"
name="product_id"
value="3">
<label for="product3_quantity">
Quantity:
</label>
<input type="number"
id="product3_quantity"
name="product_quantity"
value=""
min="0"
max="10">
<button type="submit"
name="add_to_cart">
Add to Cart
</button>
</form>
</li>
<!-- Add forms for the other products here -->
</ul>
</section>
</main>
<footer>
<p>© 2023 GFG Shopping Web Application</p>
</footer>
<script src="shop.php"></script>
</body>
</html>
|
CSS
body {
margin: 0;
padding: 0;
background-color: white;
color: green;
font-family: Arial, sans-serif;
}
header {
background-color: white;
color: green;
padding: 20px;
}
nav {
background-color: #999999;
padding: 10px;
}
nav ul {
list-style: none;
margin: 2px;
padding: 0;
}
nav a {
color: red;
text-decoration: none;
padding: 2px;
display: flex;
cursor: pointer;
}
nav a:hover {
background-color: green;
color: red;
}
main {
max-width: 1200px;
margin: 0 auto;
padding: 20px;
}
section {
margin-bottom: 20px;
}
h2 {
font-size: 32px;
margin-top: 0;
}
ul {
list-style: none;
margin: 0;
padding: 0;
display: flex;
flex-wrap: wrap;
}
li {
margin-right: 20px;
margin-bottom: 20px;
flex-basis: calc(33.33% - 20px);
}
h3 {
font-size: 24px;
margin-top: 0;
}
img {
max-width: 200px;
height: 200px;
margin-bottom: 10px;
}
button {
background-color: #333;
color: #fff;
border: none;
padding: 10px;
cursor: pointer;
}
|
Output: After the implementation of the above files, the output will be as shown below:
Now, Create a table ‘products’ using the following MySQL command:
CREATE TABLE products (
     id INT NOT NULL ,
     name TEXT NOT NULL,
     price INT NOT NULL,
     PRIMARY KEY (id)
);
Table Structure: The following table structure will be generated with the help of the above SQL Query:

Products Table
Now, using the following SQL Query, insert products to the table:
INSERT INTO `products` (`id`, `name`, `price`)
VALUES ('1', 'GFG Bag', '12'),
         ('2', 'GFG T-shirts', '20'),
       ('3', 'GFG Hoodie', '50');
- Cart: Create a “cart.php” file to allow users to add items to the cart and update the cart price.
PHP
<!DOCTYPE html>
<html>
<head>
<title>Shopping Cart</title>
</head>
<style>
body {
background-color: green;
}
header, nav, main, footer {
background-color: white;
}
table {
border-collapse: collapse;
width: 100%;
}
th, td {
text-align: left;
padding: 8px;
}
th {
background-color: #dddddd;
}
tr:nth-child(even) {
background-color: #f2f2f2;
}
footer {
background-color: green;
margin-top: 348px;
color: black;
max-width: 264px;
}
</style>
<body>
<header>
<h1><?php session_start();
$user = $_SESSION['user'];
echo $user['name']; ?> Shopping Cart</h1>
</header>
<nav>
<ul>
<li>
<a href="shop.html">Home</a>
</li>
<li>
<a href="shop.html">Products</a>
</li>
<li>
<a href=
"mailto:adarsh.raj.2004@outlook.com">Contact Us</a>
</li>
<li>
<a href="cart.php">Cart</a>
</li>
</ul>
</nav>
<main>
<section>
<table>
<tr>
<th>Product Name </th>
<th>Quantity </th>
<th>Price </th>
<th>Total </th>
</tr>
<?php
$servername = "localhost";
$username = "root";
$password = "";
$dbname = "shp";
$conn =
new mysqli($servername, $username, $password, $dbname);
if ($conn->connect_error) {
die("Connection failed: " . $conn->connect_error);
}
$total = 0;
foreach ($_SESSION['cart'] as $product_id => $quantity) {
$sql = "SELECT * FROM products WHERE id = $product_id";
$result = $conn->query($sql);
if ($result->num_rows > 0) {
$row = $result->fetch_assoc();
$name = $row['name'];
$price = $row['price'];
$item_total = $quantity * $price;
$total += $item_total;
echo "<tr>";
echo "<td>$name</td>";
echo "<td>$quantity</td>";
echo "<td>$price $</td>";
echo "<td>$item_total $</td>";
echo "</tr>";
}
}
echo "<tr>";
echo "<td colspan='3'>Total:</td>";
echo "<td>$total $</td>";
echo "</tr>";
?>
</table>
<form action="checkout.php" method="post">
<input type="submit"
value="Checkout"
class="button" />
</form>
</section>
</main>
<footer>
<p>©2023 GFG Shopping Web Application</p>
</footer>
</body>
</html>
|
Output: After creating the ‘cart.php’ file and adding any item, the output will be as shown below:

Cart after adding a product
- Checkout: Once the user has added his/her wished products, after clicking on Checkout, He/She will be directed to the ‘checkout.php’ page to give their address and make payment. The code for ‘checkout.php’ is as follows:
PHP
<!DOCTYPE html>
<html>
<head>
<title>Checkout Page</title>
<link rel="stylesheet"
type="text/css"
href="checkout.css">
</head>
<style>
body {
background-color: #ffffff;
font-family: Arial, sans-serif;
}
header {
background-color: green;
color: #ffffff;
padding: 20px;
}
nav ul {
margin: 0;
padding: 0;
list-style: none;
}
nav li {
display: inline-block;
margin-right: 20px;
}
nav a {
color: #ffffff;
text-decoration: none;
}
nav a:hover {
text-decoration: underline;
}
section {
max-width: 600px;
margin: 0 auto;
padding: 20px;
}
h1 {
color: green;
font-size: 32px;
margin-bottom: 20px;
}
h2 {
color: green;
font-size: 24px;
margin-bottom: 10px;
}
label {
display: block;
margin-bottom: 5px;
color: #666666;
}
input[type="text"],
input[type="email"] {
width: 100%;
padding: 10px;
border: 1px solid #cccccc;
border-radius: 5px;
margin-bottom: 10px;
font-size: 16px;
}
input[type="submit"] {
background-color: green;
color: #ffffff;
padding: 10px 20px;
border: none;
border-radius: 5px;
font-size: 16px;
cursor: pointer;
}
input[type="submit"]:hover {
background-color: #228B22;
}
footer {
background-color: green;
color: #ffffff;
padding: 20px;
text-align: center;
}
</style>
<body>
<header>
<nav>
<ul>
<li>
<a href="shop.php">Home</a>
</li>
<li>
<a href="shop.php">Shop</a>
</li>
<li>
<a href="cart.php">Cart</a>
</li>
<li>
<a href=
"mailto:adarsh.raj.2004@outlook.com">Contact</a>
</li>
</ul>
</nav>
</header>
<section>
<h1>Checkout</h1>
<form action="thanks.php" method="post">
<h2>Billing Information</h2>
<label for="name">Name:</label>
<input type="text"
id="name"
name="name" required>
<label for="email">Email:</label>
<input type="email"
id="email"
name="email" required>
<label for="address">Address:</label>
<input type="text"
id="address"
name="address" required>
<label for="city">City:</label>
<input type="text"
id="city"
name="city" required>
<label for="state">State:</label>
<input type="text"
id="state"
name="state" required>
<label for="zip">Zip Code:</label>
<input type="text"
id="zip"
name="zip" required>
<h2>Payment Information</h2>
<label for="cardholder">Name on Card:</label>
<input type="text" id="cardholder"
name="cardholder" required>
<label for="cardnumber">Card Number:</label>
<input type="text"
id="cardnumber"
name="cardnumber" required
pattern="\d{4}-?\d{4}-?\d{4}-?\d{4}" required=>
<label for="expmonth">Expiration Month:</label>
<input type="text"
id="expmonth"
name="expmonth" required>
<label for="expyear">Expiration Year:</label>
<input type="text"
id="expyear"
name="expyear" required>
<label for="cvv">CVV:</label>
<input type="text"
id="cvv"
name="cvv" required>
<input type="submit"
value="Place Order">
</form>
</section>
<footer>
<p>© 2023 GFG Shopping Web Application</p>
</footer>
</body>
</html>
|
Output:

Checkout Page cropped image
Now, create one ‘thanks.php’, which will be used to display the Thanks message to the user and give an order confirmation message.
PHP
<html>
<head>
<style>
body {
background-color: #f2f2f2;
font-family: Arial, sans-serif;
}
h1 {
color: #008000;
font-size: 2.5em;
text-align: center;
margin-top: 50px;
}
p {
color: #333;
font-size: 1.2em;
text-align: center;
margin-top: 20px;
}
</style>
</head>
<?php
session_start();
if (isset($_SESSION['user'])) {
$user = $_SESSION['user'];
$customerName = $user['name'];
} else {
$customerName = "Valued Customer";
}
echo "<h1>Thank You, $customerName!</h1>";
echo
"<p>Your order has been received and will be delivered soon.</p>";
?>
</html>
|
At last, create ‘logout.php’ to destroy all the started sessions and ask the user to log in again.
PHP
<?php
session_start();
session_destroy();
header("Location: login.html");
exit;
?>
|
Output:
Share your thoughts in the comments
Please Login to comment...