Build a URL Size Reduce App with Django
Last Updated :
23 Jan, 2023
Django is a high-level Python web framework that encourages rapid development and clean, pragmatic design. In this article, we will learn to build a URL shortener using Django. A URL shortener is used to reduce the size of long URLs. Short URLs are better for sharing purposes. In this article, we will use Bitly API to shorten our URL. For this, we will be having 2 pages, one to enter the URL and another to show shortened URL. When the user will visit the site, on the home page he can enter the URL and click on submit button. When the user will click on submit button, the URL will go to the backend and it will be processed. After processing, a new short URL is generated, which will be rendered on the next page from where the user can see it.
What is Bitly API?
Bitly is the most widely trusted link management platform in the world. By using the Bitly API, you will exercise the full power of your links through automated link customization, mobile deep linking, and click analytics.
Generating access tokens on Bitly website
Step 1: Create an account on https://bitly.com/.
Step 2: Login to Bitly and go to settings.
Step 3: In settings select API. Then Enter your password and Generate an access token.
Setup of a Django Project
This is the final file structure after completing the project.
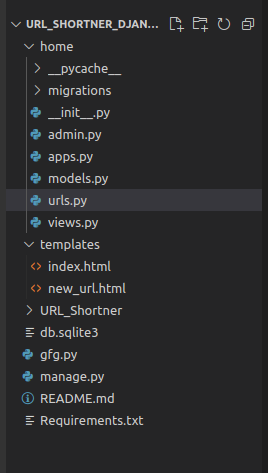
File Structure
Step 1: Start a project with the following command, and Change the directory to URL_Shortner:
django-admin startproject URL_Shortner
cd URL_Shortner
Step 2: Create an app.
python manage.py startapp home
Step 3: In the current directory create a templates folder. In this, we will store our HTML files.
Step 4: Add the home app to the INSTALLED_APPS list in the URL_Shortner/settings.py file.
Step 5: Set the templates directory in the URL_Shortner/settings.py file.
Step 6: Update the urls.py of the project.
Python3
from django.contrib import admin
from django.urls import path, include
import home
urlpatterns = [
path('admin/', admin.site.urls),
path('', include(home.urls)),
]
|
Step 7: Create an urls.py file in the home directory(app).
Python3
from django.urls import path
from home import views
urlpatterns = [
path('',views.index),
path('index_form',views.index_form),
]
|
Step 8: As we have completed the basic setup, now we need to add functionality to it. Create index.html and new_url.html files in the templates folder. We will use Bootstrap in index.html and new_url.html files.
HTML
<!DOCTYPE html>
<html lang="en">
<head>
<meta charset="UTF-8">
<meta http-equiv="X-UA-Compatible" content="IE=edge">
<meta name="viewport" content="width=device-width, initial-scale=1.0">
<style>
body{
background-color: rgb(171, 240, 254);
}
.selfhead{
font-size: 90px;
font-weight: bolder;
font-family: 'Baloo Chettan 2', cursive;
}
@media only screen and (max-width:485px){
.selfhead{
font-size: 50px;
font-weight: bold;
}
}
</style>
<title>GFG</title>
</head>
<body>
<div class="container" id="Contact-us">
<div class="selfhead text-center py-0 ">
URL shortener
</div>
</div>
<div class="container my-3">
<form method="post" action="/index_form">
{%csrf_token%}
<div class="mb-3">
<label for="url" class="form-label fw-bold">Enter Long URL</label>
<input type="text" class="form-control" id="url" aria-describedby="emailHelp" placeholder="Enter your URL" name="long_url">
</div>
<p class="text-center"><button type="submit" class="btn btn-danger">Submit</button>
</p>
</form>
</div>
</body>
</html>
|
home/views.py
In the views.py page, we have three functions that are index(),index_form(), and shorten_url(). When users visit our website, the index() function is called and it renders the “index.html” page. And when the user Enters the URL on the home page and then clicks on submit button, the form is submitted and this form submission is handled by the index_form() function. In this function, we get the URL that is entered by the user and use our shorten_url() function to call the API and shorten our URL. And finally, we render our shortened URL on a new page.
Python3
from django.shortcuts import render
import requests
import json
def index(request):
return render(request, 'index.html')
def index_form(request):
if request.method == "POST":
long_url = request.POST.get('long_url')
new_url = shorten_url(long_url)
return render(request, "new_url.html", context={'url': new_url})
return render(request, 'index.html')
def shorten_url(url):
headers = {
'Authorization': 'Bearer f87979ebfc5c57f24a00218b7f5e94f95669b568',
'Content-Type': 'application/json',
}
data_dict = {"long_url": url, "domain": "bit.ly"}
data = json.dumps(data_dict)
response = requests.post(
response_dict = json.loads(response.text)
print(response_dict)
return response_dict['link']
|
Step 10: Now we can run the server to see our URL shortener:
python manage.py runserver
Output:
On submitting the URL a new page appears with a new short link.

OUTPUT
Share your thoughts in the comments
Please Login to comment...