Browse Upload & Display Image in Tkinter
Last Updated :
19 Feb, 2024
Tkinter is a standard GUI(Graphic User interface) library in Python. We use the Tkinter library to create basic applications. We can use this library to create various cross-platform applications too. It supports various event-driven programming, allowing the programmers to respond with user interactions to the applications (such as button clicks, check box selections, and so on). We can clearly say that Tkinter is a beginner-friendly yet very versatile language for developing simple to advanced apps. Pillow is a powerful library in Python that allows us to open, manipulate, and save various file formats.
In this article, we are going to create a simple application to perform tasks such as “Browse and Upload image” and “Display image”. We are going to create this application with the help of the Tkinter library of Python. We will be providing a clear and concise explanation of each step.
Create Browse, Upload, and Display Image Applications in Tkinter
Below we have shown steps to create an application for uploading and displaying images in Tkinter.
Step 1: Installation of Necessary Packages
To create our application, we need to install some necessary packages on our computer. We can simply perform this by typing the below commands in the command prompt.
Commands
pip install tk-tools
pip install pillow
Step 2: Importing Libraries into our Code
In this step, we will import all the libraries we have installed till now in the previous step into our code. We have imported Label and filedialog from tkinter to set the background image and accept files from the system respectively. PIL stands for pillow library of Python which will help us to deal with images in our applications.
Python3
import tkinter as tk
from tkinter import Label
from tkinter import filedialog
from PIL import Image, ImageTk
|
Step 3: Creating an image uploader Function
In this step, we will create an user defined image uploader function. Inside this function, we will specify all the file types of images we wish our application to accept. Then we will call the function from filedialog module to accept the image. After that, we will check if any file is chosen or not. If not, then we ill display the message accordingly.
Python3
def imageUploader():
fileTypes = [("Image files", "*.png;*.jpg;*.jpeg")]
path = tk.filedialog.askopenfilename(filetypes=fileTypes)
if len(path):
img = Image.open(path)
img = img.resize((200, 200))
pic = ImageTk.PhotoImage(img)
app.geometry("560x300")
label.config(image=pic)
label.image = pic
else:
print("No file is chosen !! Please choose a file.")
|
Step 4: Setting up the Background Image
In this step, we will create an object for our tkinter class. Now we will set the background image and size of the window of our application. We will also set the application title as “GeeksForGeeks Image Viewer“.
Python3
if __name__ == "__main__":
app = tk.Tk()
app.title("GeeksForGeeks Image Viewer")
app.geometry("560x270")
img = ImageTk.PhotoImage(file='gfglogo1.png')
imgLabel = Label(app, image=img)
imgLabel.place(x=0, y=0)
|
Step 5: Defining the Locate Button
In this step we will add color ( “light Green”) to our Locate image button. After adding the color we will add padding to it. Now we will add command (“image uploader function”) to our button.
Python3
app.option_add("*Label*Background", "white")
app.option_add("*Button*Background", "lightgreen")
label = tk.Label(app)
label.pack(pady=10)
uploadButton = tk.Button(app, text="Locate Image", command=imageUploader)
uploadButton.pack(side=tk.BOTTOM, pady=20)
app.mainloop()
|
Complete Code
Here is the compiled code for all the procedure we have covered till now.
Python3
import tkinter as tk
from tkinter import Label
from tkinter import filedialog
from PIL import Image, ImageTk
def imageUploader():
fileTypes = [("Image files", "*.png;*.jpg;*.jpeg")]
path = tk.filedialog.askopenfilename(filetypes=fileTypes)
if len(path):
img = Image.open(path)
img = img.resize((200, 200))
pic = ImageTk.PhotoImage(img)
app.geometry("560x300")
label.config(image=pic)
label.image = pic
else:
print("No file is Choosen !! Please choose a file.")
if __name__ == "__main__":
app = tk.Tk()
app.title("GeeksForGeeks Image Viewer")
app.geometry("560x270")
img = ImageTk.PhotoImage(file='gfglogo1.png')
imgLabel = Label(app, image=img)
imgLabel.place(x=0, y=0)
app.option_add("*Label*Background", "white")
app.option_add("*Button*Background", "lightgreen")
label = tk.Label(app)
label.pack(pady=10)
uploadButton = tk.Button(app, text="Locate Image", command=imageUploader)
uploadButton.pack(side=tk.BOTTOM, pady=20)
app.mainloop()
|
Output
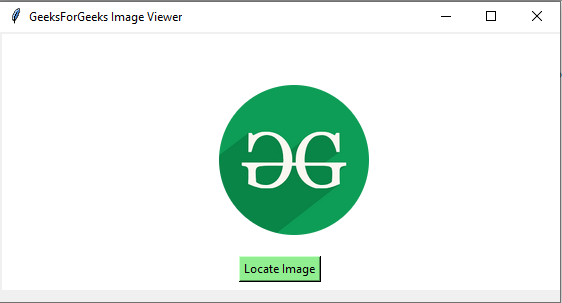
Image Uploader App
Video Output
Share your thoughts in the comments
Please Login to comment...