Audio is nothing but any type of sound in a digital format. It can be speech, music, environmental sounds, etc. Audio data is commonly used in various fields such as speech recognition, music analysis, audio classification, and more. In recent years, audio data has become an increasingly important data type for training models that can perform audio-related tasks. but after a certain point, the human ear can no longer distinguish between the two.
How exactly is sound recorded? In order for a computer to understand our real-world audio, we need to convert audio to numbers just like it is done with images. A microphone is used to record audio, which is subsequently transformed from analog sound to digital sound via sampling at regular intervals of time. It is known as the sample rate. The sound quality improves with the increase in the sample rate. The average sound sample rate is 48kHz or 48000 samples per second.
Audio data preparation and augmentation are important steps in machine learning workflows that involve audio data. Here are a few reasons why:
- In order to use audio data it should be in a useable format like WAV, MP3, and FLAC.
- Our audio data can contain noise or background sounds, therefore data cleaning is necessary to build an effective model.
- Augmenting audio data can also help improve the generalization of machine learning models, by bringing more variations in the input data.
Audio Data Preparation
Let’s get started with the implementation.
In this article, we are using “tensorflow-io” library which provides necessary APIs for efficient and scalable audio data preparation and augmentation. Here are the steps:
Step 1:
First, we will Install the required packages and restart the kernel/runtime.
!pip install tensorflow-io
Step 2: Load the Dataset
Download the sample audio file: [https://www2.cs.uic.edu/~i101/SoundFiles/].
I have used the audio having wav format, you can use other formats. Next load the audio file by specifying the path and read it using ‘tfio.audio.AudioIOTensor’, it is a TensorFlow Python module that provides a class for reading audio files into a TensorFlow Tensor object.
Python3
import tensorflow as tf
import tensorflow_io as tfio
audio_data = tfio.audio.AudioIOTensor('/content/CantinaBand3.wav')
print(audio_data)
print(audio_data.shape)
print(audio_data.rate)
|
Output:
<AudioIOTensor: shape=[66150     1], dtype=<dtype: 'int16'>, rate=22050>
tf.Tensor([66150     1], shape=(2,), dtype=int64)
tf.Tensor(22050, shape=(), dtype=int32)
The shape, dtype and sample rate of the AudioIOTensor is printed. The shape is represented as [Samples, Channels] (samples=length of audio clip in secs * sample rate of audio), therefore from the above example our audio clip has 66150 (3*22050) samples in int16 and 1 channel which says our audio is mono channel.
Step 3: Audio preprocessing
Next is Audio preprocessing using TensorFlow. Slicing is done when we want to focus or use only a specific part of the audio clip.
Python3
audio_sl = audio_data[6:]
print('Shape After Slicing :',audio_sl.shape)
audio_t = tf.squeeze(audio_sl, axis=[-1])
print('Shape After squeezing:',audio_t.shape)
from IPython.display import Audio
Audio(audio_t.numpy(), rate=audio_data.rate.numpy())
|
Output:
Shape After Slicing : (66144, 1)
Shape After squeezing: (66144,)
Listen Audio clip
we have used the tf.squeeze() function to remove the last dimension of our audio tensor because it simplifies the data representation, reduces memory usage, and makes the audio tensor compatible with TensorFlow operations. As our audio is of the mono channel, therefore, we have taken axis=-1, if it is stereo i.e., channel=2 then axis=1.
Note: If your audio data is a tensor of floating point values then you can perform Normalization using the code,
# Normalize audio between -1 and 1
normalized_audio = audio_t / tf.math.reduce_max(tf.math.abs(audio_t))
In our example, we have audio data represented as a tensor of 16-bit signed integers so the common normalization technique is to convert the integer values to floating-point values between -1 and 1. This can be done by dividing the integer values by the maximum value that can be represented by the integer data type, such as 32767 for 16-bit signed integers. This technique is sometimes referred to as “integer normalization” or “sample normalization”.
We can then use matplotlib.pyplot library to plot our audio data in the form of a graph.
Python3
tensor = tf.cast(audio_t, tf.float32) / 32767.0
print(tensor)
import matplotlib.pyplot as plt
plt.figure()
plt.plot(tensor.numpy())
plt.show()
|
Output:
tf.Tensor(
[ 9.15555283e-05  2.13629566e-04  1.52592547e-04 ... -3.66222113e-04
 -1.30314035e-02 -6.92770164e-03], shape=(66144,), dtype=float32)
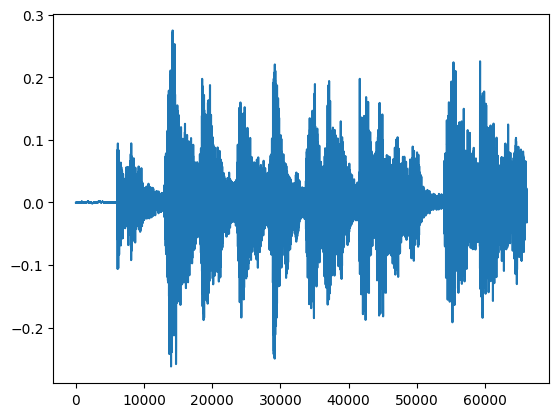
Audio clip in Graph
Step 4: Trimming
Trimming is another pre-processing technique, it is used to remove the trailing silence from the audio which is unnecessary or can help to reduce unnecessary processing and improve the accuracy. “tfio.audio.trim()” function provides a convenient way to perform this operation in TensorFlow.
Syntax: tfio.audio.trim(audio, axis, epsilon)
Parameters
- audio–> representing the audio waveform.
- axis–> The axis along which to trim the audio.
- epsilon–> representing the threshold below which samples are considered as silent, the silent part or the part Whose threshold value was zero is been removed.
Python3
trimed = tfio.audio.trim(tensor,
axis=0,
epsilon=0.2)
print('Trimmed :',trimed)
start = trimed[0]
stop = trimed[1]
print("START:{},\nSTOP :{}".format(start.numpy(),
stop.numpy()))
trimmed_audio = tensor[start:stop]
print('Trimmed Audio shape:',trimmed_audio.shape)
plt.figure()
plt.plot(trimmed_audio.numpy())
Audio(trimmed_audio.numpy(),
rate=audio_data.rate.numpy())
|
Output:
Trimmed : tf.Tensor([13840 59291], shape=(2,), dtype=int64)
START:13840,
STOP :59291
Trimmed Audio shape: (45451,)
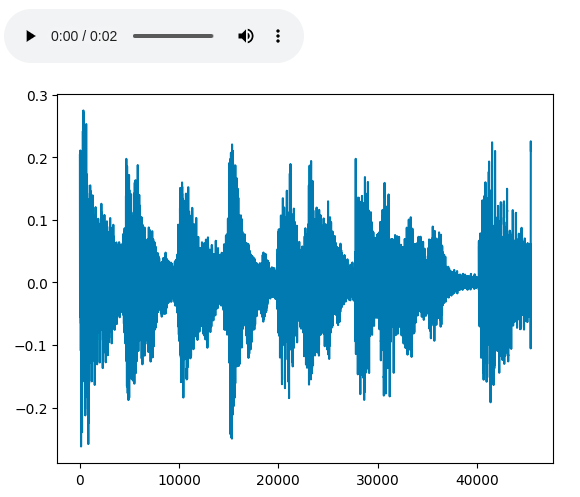
Trimed audio
Step 5: Fade in and out
Fading in and fading out are common audio augmentation techniques used to avoid abrupt transitions in audio signals.
To apply the fade-in and fade-out effects, you can use the tfio.audio.fade function in TensorFlow.
Syntax: tfio.audio.fade(samples, fade_in_len, fade_out_len, mode='logarithmic', axis=-1)
Parameters:
- samples–> A tensor containing the audio samples.
- fade_in_len–> An integer scalar, the number of samples to fade in at the beginning.
- fade_out_len–>An integer scalar, the number of samples to fade out at the end.
- mode–> (Optional) A string specifying the type of fade, either ‘logarithmic’ or ‘linear’. The default is ‘logarithmic’.
- axis–> (Optional) An integer specifying the axis over which to apply the fade. The default is -1, the last axis.
Here’s an example of how to apply a fade-in and fade-out effect to an audio clip:
Python3
audio_fade = tfio.audio.fade(trimmed_audio,
fade_in=1000,
fade_out=2000,
mode="logarithmic")
plt.figure()
plt.plot(audio_fade.numpy())
Audio(audio_fade.numpy(),
rate=audio_data.rate.numpy())
|
Output:
tf.Tensor([0.         0.00027118 0.00048062 ... 0.000303   0.00016269 0.        ],
 shape=(45451,), dtype=float32)
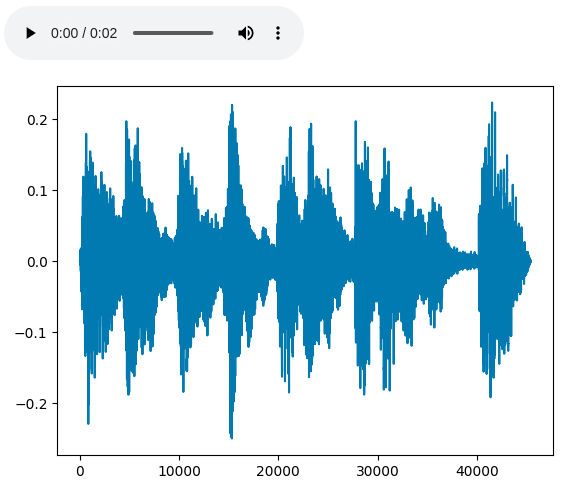
Fade in and out
Step 6: Spectrogram
A spectrogram is useful in pre-processing as it helps in the representation of frequencies present in the audio data.
It’s mainly helpful in sound detection, information retrieval, etc. We will use “tfio.audio.spectrogram” function to do so.
“tfio.audio.spectrogram” with the audio_tensor object as input, along with the parameter,
nfft -->  representing the number of samples to use for the fast Fourier transform (FFT),
window --> representing the size of the window used for the FFT,
the stride --> representing the distance between consecutive windows.
The function returns a new tensor representing the spectrogram of the audio signal.
Spectrograms can be used in audio augmenting techniques such as time masking, and frequency masking.
Python3
spectrogram = tfio.audio.spectrogram(audio_fade,
nfft=512,
window=512,
stride=512)
plt.figure()
plt.imshow(tf.math.log(spectrogram).numpy())
plt.show()
|
Output:
Spectrogram
Mel spectrogram
Mel spectrogram is a version of the spectrogram that is scaled based on the human auditory system. The mel scale is a non-linear transformation of frequency that is designed to better reflect how the human ear perceives sound.
“tfio.audio.melscale” is a TensorFlow I/O (TFIO) Python module function that can be used to convert a spectrogram into a mel spectrogram.
“tfio.audio.melscale()” takes the parameter such as,
- spectrogram–>A float tensor of shape [batch_size, num_frames, num_fft_bins], representing the input spectrogram. The input should be in a linear magnitude scale.
- rate–>An integer or float scalar representing the sample rate of the input audio signal. The default value is 16000.
- mels–>An integer scalar representing the number of mel bins. The default value is 500.
- fmin–>A float scalar representing the minimum frequency of the spectrogram. The default value is 0.
- fmax–>A float scalar representing the maximum frequency of the spectrogram. The default value is 8000.
The “tfio.audio.dbscale” is a TensorFlow module function that can be used to convert a spectrogram or mel spectrogram into a decibel-scaled version of the same representation.
we call “tfio.audio.dbscale” takes,
- spectrogram object as input
- top_db–> representing the maximum value in decibels that should be represented in the output. Any values above this threshold will be clipped to the maximum value.
The function returns a new tensor representing the decibel-scaled spectrogram of the audio signal.
Python3
spectrogram_mel = tfio.audio.melscale(spectrogram, rate=16000, mels=250, fmin=0, fmax=7000)
plt.figure()
plt.imshow(tf.math.log(spectrogram_mel).numpy())
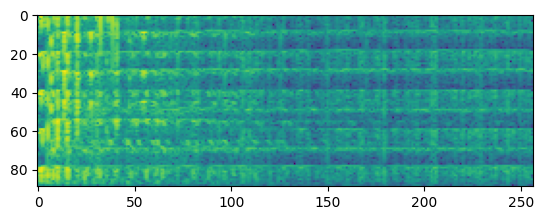
spectrogram_dbscale = tfio.audio.dbscale(spectrogram_mel, top_db=70)
plt.figure()
plt.imshow(spectrogram_dbscale.numpy())
plt.show()
|
Output:

Mel spectrogram
Step 7: Frequency masking and Time masking
Frequency masking and Time masking are audio augmentation techniques used to improve the robustness and generalization of audio models. They are based on the idea of randomly masking certain frequency bands or time steps in the audio signal to simulate real-world variations and improve the model’s ability to handle noisy or incomplete inputs.
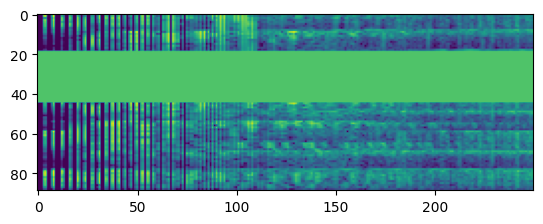
Frequency masking
Python3
spec_freq_mask = tfio.audio.freq_mask(spectrogram_dbscale, param=100)
plt.figure()
plt.imshow(spec_freq_mask.numpy())
plt.show()
|
Output:
Frequency masking
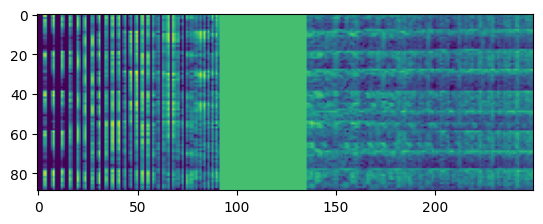
Time masking
Python3
audio_time_masked = tfio.audio.time_mask(spectrogram_dbscale,
param=50)
plt.figure()
plt.imshow(audio_time_masked.numpy())
plt.show()
|
Output:
Time masking
tfio.audio.freq_mask() and tfio.audio.time_mask() applies masking on the frequency axis and time axis respectively of the input spectrogram by setting a rectangular window of zeros centered around a random frequency and time index respectively.
This helps to make the model more robust by shifting freq and time to improve its generalization performance.
By following these steps, you can preprocess and augment audio data using TensorFlow in Python. You can experiment with different data augmentation techniques and evaluate their impact on the performance of your audio models.
Share your thoughts in the comments
Please Login to comment...