Android | Auto Complete TextBox and How to Create it
Last Updated :
23 Jan, 2022
Pre-requisites:
Android AutoComplete TextViews is used for Completing the words automatically. Whenever the user writes a Character, Auto Complete TextView will show suggestions of the words that the user can select. AutoComplete TextViews is the subclass of EditText.
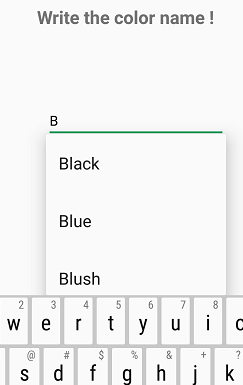
For Example:
Auto Complete TextView provides the following methods:
- setThreshold() method to start the suggestion words in first character.
- setAdapter() method to set all the data in AutoCompleteTextView.
- setTextColor this is used for the text with the black color.
How to create an Android App to use AutoComplete TextViews
This example will help to develop an Android App that creates AutoComplete TextViews according to the example shown above:
Some colours are stored in String array. Now words are shown in the list so we use ArrayAdapter Class.
ArrayAdapter Class is used for holding the data of Color String array as a list item as shown below and then Set all the above methods in AutoCompleteTextView.
Example:
Below are the steps for Creating an Alert Dialog Android Application:
Step1: Firstly create a new Android Application. This will create an XML file “activity_main.xml” and a Java File “MainActivity.Java”. Please refer the pre-requisites to learn more about this step.
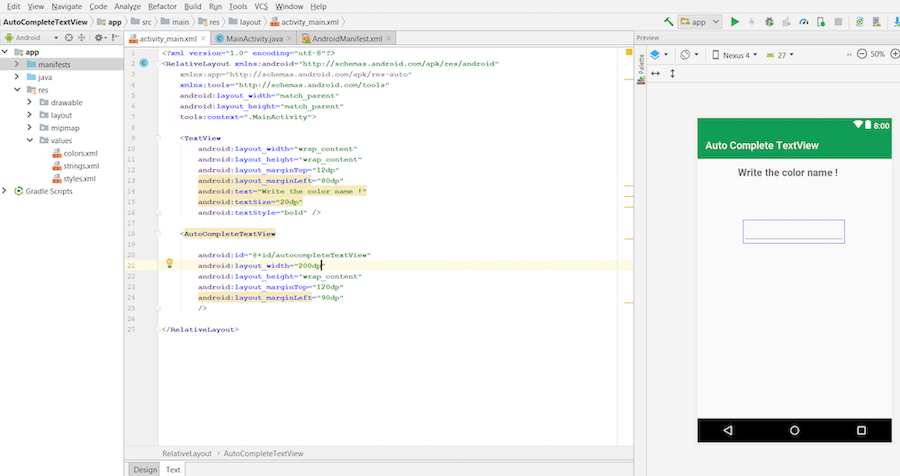
Step 2: Open “activity_main.xml” file and add following widgets in a Relative Layout:
- A TextView to display the message
- A AutoCompleteTextView to get the user answer with the help of AutoComplete Suggestions.
Also, Assign the ID to each component along with other attributes as shown in the image and the code below. The assigned ID on a component helps that component to be easily found and used in the Java files.
Syntax:
android:id="@+id/id_name"
Here the given IDs are as follows:
- AutoCompleteTextView: android:id=”@+id/autocompleteTextView”
This will make the UI of the Application.
Step 3: Now, after the UI, this step will create the Backend of the App. For this, open the “MainActivity.java” file and instantiate the components made in the XML file (AutoCompleteTextView) using findViewById() method. This method binds the created object to the UI Components with the help of the assigned ID.
General Syntax:
ComponentType object = (ComponentType)findViewById(R.id.IdOfTheComponent);
Syntax for components used:
AutoCompleteTextView autoCompleteTextView = (AutoCompleteTextView) findViewById(R.id.autocompleteTextView);
Step4: This step involves setting up the operations on the AutoCompleteTextView. These operations are as follows:
1. Create the string array and store the color values that are to be shown in the suggestions.
String[] colors = { “Red”, “Green”, “Black”, “Orange”, “Blue”, “Pink”, “Blush”, “Brown”, “Yellow” };
2. Create the object of ArrayAdapter with String which holds the data as the list item.
ArrayAdapter adapter = new ArrayAdapter(this,android.R.layout.select_dialog_item, colors);
ArrayAdapter Class is used to hold the data of Color String array as a list item as shown below and then Set all the above methods in AutoCompleteTextView.
3. Set the threshold value as 1 which tells about how many letters to give suggestions. Here it is set to 1 character.
autoCompleteTextView.setThreshold(1);
4. Set the adapter for data passed as the list.
autoCompleteTextView.setAdapter(adapter);
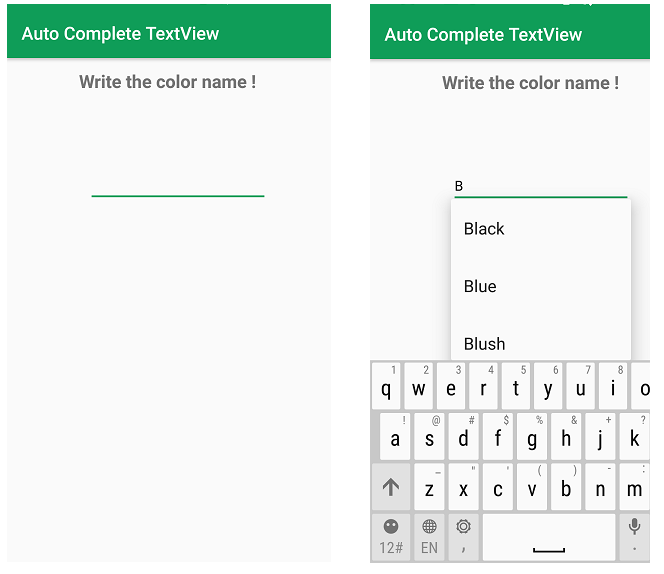
Step 5: Now run the app and operate as follows:
- When the app is opened, it displays a message to enter the color name with a TextBox below it to get the user response.
- When a character is typed, the suggestions starting with the entered text are shown and the user can select from it.
Complete code of MainActivity.java or activity_main.xml of AutoCompleteTextView is below.
activity_main.xml
XML
<?xml version="1.0" encoding="utf-8"?>
<RelativeLayout
android:layout_width="match_parent"
android:layout_height="match_parent"
tools:context=".MainActivity">
<TextView
android:layout_width="wrap_content"
android:layout_height="wrap_content"
android:layout_marginTop="12dp"
android:layout_marginLeft="80dp"
android:text="Write the color name !"
android:textSize="20dp"
android:textStyle="bold" />
<AutoCompleteTextView
android:id="@+id/autocompleteTextView"
android:layout_width="200dp"
android:layout_height="wrap_content"
android:layout_marginTop="120dp"
android:layout_marginLeft="90dp"
/>
</RelativeLayout>
|
MainActivity.java
Java
package org.geeksforgeeks.navedmalik.autocompletetextview;
import android.arch.lifecycle.AndroidViewModel;
import android.graphics.Color;
import android.support.v7.app.AppCompatActivity;
import android.os.Bundle;
import android.widget.ArrayAdapter;
import android.widget.AutoCompleteTextView;
public class MainActivity extends AppCompatActivity {
@Override
protected void onCreate(Bundle savedInstanceState)
{
super.onCreate(savedInstanceState);
setContentView(R.layout.activity_main);
AutoCompleteTextView
autoCompleteTextView
= (AutoCompleteTextView)
findViewById(
R.id.autocompleteTextView);
String[] colors
= { "Red", "Green", "Black",
"Orange", "Blue", "Pink",
"Blush", "Brown", "Yellow" };
ArrayAdapter<String> adapter
= new ArrayAdapter<String>(
this,
android.R.layout.select_dialog_item,
colors);
autoCompleteTextView.setThreshold(1);
autoCompleteTextView.setAdapter(adapter);
autoCompleteTextView.setTextColor(Color.BLACK);
}
}
|
Output:
Share your thoughts in the comments
Please Login to comment...