Unit Testing in Android using JUnit
Last Updated :
18 Dec, 2021
Unit testing is done to ensure that developers write high-quality and errorless code. It is advised to write Unit tests before writing the actual app, you will write tests beforehand and the actual code will have to adhere to the design guidelines laid out by the test. In this article, we are using JUnit to test our code. JUnit is a “Unit Testing” framework for Java Applications which is already included by default in android studio. It is an automation framework for Unit as well as UI Testing. It contains annotations such as @Test, @Before, @After, etc. Here we will be using only @Test annotation to keep the article easy to understand. Note that we are going to implement this project using the Kotlin language.
Step by Step Implementation
Step 1: Create a new Project
To create a new project in Android Studio please refer to How to Create/Start a New Project in Android Studio. Note that select Kotlin as the programming language.
Step 2: Add dependency to the build.gradle file and click “sync now”
testImplementation “com.google.truth:truth:1.0.1”
androidTestImplementation “com.google.truth:truth:1.0.1”
Step 3: Working with the RegistrationUtil.kt file
Create a new Kotlin file RegistrationUtil and choose its type as an object. Since this is a singleton we do not need to create an object of it while using it in other classes. It has a function called validRegistrationInput which requires three arguments username, password, and confirm password. We will be testing this function with different sets of inputs with the following test cases.
- Username, password, confirm password should not be empty.
- Password must contain at least two digits.
- Password matches the confirmed password.
- Username must not be taken.
Kotlin
object RegistrationUtil {
private val existingUsers = listOf("Rahul" , "Rohan")
fun validRegistrationInput(
userName : String,
password : String,
confirmPassword : String
) : Boolean {
if (userName.isEmpty() || password.isEmpty() || confirmPassword.isEmpty()){
return false
}
if (userName in existingUsers){
return false
}
if (password != confirmPassword){
return false
}
if (password.count { it.isDigit() } < 2){
return false
}
return true
}
}
|
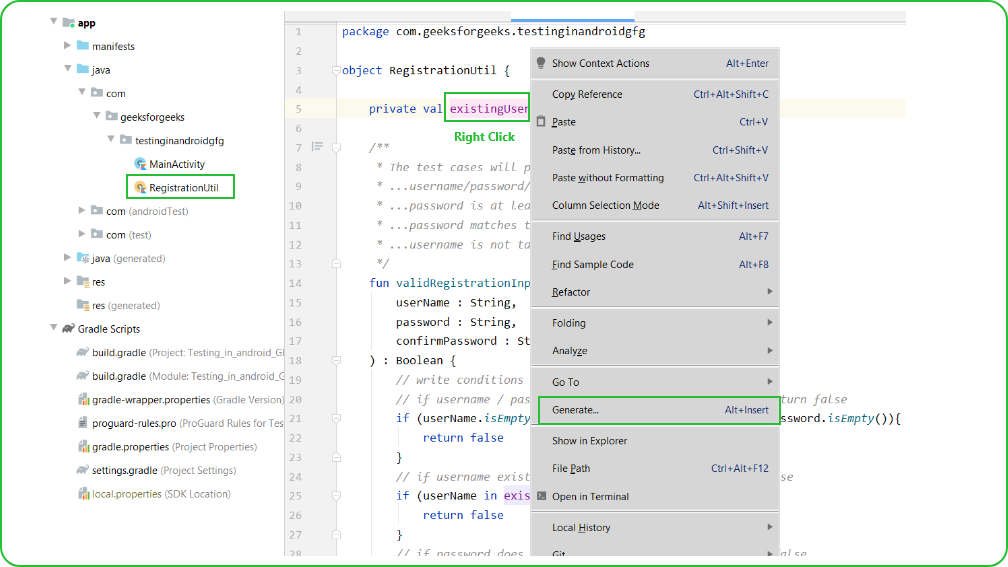
Step 4: Create a test class
In order to create a test class of RegistrationUtil right-click on RegistrationUtil then click generate and then select the test. A dialog will open, from the dialog choose Testing library as JUnit4 and keep the class name as default that is RegistrationUtilTest, and click ok. After that, another dialog will open to choose the destination directory, choose the one which has ..app\src\test\. because our test class does not require any context from the application. Below is the screenshot to guide you create the test class.


Step 5: Working with RegistrationUtilTest.kt file
Go to RegistrationUtilTest.kt file and write the following code. Comments are added inside the code to understand the code in more detail.
Kotlin
import com.google.common.truth.Truth.assertThat
import org.junit.Test
class RegistrationUtilTest {
@Test
fun `empty username returns false`(){
val result = RegistrationUtil.validRegistrationInput(
"",
"123",
"123"
)
assertThat(result).isFalse()
}
@Test
fun `username and correctly repeated password returns true`() {
val result = RegistrationUtil.validRegistrationInput(
"Rahul",
"123",
"123"
)
assertThat(result).isTrue()
}
@Test
fun `username already taken returns false`() {
val result = RegistrationUtil.validRegistrationInput(
"Rohan",
"123",
"123"
)
assertThat(result).isFalse()
}
@Test
fun `incorrect confirm password returns false`() {
val result = RegistrationUtil.validRegistrationInput(
"Rahul",
"123",
"1234"
)
assertThat(result).isFalse()
}
@Test
fun `less than two digit password return false`() {
val result = RegistrationUtil.validRegistrationInput(
"Rahul",
"abcd1",
"abcd1"
)
assertThat(result).isFalse()
}
}
|
Step 6: Run the Test cases
To run the test case click on the little run icon near the class name and then select Run RegistrationUtilTest. If all the test cases pass you will get a green tick in the Run console. In our case, all tests have passed.


Github repo here.
Share your thoughts in the comments
Please Login to comment...