When working with databases in Python, SQLAlchemy is a popular and powerful library that provides a high-level interface for interacting with relational databases. It offers an Object-Relational Mapping (ORM) layer that allows developers to work with database tables as Python objects. In this article, we will explore how to perform bulk inserts with a one-to-one relation using SQLAlchemy in Python.
Before proceeding, make sure you have Python and MySQL servers installed. You can install the SQLAlchemy library and MySQL Connector library in Python by executing the following command in your terminal:
pip install SQLAlchemy
pip install mysql-connector-python
Bulk Insertion with One-to-One Relation in SQLAlchemy
In SQLAlchemy, a one-to-one relationship represents a relationship between two tables where each record in one table is associated with exactly one record in the other table. SQLAlchemy provides the relationship() function to define one-to-one relationships between tables. It allows you to navigate and access related objects conveniently.
Steps for Bulk Insertion with One-to-One Relation in SQLAlchemy
Let us see a step-by-step process of bulk insertion with one-to-one relation in SQLAlchemy using Python.
Step 1: Create a Schema
The first step is to create a schema in MySQL Server.
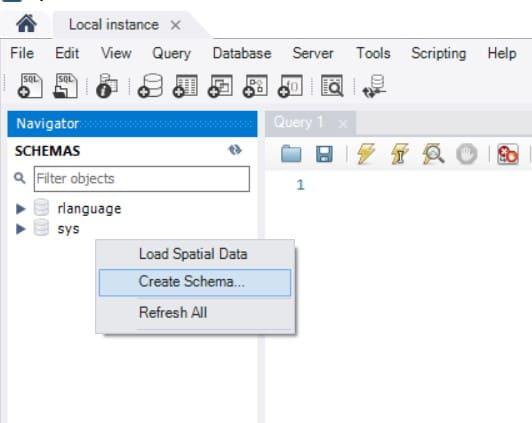
Creating Schema in MySQL Server Workbench
Created a Schema named ‘gfg‘.
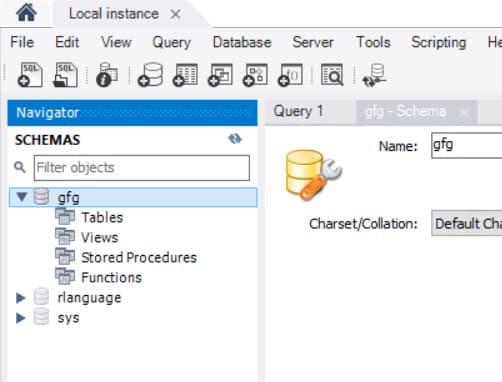
gfg Schema created
Step 2: Import necessary modules
The next step is to import various sqlalchemy modules which are used to create a database and to establish a connection. The declarative_base is used as a base class for defining ORM classes.
from sqlalchemy import create_engine, MetaData, Table, Column, Integer, String, ForeignKey
from sqlalchemy.orm import sessionmaker, relationship
from sqlalchemy.ext.declarative import declarative_base
Step 3: Setting up the Database Connection
To begin, establish a connection to your MySQL database using SQLAlchemy. The create_engine() function is used to create an SQLAlchemy engine that represents a connection to the database. It takes the database URL as a parameter and returns an engine object.
Make sure to replace the placeholder values (username, password, host, and database_name) with your actual MySQL credentials. If your password contains the ‘@' symbol, it can interfere with the connection URL’s syntax, as the ‘@' symbol is used to separate the username and password in the URL. To include a special character ‘@' in your password, you need to URL-encode it.
from urllib.parse import quote_plus

password = 'password'
encoded_password = quote_plus(password)
engine = create_engine('mysql+mysqlconnector://username:'+encoded_password+
   '@localhost:3306/database_name')
Step 4: Create a Session
The declarative_base() function returns a base class for declarative class definitions. It is used as a base class for defining ORM (Object-Relational Mapping) classes. The sessionmaker() function returns a class for creating sessions. It binds the session class to the engine and provides a factory for creating session instances.
Base = declarative_base()
Base.metadata.create_all(engine)
Session = sessionmaker(bind=engine)
session = Session()
Step 5: Define the Database Tables
Next, define the database tables with the appropriate columns and relationships. The relationship() function is used to define a relationship between two tables. It takes various parameters to specify the relationship type, back-references, and other options. In the code example, we use it to define the one-to-one relationship between the “users” and “profiles” tables.
class User(Base):
    __tablename__ = 'users'
    id = Column(Integer, primary_key=True)
    name = Column(String)
    email = Column(String)
    profile = relationship("Profile", uselist=False, back_populates="user")

class Profile(Base):
    __tablename__ = 'profiles'
    id = Column(Integer, primary_key=True)
    user_id = Column(Integer, ForeignKey('users.id'), unique=True)
    bio = Column(String)
    user = relationship("User", back_populates="profile")

2 Databases created
Step 6: Perform Bulk Insert
To perform a bulk insert, you can create a list of objects representing the records you want to insert, and then use the add_all() method to add them to the session. The commit() method commits the current transaction. It saves any changes made within the transaction to the database.
users = [
    User(name='John', email='john@example.com'),
    User(name='Alice', email='alice@example.com')
]
profiles = [
    Profile(bio='Bio for John', user=users[0]),
    Profile(bio='Bio for Alice', user=users[1])
]
session.add_all(users)
session.add_all(profiles)
session.commit()
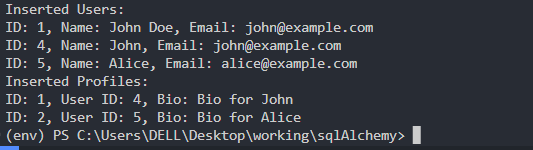
Step 7: Verify the Results
To verify the results, you can query the database and print the inserted records:
users = session.query(User).all()
profiles = session.query(Profile).all()
print("Inserted Users:")
for user in users:
    print(f"ID: {user.id}, Name: {user.name}, Email: {user.email}")
print("Inserted Profiles:")
for profile in profiles:
    print(f"ID: {profile.id}, User ID: {profile.user_id}, Bio: {profile.bio}")
Step 8: Close the Session
Finally, close the session to release the database connection:
session.close()
Example:
This example code focuses on working with a one-to-one relationship between two tables, “users” and “profiles,” using SQLAlchemy. In a one-to-one relationship, each record in one table is associated with exactly one record in the other table.
Here’s the complete working code that demonstrates a bulk insert with a one-to-one relationship using SQLAlchemy in Python:
Python
from sqlalchemy import create_engine, MetaData, Table, Column, Integer, String, ForeignKey
from sqlalchemy.orm import sessionmaker, relationship
from sqlalchemy.ext.declarative import declarative_base
Base = declarative_base()
class User(Base):
__tablename__ = 'users'
id = Column(Integer, primary_key=True)
name = Column(String(20))
email = Column(String(20))
profile = relationship("Profile", uselist=False, back_populates="user")
class Profile(Base):
__tablename__ = 'profiles'
id = Column(Integer, primary_key=True)
user_id = Column(Integer, ForeignKey('users.id'), unique=True)
bio = Column(String(20))
user = relationship("User", back_populates="profile")
engine = create_engine('your_database_url')
Base.metadata.create_all(engine)
Session = sessionmaker(bind=engine)
session = Session()
users = [
User(name='John', email='john@example.com'),
User(name='Alice', email='alice@example.com')
]
profiles = [
Profile(bio='Bio for John', user=users[0]),
Profile(bio='Bio for Alice', user=users[1])
]
session.add_all(users)
session.add_all(profiles)
session.commit()
users = session.query(User).all()
profiles = session.query(Profile).all()
print("Inserted Users:")
for user in users:
print(f"ID: {user.id}, Name: {user.name}, Email: {user.email}")
print("Inserted Profiles:")
for profile in profiles:
print(f"ID: {profile.id}, User ID: {profile.user_id}, Bio: {profile.bio}")
session.close()
|
Output
Bulk insertion with one-to-one relation in SQLAlchemy
Rows inserted to the Profiles and Users table in MySQL Server Workbench.
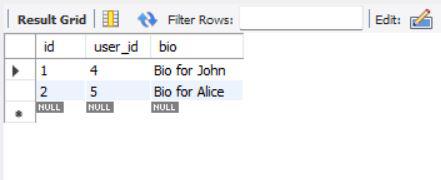
Profiles table for bulk insertion with one-to-one relation in SQLAlchemy
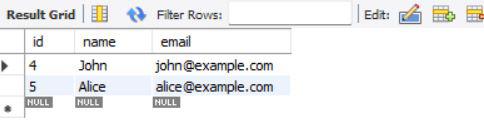
Users table for bulk insertion with one-to-one relation in SQLAlchemy
Share your thoughts in the comments
Please Login to comment...