Spring WebFlux is a reactive programming framework for building non-blocking, asynchronous web applications in Java. Transactions play an important role while we are dealing with databases like data insertion, fetching all data, and other functions. Here, Spring provides robust support for transactions through its transaction management. The Spring’s transaction manager interface provides support for reactive transaction management, and we can use reactive transaction management in any database. We can define transactions by using @Transactional annotation.
The Transactional is a sequence of one or more database operations. Transactional provides data integrity and consistency during complex operations involving multiple database operations. In the Spring framework, @Transactional is used to indicate that a method or class should be wrapped with Transaction. Below we have provided an example with @Transactional for every API endpoint.
Prerequisites:
- Spring Reactive Programming
- Basics of API functionality
- Spring Annotations
- Database Connection in Spring Reactive
- Transaction Management in Spring
- MongoDB
Below we have provided the entire project code for reference.
Note: Here, we have created Gradle type project with MongoDB.
Project Dependencies:
Below we have provided the project Dependencies.
dependencies {
    implementation 'org.springframework.boot:spring-boot-starter-data-mongodb-reactive'
    implementation 'org.springframework.boot:spring-boot-starter-webflux'
    compileOnly 'org.projectlombok:lombok'
    developmentOnly 'org.springframework.boot:spring-boot-devtools'
    annotationProcessor 'org.projectlombok:lombok'
    testImplementation 'org.springframework.boot:spring-boot-starter-test'
    testImplementation 'io.projectreactor:reactor-test'
    testRuntimeOnly 'org.junit.platform:junit-platform-launcher'
}
Project Folder Structure:
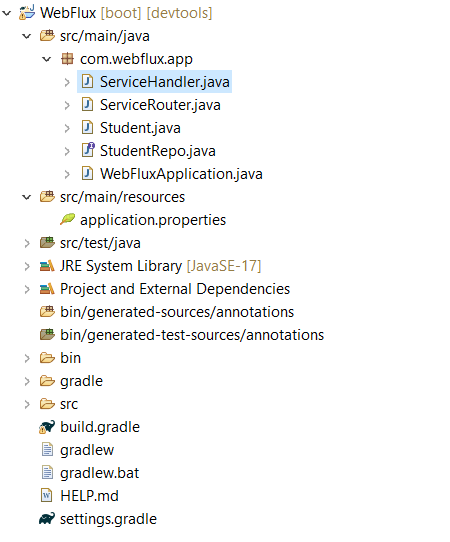
Database Connection
In Spring Boot, we have one file is there that is application.properties file which is used for dynamic configuration. Here, for database connection, we configure the connection details in this file. Below we have provided that file configuration details for reference. Here, localhost is the name of the host, The 27017 is MongoDB port number and the final one is database name that is working.
spring.data.mongodb.host=localhost
spring.data.mongodb.port=27017
spring.data.mongodb.database=working
Entity Class
The Student class is one of the POJO class used for handling database operations. This class contains information like document name, field names and Getters and Setters methods are available. Below we provide POJO class code for reference. The Student class contains three fields namely id, name and age. By using this Java class, we can perform database related operations.
Student.java:
Java
/*
 * This class represents a Student entity used in the application.
 */
package com.webflux.app;

import org.springframework.data.annotation.Id;
import org.springframework.data.mongodb.core.mapping.Document;

import lombok.AllArgsConstructor;
import lombok.Data;
import lombok.NoArgsConstructor;

/*
 * The @Data annotation is from Lombok library and generates
 * getters, setters, toString, equals, and hashCode methods.
 */
@Data
@AllArgsConstructor
@NoArgsConstructor
/*
 * The @Document annotation is from Spring Data MongoDB and
 * indicates that this class is a MongoDB document and specifies
 * the collection name where instances of this class will be stored.
 */
@Document(collection = "studentdata")
public class Student {
    /*
     * The @Id annotation marks the field as the primary identifier
     * for this document.
     */
    @Id
    private String id;
    // The name of the student.
    private String name;
    // The age of the student.
    private String age;
}
Repository Class
This is one of the interfaces which is extends ReactiveMongoRepository for creating repository by using @Repository Annotation. And this ReactiveMongoRepository take two inputs as arguments. The first one targeted pojo class name here we provide Student and the second argument is POJO class Id datatype. In this example, we have used Student POJO class and It’s Id type is String. By using this interface, we can perform database related operations like CRUD operations.
StudentRepo.java:
Java
/*
 * This interface represents a repository for managing Student entities
 * in a reactive way using Spring Data MongoDB.
 */
package com.webflux.app;

import org.springframework.data.mongodb.repository.ReactiveMongoRepository;
import org.springframework.data.mongodb.repository.config.EnableReactiveMongoRepositories;
import org.springframework.stereotype.Repository;

/*
 * The @Repository annotation indicates that this interface is a Spring
 * repository bean, allowing it to be automatically discovered and
 * instantiated as a bean.
 */
@Repository
/*
 * The @EnableReactiveMongoRepositories annotation enables reactive MongoDB
 * repositories and specifies the base packages where Spring Data MongoDB
 * will scan for repository interfaces.
 */
@EnableReactiveMongoRepositories
public interface StudentRepo extends ReactiveMongoRepository<Student, String> {

}
Configuration Class
In this Java class, we have defined all API end points. By using @Configuration annotation and we Autowired the ServiceHandler by using @Autowired for accessing API methods from the ServiceHandler. After this, we have created RouterFunction for defining the API end points all APIs are POST methods.
ServiceRouter.java:
Java
/*
 * This class configures the routing for handling incoming HTTP requests
 * related to student management services in a reactive way using Spring WebFlux.
 */
package com.webflux.app;

import org.springframework.beans.factory.annotation.Autowired;
import org.springframework.context.annotation.Bean;
import org.springframework.context.annotation.Configuration;
import org.springframework.web.reactive.function.server.RequestPredicates;
import org.springframework.web.reactive.function.server.RouterFunction;
import org.springframework.web.reactive.function.server.RouterFunctions;
import org.springframework.web.reactive.function.server.ServerResponse;

/*
 * The @Configuration annotation indicates that this class contains
 * bean definitions that should be processed by the Spring container.
 */
@Configuration
public class ServiceRouter {

    @Autowired
    private ServiceHandler serviceHandler;

    /*
     * This method configures the RouterFunction to define the routes
     * for handling various HTTP requests related to student services.
     */
    @Bean
    RouterFunction<ServerResponse> routerFunction(){
        return RouterFunctions.route(RequestPredicates.POST("api/student/add"),serviceHandler::addStudent)
                .andRoute(RequestPredicates.POST("api/student/delete"), serviceHandler::deleteStudentById)
                .andRoute(RequestPredicates.POST("api/student/update"), serviceHandler::updateStudentById)
                .andRoute(RequestPredicates.POST("api/student/getall"), serviceHandler::getAllStudents);
    }
}
ServiceHandler Class
Here, we have created one more Java class for handling the API end points. By using @Service annotation, we have created this in this service layer. We have created four API end points name addStudent, updateStudentById, deleteStudentById and final one is getAllStudents. Here, we have used @Transaction annotation for every API End Point. We can observe this in the below code. After that we Autowired the StudentRepo by using @Autowired annotation. This interface for handling Database operations in every API end point.
ServiceHandler.java:
Java
/*
 * This class implements the handler methods for processing HTTP requests related to student services.
 */
package com.webflux.app;

import org.springframework.beans.factory.annotation.Autowired;
import org.springframework.stereotype.Service;
import org.springframework.transaction.annotation.Transactional;
import org.springframework.web.reactive.function.server.ServerRequest;
import org.springframework.web.reactive.function.server.ServerResponse;
import reactor.core.publisher.Mono;

/*
 * The @Service annotation indicates that this class is a service component in Spring.
 */
@Service
public class ServiceHandler {

    @Autowired
    private StudentRepo studentRepo;

    /*
     * This method adds a new student to the database.
     */
    @Transactional
    public Mono<ServerResponse> addStudent(ServerRequest request) {
        return request.bodyToMono(Student.class).flatMap(data -> {
            return ServerResponse.ok().body(studentRepo.save(data), Student.class);
        });
    }

    /*
     * This method deletes a student from the database by ID.
     */
    @Transactional
    public Mono<ServerResponse> deleteStudentById(ServerRequest request) {
        return request.bodyToMono(Student.class).flatMap(data -> {
            return ServerResponse.ok().body(studentRepo.deleteById(data.getId()), Student.class);
        }).switchIfEmpty(ServerResponse.ok().bodyValue("No Student Data Found"));
    }

    /*
     * This method updates a student's information in the database by ID.
     */
    @Transactional
    public Mono<ServerResponse> updateStudentById(ServerRequest request) {
        return request.bodyToMono(Student.class).flatMap(data -> {
            return studentRepo.findById(data.getId()).flatMap(change -> {
                change.setId(data.getId());
                change.setName(data.getName());
                change.setAge(data.getAge());
                return ServerResponse.ok().body(studentRepo.save(change), Student.class);
            }).switchIfEmpty(ServerResponse.ok().bodyValue("No Student Data Found"));
        });
    }

    /*
     * This method retrieves all students' data from the database.
     */
    @Transactional(readOnly = true)
    public Mono<ServerResponse> getAllStudents(ServerRequest request) {
        return request.bodyToMono(Student.class).flatMap(data -> {
            return ServerResponse.ok().body(studentRepo.findAll(), Student.class);
        }).switchIfEmpty(ServerResponse.ok().bodyValue("No Student Data Found"));
    }
}
In the above code, we have created four API end points for handling database related operations with @Transaction annotation. Below we will get to know more about each and every API end point.
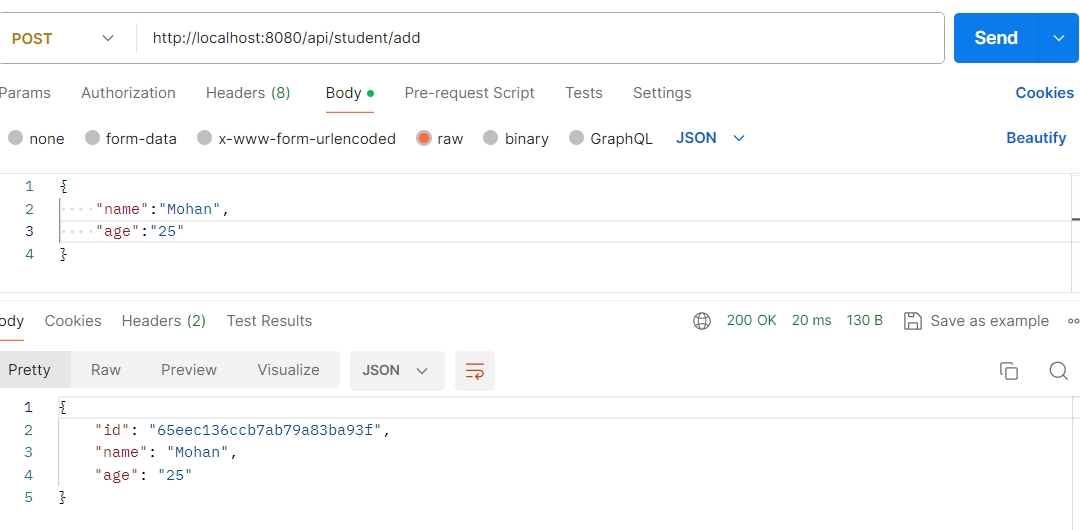
Add Student API
@Transactional
    public Mono<ServerResponse> addStudent(ServerRequest request) {
        return request.bodyToMono(Student.class).flatMap(data -> {
            return ServerResponse.ok().body(studentRepo.save(data), Student.class);
        });
    }
In the above API code, we have used @Transactional for addStudent() method, here we take student details after that by using StudentRepo object. Then we save the student details by using save() method. When we test this API with Post Man Tool, we will get the below output.
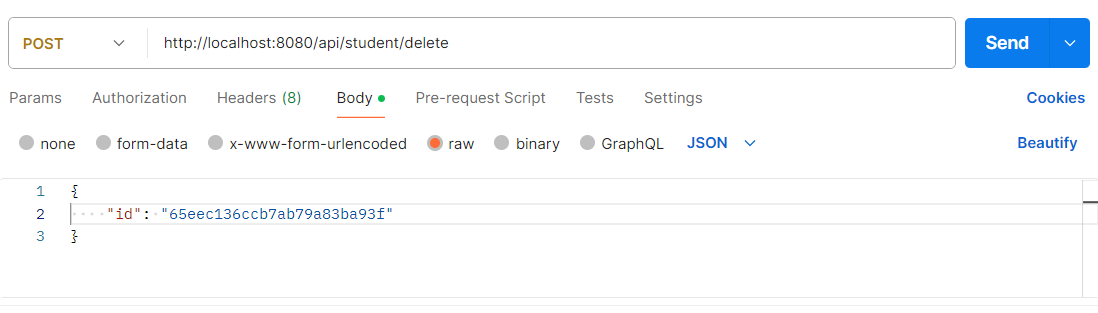
Delete Student API
In this API end point is wrapped with @Transaction annotation. This API take Student Id as input, if Id exists then student data is deleted otherwise It will show some error message like No Student Data Found.
@Transactional
    public Mono<ServerResponse> deleteStudentById(ServerRequest request) {
        return request.bodyToMono(Student.class).flatMap(data -> {
            return ServerResponse.ok().body(studentRepo.deleteById(data.getId()), Student.class);
        }).switchIfEmpty(ServerResponse.ok().bodyValue("No Student Data Found"));
    }
Below is the api testing output in POSTMAN tool.
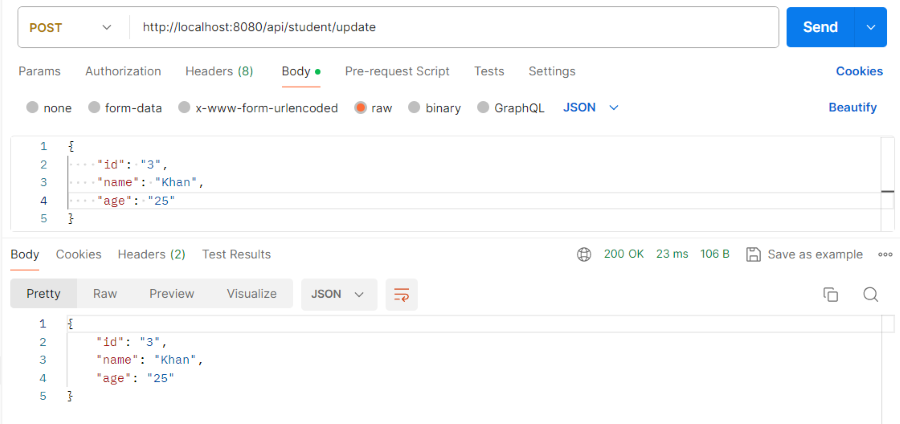
Update Student API
This API also wrapped with @Transaction annotation means the Transaction Manager create Transaction around this method. For Update the student details It will take existing student id with new student details. Once details are right then data is successfully updated into database. If Id is not found then we got error message like No Student Data Found.
@Transactional
    public Mono<ServerResponse> updateStudentById(ServerRequest request) {
        return request.bodyToMono(Student.class).flatMap(data -> {
            return studentRepo.findById(data.getId()).flatMap(change -> {
                change.setId(data.getId());
                change.setName(data.getName());
                change.setAge(data.getAge());
                return ServerResponse.ok().body(studentRepo.save(change), Student.class);
            }).switchIfEmpty(ServerResponse.ok().bodyValue("No Student Data Found"));
        });
    }
Below is the api testing output in POSTMAN tool.
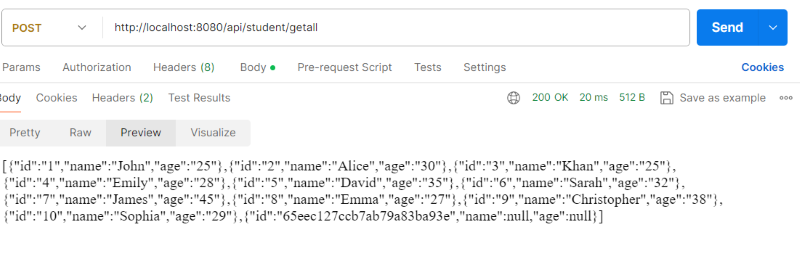
Get All Data API
In this API end point, we fetch all data from the database. This method also wrapped with @Transaction which is created Transaction around this method. Here, we have used @Transactional(readOnly = true) means Only we can fetch the data in the format of read only.
@Transactional(readOnly = true)
    public Mono<ServerResponse> getAllStudents(ServerRequest request) {
        return request.bodyToMono(Student.class).flatMap(data -> {
            return ServerResponse.ok().body(studentRepo.findAll(), Student.class);
        }).switchIfEmpty(ServerResponse.ok().bodyValue("No Student Data Found"));
    }
Below is the api testing in the POSTMAN tool.
Conclusion
In Spring We have Transaction manager to handle the Transaction. And We can define a Transaction with help of @Transaction annotation in Spring framework. Mostly the Transactions are dealing with database related operations like data fetch, data insertion, data update and other functions. In this example, we have created four API endpoints for handling database operations like CRUD operation. Mostly this Transactions are used in complex database related queries.
Share your thoughts in the comments
Please Login to comment...