Spring Boot – Interceptor
Last Updated :
15 Nov, 2023
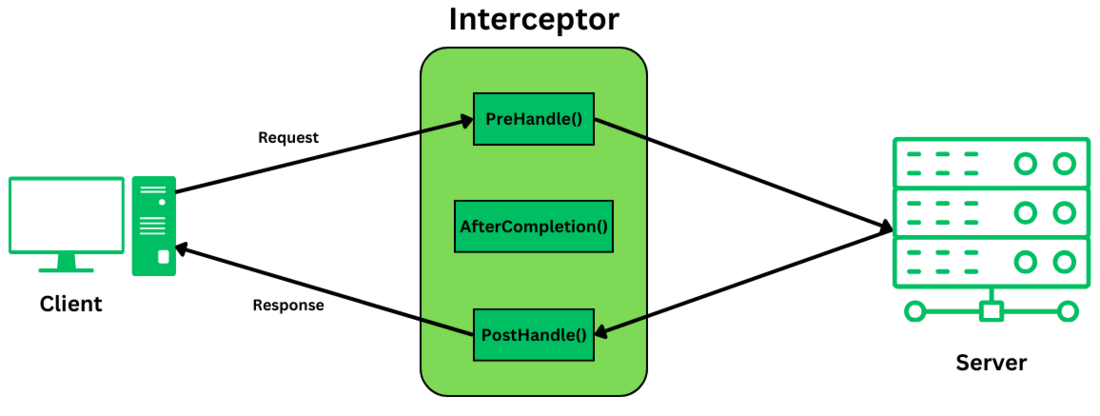
Spring Boot Interceptor is an additional component that will intercept every request and response dispatch and perform some operations on it.
Interceptors in web applications play a major in performing initial or finalization work.
Interceptors have one primary purpose – “To intercept an incoming or outgoing request”.
This intercepting behavior is done to perform some operation BEFORE or AFTER an action invocation. You can think of an interceptor as a mediator between the request and the business logic reserved for that request. Interceptor in Spring Boot can be implemented either by extending the HandlerInterceptorAdapter class or by implementing HandlerInterceptor Interface.
Interceptors are useful for many purposes some of which are listed below :
1. Logging
Logging is a common practice to understand the flow of code & debugging. Interceptors are widely for the same, Documenting or recording the requests made by the client or the responses sent back to them is generally useful in debugging and monitoring purposes.
2. Authentication
Authentication is a security mechanism that can be implemented inside an Interceptor before the request even reaches its appropriate controller. It can be intercepted by the Interceptor & authentication can be verified, if denied then the request doesn’t get delegated to the controller which not only minimizes the code but reduces a great overhead.
3. Request/Response Modification
Interceptors are also used for modifying requests & responses. It can be done in the following ways :
- Adding or modifying request parameters
- Modifying request headers, or response head
- Change status code
- Redirection to a different URL
- Handle custom error requests/responses which frees the controller or an addition of an external component just to handle the exceptions.
Limitations
- Performance overhead: If our application deals with a large number of interceptors, then it is not only complex to manage each one of them but also it results in reduced performance.
- Disconnected with global state: Interceptors do not store the state of any application as to what data is currently updated & where. The interceptor must be implemented in a way that its interception doesn’t affect other parts of our application & should only impact the request for its intercepting.
- Security: When an interceptor logs the request & response data it must be doing so in a protective manner else it would expose the request’s data to attackers.
Advantages
- Reusability: The interceptors we implement in our application, can be reused back & forth for handling a request & response to multiple requests. They also help us minimize the code in the controller, shifting the authentication, and modification logic from the controller to the Interceptor.
- Logging & Monitoring: Interceptors help us log, debug & monitor incoming & outgoing requests. This saves time, to apprehend the state of request back and forth.
- Security and Authentication: Interceptors can verify the request made & delegate it as per the verification.
- Easy Configuration: Interceptors can be easily configured without affecting the whole application as the primary purpose of the interceptor is just to intercept requests & responses.
Step-by-Step Implementation
Here’s a step-by-step implementation for implementing an Interceptor in Spring Boot.
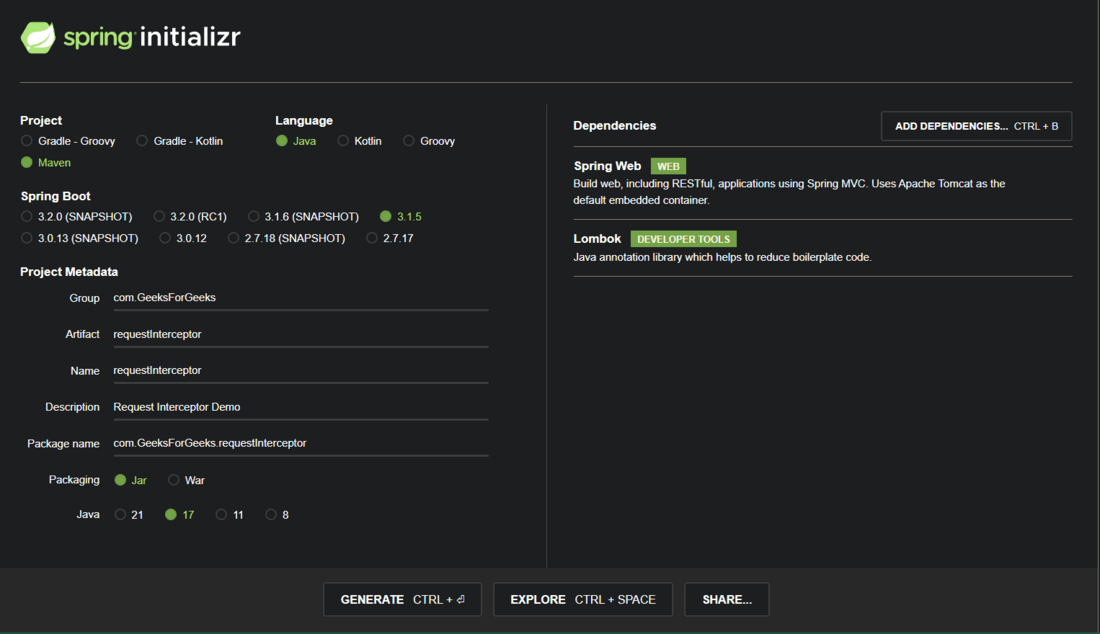
- Spring Boot Version: 3.1.5
- Java version: 17
- Go to Spring Initializr and create a configuration file with the following dependencies :
Spring boot starter file
Download the zip file and extract it wherever you want.
- Go to IntelliJ > File > Open > Browse where you saved the extracted zip file then open it.
- Add the following packages in the main package – entity, RequestInterceptor, config, REST Packages.
- The final directory structure should look something like this :
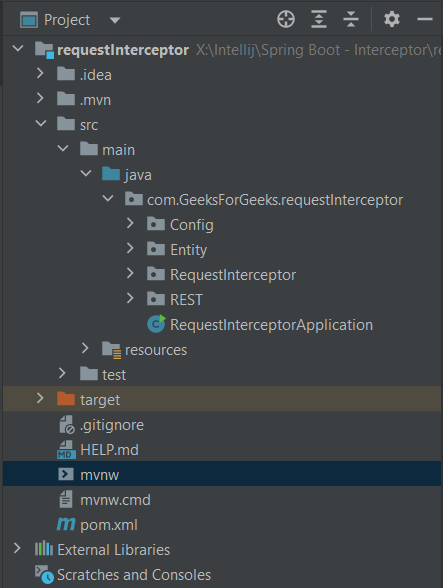
Directory Structure
Now we’re done with our setup and we can start implementing our Request Interceptor. Step one of the following 3 steps is completed :
- Step 1: Create a POM file containing the required dependencies
- Step 2: Create a configuration class to register the interceptor with Spring MVC, Entity class (POJO), Request Interceptor, and REST Controller to handle requests.
- Step 3: Implement the Request Interceptor methods like preHandle(), postHandle() & afterCompletion(). (Writing our custom logic for login, authentication, or any other purpose)
1. POM File
We have included the following dependencies in our POM File:
- Spring-Boot-starter-web
- Lombok Library
Note: Lombok Library is completely OPTIONAL, you can write your own setters & getters. We’re using it for simplicity.
XML
<?xml version="1.0" encoding="UTF-8"?>
<modelVersion>4.0.0</modelVersion>
<parent>
<groupId>org.springframework.boot</groupId>
<artifactId>spring-boot-starter-parent</artifactId>
<version>3.1.5</version>
<relativePath/>
</parent>
<groupId>com.GeeksForGeeks</groupId>
<artifactId>requestInterceptor</artifactId>
<version>0.0.1-SNAPSHOT</version>
<name>requestInterceptor</name>
<description>Request Interceptor Demo</description>
<properties>
<java.version>17</java.version>
</properties>
<dependencies>
<dependency>
<groupId>org.springframework.boot</groupId>
<artifactId>spring-boot-starter-web</artifactId>
</dependency>
<dependency>
<groupId>org.projectlombok</groupId>
<artifactId>lombok</artifactId>
<optional>true</optional>
</dependency>
<dependency>
<groupId>org.springframework.boot</groupId>
<artifactId>spring-boot-starter-test</artifactId>
<scope>test</scope>
</dependency>
</dependencies>
<build>
<plugins>
<plugin>
<groupId>org.springframework.boot</groupId>
<artifactId>spring-boot-maven-plugin</artifactId>
<configuration>
<excludes>
<exclude>
<groupId>org.projectlombok</groupId>
<artifactId>lombok</artifactId>
</exclude>
</excludes>
</configuration>
</plugin>
</plugins>
</build>
</project>
|
2. Entity Class
Below is our entity class, it contains 2 annotations:-
- @Data: It indicates that this class is solely for data storage purposes & getters and setters are defined for all non-static and non-final fields.
- @AllArgsConstructor: It generates a constructor that takes all the fields as arguments.
Java
import lombok.AllArgsConstructor;
import lombok.Data;
@Data
@AllArgsConstructor
public class Student {
int id;
String firstName;
String lastName;
}
|
3. Configuration Class
This is a Java class annotated with @Configuration for auto-configuration that is, it indicates this class contains configuration for the spring application context. Basically, it indicates that this class will contain some beans that must be registered with the application context to be used in the application.
- We created a configuration class, and annotated it with @Configuration, basically indicating that this class is for configuring the spring application context
- This class implements an interface – ‘WebMvcConfigurer‘ which allows us to customize spring MVC configuration specific to our own needs, overriding its default behavior.
- @Override the method – addInterceptors(InterceptorRegistry registry): This tells the InterceptorRegistry to register the provided class as the Interceptor. In our case it – is ‘RequestInterceptor’.
In summary, the whole point of creating a configured class is to register custom interceptors with the ‘InterceptorRegistry‘.
Java
package com.GeeksforGeeks.requestinterceptorexample.config;
import com.GeeksforGeeks.requestinterceptorexample.RequestInterceptor.RequestInterceptor;
import org.springframework.web.servlet.config.annotation.InterceptorRegistration;
import org.springframework.web.servlet.config.annotation.InterceptorRegistry;
import org.springframework.web.servlet.config.annotation.WebMvcConfigurer;
@Configuration
public class RequestInterceptorConfig implements WebMvcConfigurer {
@Override
public void addInterceptors(InterceptorRegistry registry) {
registry.addInterceptor(new RequestInterceptor());
}
}
|
4. Request Interceptor
Request Interceptor is an additional component class that intercepts all the incoming and outgoing requests (before any action is performed). It has the following 3 methods :
1. preHandle(): When an interceptor is implemented, any request before reaching the desired controller will be intercepted by this interceptor and some pre-processing can be performed like logging, authentication, redirection, etc.
- This method takes 3 parameters :
- HttpServletRequest request – represents the request being handled,
- HttpServletResponse response – represents the HTTP response to be sent back to the client,
- Object handler – the target controller method that will handle this request.
- Boolean return type: If the method returns true then the request will be directed towards the target control else the target controller method won’t be invoked if this method returns false and the request will be halted.
2. postHandle(): This method is executed after the request is served but just before the response is sent back to the client. It intercepts the request in the final stage, giving us a chance to make any final trivial adjustments.
- We can modify the view response, for certain specific conditions.
- It takes 4 parameters –
- 3 are same as previous but there is one more
- ‘ModelAndView’. It contains information about the model (data that is shipped across the parts of our web application) and the view that is rendered by the client.
- It can be used for debugging, logging, and capturing final response data.
3. afterCompletion(): This method is executed after the request and response mechanism is completed.
- This method can turn out to be very useful in cleaning up the resources once the request is served completely.
- It also takes 4 parameters, but the ‘ModelAndView’ object is replaced by an Exception object which contains information if any Exceptions occurred while serving the request.
@Component annotation tells the component scanning mechanism that this class should be registered for component scanning.
Java
import jakarta.servlet.http.HttpServletRequest;
import jakarta.servlet.http.HttpServletResponse;
import org.springframework.stereotype.Component;
import org.springframework.web.servlet.HandlerInterceptor;
import org.springframework.web.servlet.ModelAndView;
@Component
public class RequestInterceptor implements HandlerInterceptor {
@Override
public boolean preHandle(HttpServletRequest request, HttpServletResponse response, Object handler) throws Exception {
try {
System.out.println("1 - preHandle() : Before sending request to the Controller");
System.out.println("Method Type: " + request.getMethod());
System.out.println("Request URL: " + request.getRequestURI());
}
catch (Exception e) {
e.printStackTrace();
return false;
}
return true;
}
@Override
public void postHandle(HttpServletRequest request, HttpServletResponse response, Object handler, ModelAndView modelAndView) throws Exception {
try {
System.out.println("2 - postHandle() : After the Controller serves the request (before returning back response to the client)");
}
catch (Exception e) {
e.printStackTrace();
}
}
@Override
public void afterCompletion(HttpServletRequest request, HttpServletResponse response, Object handler, Exception ex) throws Exception {
try {
System.out.println("3 - afterCompletion() : After the request and Response is completed");
}
catch (Exception e) {
e.printStackTrace();
}
}
}
|
5. REST Controller
The rest controller is to handle the requests, defining the endpoints – REST APIs to handle the requests. We’ve taken only a GET mapping for the simplicity of this example.
- When the endpoint – /api/students are hit, it makes a list of mentioned 3 students and returns the list.
Code
Java
import com.GeeksForGeeks.requestInterceptor.Entity.Student;
import org.springframework.web.bind.annotation.GetMapping;
import org.springframework.web.bind.annotation.RequestMapping;
import org.springframework.web.bind.annotation.RestController;
import java.util.ArrayList;
import java.util.List;
@RestController
@RequestMapping("/api")
public class RESTController {
@GetMapping("/students")
public List<Student> getStudents(){
Student student1 = new Student(1,"Adwitiya", "Mourya");
Student student2 = new Student(2,"David", "Goggins");
Student student3 = new Student(3,"Andrew", "Huberman");
List<Student> myList = new ArrayList<Student>();
myList.add(student1);
myList.add(student2);
myList.add(student3);
return myList;
}
}
|
6. SpringBootApplication
Execute the following SpringBootApplication code:
Java
package com.GeeksforGeeks.requestinterceptorexample;
import org.springframework.boot.SpringApplication;
import org.springframework.boot.autoconfigure.SpringBootApplication;
@SpringBootApplication
public class RequestInterceptorExampleApplication {
public static void main(String[] args) {
SpringApplication.run(RequestInterceptorExampleApplication.class, args);
}
}
|
Step-1: Test the response on Postman or any browser by going to – “default port/api/students”
Output window of testing REST API using PostMan
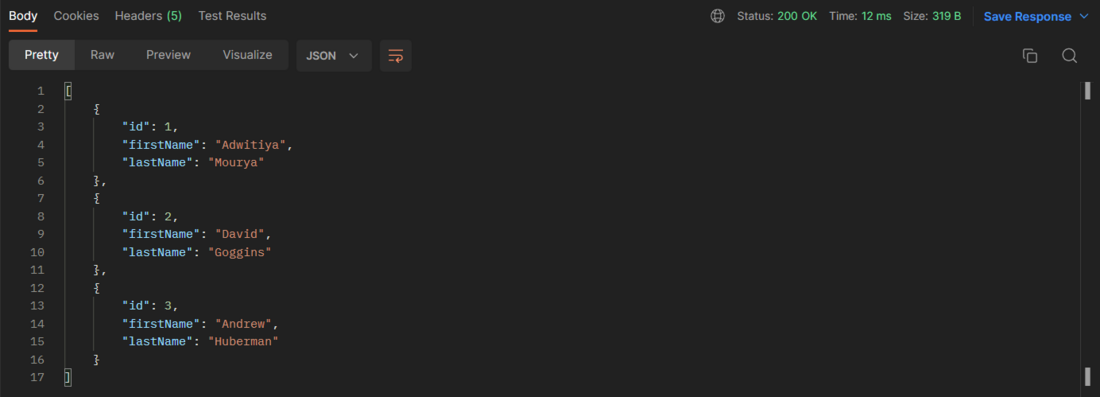
PostMan Output
Step-2: Check the console for preHandle, postHandle, and afterCompletion Method Outputs:
Console output of the interceptor methods
.png)
Console Output
Share your thoughts in the comments
Please Login to comment...