Spring Boot – Enhancing Data Security Column Level Encryption
Last Updated :
05 Feb, 2024
Column-level encryption is crucial to enhancing data security in a Spring Boot application. It involves encrypting sensitive data at the column level in a database, ensuring that even if the database itself is compromised, the sensitive information remains secure. In a Spring Boot application, you can achieve column-level encryption by combining the use of encryption libraries, database features, and proper coding practices. Here’s a step-by-step guide.
Importance of Implementing Column-Level Encryption in a Spring Boot Application
- Protects Sensitive Data: Safeguards personal and financial information, ensuring confidentiality.
- Ensures Compliance: Meets industry regulations, preventing legal consequences.
- Defends Against Insider Threats: Adds an extra layer of protection against misuse by those with database access.
- Minimizes Breach Impact: Reduces the impact of data breaches, making it harder for attackers to exploit information.
- Builds Trust: Demonstrates a commitment to data security, enhancing user trust and organizational reputation.
Steps to Implement Column-Level Encryption in a Spring Boot Application
Below are steps to be followed while implementing Column-Level Encryption in a Spring Boot Application
Step 1: Set Up a Spring Boot Project
You can use Spring Initializer spring_initializer to generate a basic Spring Boot project. Choose the following options:
- Project: Maven or Gradle (depending on your preference)
- Language: Java
- Spring Boot: The latest stable version
- Group: Your project’s group name (e.g., com.example)
- artefactArtifact: Your project’s artifact name (e.g., column-level-encryption)Dependencies: Add Spring Web and Spring Data JPA
Click “Generate” to download the project archive. consider below-given pom.xml file below:
XML
<?xml version="1.0" encoding="UTF-8"?>
<modelVersion>4.0.0</modelVersion>
<parent>
<groupId>org.springframework.boot</groupId>
<artifactId>spring-boot-starter-parent</artifactId>
<version>3.2.1</version>
<relativePath />
</parent>
<groupId>com.example</groupId>
<artifactId>SecureColumnEncryptionDemo</artifactId>
<version>0.0.1-SNAPSHOT</version>
<name>SecureColumnEncryptionDemo</name>
<description>RESTful API for Secure Column Encryption Demo</description>
<properties>
<java.version>17</java.version>
</properties>
<dependencies>
<dependency>
<groupId>org.springframework.boot</groupId>
<artifactId>spring-boot-starter-data-jpa</artifactId>
</dependency>
<dependency>
<groupId>org.springframework.boot</groupId>
<artifactId>spring-boot-starter-web</artifactId>
</dependency>
<dependency>
<groupId>com.h2database</groupId>
<artifactId>h2</artifactId>
<scope>runtime</scope>
</dependency>
<dependency>
<groupId>org.projectlombok</groupId>
<artifactId>lombok</artifactId>
<optional>true</optional>
</dependency>
<dependency>
<groupId>org.jasypt</groupId>
<artifactId>jasypt</artifactId>
<version>1.9.3</version>
</dependency>
<dependency>
<groupId>org.springframework.boot</groupId>
<artifactId>spring-boot-starter-test</artifactId>
<scope>test</scope>
</dependency>
</dependencies>
<build>
<plugins>
<plugin>
<groupId>org.springframework.boot</groupId>
<artifactId>spring-boot-maven-plugin</artifactId>
<configuration>
<excludes>
<exclude>
<groupId>org.projectlombok</groupId>
<artifactId>lombok</artifactId>
</exclude>
</excludes>
</configuration>
</plugin>
</plugins>
</build>
</project>
|
Step 2: Import the Project into your IDE
Unzip the downloaded archive and import the project into your preferred Integrated Development Environment (IDE) like Spring tool suite (STS), IntelliJ IDEA, Eclipse, or Visual Studio Code.
Step 3: Configure Jasypt in Application Properties
Open src/main/resources/application.properties (or application.yml) and configure the Jasypt properties:
# DataSource settings
spring.datasource.url=jdbc:h2:mem:testdb
spring.datasource.driverClassName=org.h2.Driver
spring.datasource.username=sa
spring.datasource.password=password
spring.jpa.database-platform=org.hibernate.dialect.H2Dialect

# H2 Console settings
spring.h2.console.enabled=true
spring.h2.console.path=/h2-console

# Hibernate settings
spring.jpa.hibernate.ddl-auto=update
spring.jpa.show-sql=true
spring.jpa.properties.hibernate.format_sql=true

# Server port
server.port=8080

# Jasypt Configuration
jasypt.encryptor.algorithm=PBEWithMD5AndDES
jasypt.encryptor.password=mySecretKeys
Replace mySecretEncryptionKey with your actual encryption password.
Step 4: Create an Entity whose column data needs to be encrypted
Let us create an Entity named ‘Geeks’ and add encryption on its fields
Java
package com.example.securecolumnencryptiondemo.entity;
import java.time.LocalDateTime;
import java.util.UUID;
import com.example.securecolumnencryptiondemo.convertor.StringCryptoConverter;
import jakarta.persistence.Column;
import jakarta.persistence.Convert;
import jakarta.persistence.Entity;
import jakarta.persistence.GeneratedValue;
import jakarta.persistence.GenerationType;
import jakarta.persistence.Id;
import jakarta.persistence.PrePersist;
import jakarta.persistence.PreUpdate;
import lombok.AllArgsConstructor;
import lombok.Data;
import lombok.NoArgsConstructor;
@Entity
@Data
@NoArgsConstructor
@AllArgsConstructor
public class Geek {
@Id
@GeneratedValue(strategy = GenerationType.UUID)
private UUID id;
@Column
private String firstName;
@Column
private String lastName;
@Convert(converter = StringCryptoConverter.class)
private String mobileNumber;
@Convert(converter = StringCryptoConverter.class)
private String emailId;
@Column(name = "create_date_time", updatable = false)
private LocalDateTime createDateTime;
@Column(name = "updated_date_time")
private LocalDateTime updatedDateTime;
@PrePersist
protected void onCreate() {
createDateTime = LocalDateTime.now();
updatedDateTime = LocalDateTime.now();
}
/**
* This method is annotated with @PreUpdate and is called before an entity is updated in
* the database. It updates the updatedDateTime to the current timestamp.
*/
@PreUpdate
protected void onUpdate() {
updatedDateTime = LocalDateTime.now();
}
}
|
Step 5: Create the StringCryptoConverter
StringCryptoConverter class responsible for encrypting and decrypting string attributes. Below is the class StringCryptoConverter.
Java
package com.example.securecolumnencryptiondemo.convertor;
import org.jasypt.encryption.pbe.StandardPBEStringEncryptor;
import org.springframework.core.env.Environment;
import jakarta.persistence.AttributeConverter;
import jakarta.persistence.Converter;
/**
* JPA Attribute Converter for encrypting and decrypting String attributes. This
* converter uses the Jasypt library for encryption and decryption operations.
* It is configured with an environment variable for the encryption password.
*
* Note: Ensure that the Jasypt library is correctly configured in your project.
* The encryption password should be provided through the
* "jasypt.encryptor.password" property.
*
* @author rahul.chauhan
*/
@Converter
public class StringCryptoConverter implements AttributeConverter<String, String> {
private static final String ENCRYPTION_PASSWORD_PROPERTY = "jasypt.encryptor.password";
private final StandardPBEStringEncryptor encryptor;
/**
* Constructor for StringCryptoConverter.
*
* @param environment The Spring Environment used to access properties.
*/
public StringCryptoConverter(Environment environment) {
this.encryptor = new StandardPBEStringEncryptor();
this.encryptor.setPassword(environment.getProperty(ENCRYPTION_PASSWORD_PROPERTY));
}
/**
* Converts the attribute value to the encrypted form.
*
* @param attribute The original attribute value to be encrypted.
* @return The encrypted form of the attribute.
*/
@Override
public String convertToDatabaseColumn(String attribute) {
return encryptor.encrypt(attribute);
}
/**
* Converts the encrypted database value to its decrypted form.
*
* @param dbData The encrypted value stored in the database.
* @return The decrypted form of the database value.
*/
@Override
public String convertToEntityAttribute(String dbData) {
return encryptor.decrypt(dbData);
}
}
|
Step 6: Create the GeekRepository
Generate the GeekRepository interface, extending JpaRepository<Geek, UUID>, to provide basic CRUD operations for the Geek entity. This interface is automatically implemented by Spring Data JPA.
Java
package com.example.securecolumnencryptiondemo.repository;
import com.example.securecolumnencryptiondemo.entity.Geek;
import org.springframework.data.jpa.repository.JpaRepository;
import java.util.UUID;
public interface GeekRepository extends JpaRepository<Geek, UUID> {
}
|
Step 7: Create the GeekService Interface
Define the GeekService interface, declaring methods for creating and retrieving Geek entities.
Java
package com.example.securecolumnencryptiondemo.service;
import java.util.UUID;
import com.example.securecolumnencryptiondemo.entity.Geek;
public interface GeekService {
Geek createGeek(Geek geek);
Geek getGeek(UUID id);
}
|
Step 8: Implement the GeekServiceImpl
Develop the GeekServiceImpl class, which implements the GeekService interface. This class uses the GeekRepository for persisting and retrieving Geek entities.
Java
package com.example.securecolumnencryptiondemo.service.impl;
import java.util.UUID;
import org.springframework.stereotype.Service;
import com.example.securecolumnencryptiondemo.entity.Geek;
import com.example.securecolumnencryptiondemo.repository.GeekRepository;
import com.example.securecolumnencryptiondemo.service.GeekService;
@Service
public class GeekServiceImpl implements GeekService {
private final GeekRepository geekRepository;
public GeekServiceImpl(GeekRepository geekRepository) {
this.geekRepository = geekRepository;
}
@Override
public Geek createGeek(Geek geek) {
return geekRepository.save(geek);
}
@Override
public Geek getGeek(UUID id) {
return geekRepository.findById(id).orElse(null);
}
}
|
Step 9: Create the GeekController
Build the GeekController class, which serves as the REST API endpoint for creating and retrieving Geek entities. Use the GeekService to handle the business logic.
Java
package com.example.securecolumnencryptiondemo.controller;
import java.util.UUID;
import org.springframework.web.bind.annotation.GetMapping;
import org.springframework.web.bind.annotation.PathVariable;
import org.springframework.web.bind.annotation.PostMapping;
import org.springframework.web.bind.annotation.RequestBody;
import org.springframework.web.bind.annotation.RequestMapping;
import org.springframework.web.bind.annotation.RestController;
import com.example.securecolumnencryptiondemo.entity.Geek;
import com.example.securecolumnencryptiondemo.service.GeekService;
@RestController
@RequestMapping("/api/geeks")
public class GeekController {
private final GeekService geekService;
public GeekController(GeekService geekService) {
this.geekService = geekService;
}
@PostMapping
public Geek createGeek(@RequestBody Geek geek) {
return geekService.createGeek(geek);
}
@GetMapping("/{id}")
public Geek getGeek(@PathVariable UUID id) {
return geekService.getGeek(id);
}
}
|
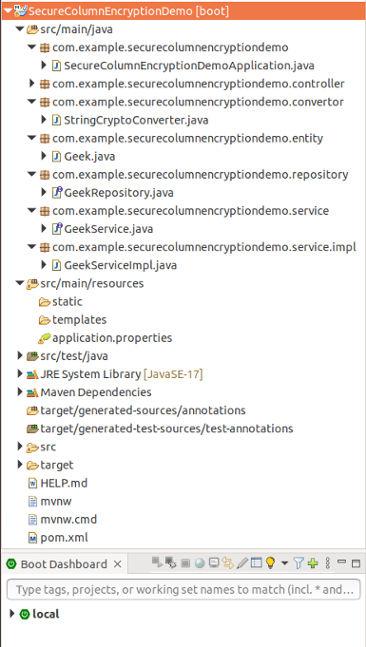
Spring Boot Application Project Directory:
Step 10: Test Your Application
Write unit and integration tests to verify that data is encrypted when stored in the database and decrypted when retrieved. Ensure that all components of your application work as expected.
Step 11: Run Your Application
Start your Spring Boot application and test the functionality by making HTTP requests to the defined API endpoints. Verify that the data is encrypted and decrypted appropriately.
Testing The Spring Boot application
- Step 1: Start Your Spring Boot Application : Ensure that your Spring Boot application is running.
- Step 2: Open Postman : Open Postman on your machine.
- Step 3: Create a New Request : Click on the “New” button in Postman to create a new request.
- Step 4: Set Request Details
Request Type: Choose the appropriate HTTP method (e.g., POST for creating a new entity).
Request URL: Use the URL of your Spring Boot application endpoint (e.g., http://localhost:8080/api/geeks).
Headers: If required, set any headers needed for your request.
Body: In the request body, provide JSON data for creating a new Geek entity with sensitive information. For example:
{
    "firstName": "Virat",
    "lastName": "Chauhan",
    "mobileNumber": "8755757578",
    "emailId": "virat.chauhan@gmail.com"
}
- Step 5: Send the Request : Click the “Send” button to send the request to your Spring Boot application.
- Step 6: Verify Encryption :Check the response from the server to ensure that the entity is created successfully.
Verify that the sensitive fields (mobileNumber and emailId) are not returned in their original form. They should be encrypted. Find below attached image of database where geek entity is saved
 As it is visible form attached image that EMAIL_ID and MOBILE_NUMBER are being encrypted.
- Step 7: Retrieve and Verify Decryption
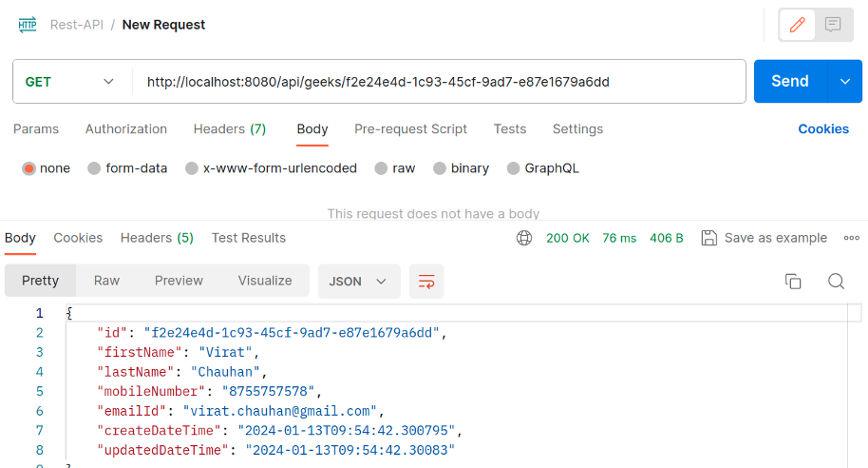
Create a new request to retrieve the entity you just created (e.g., use a GET request to http://localhost:8080/api/geeks/{id}, replacing {id} with the actual ID). Check the response to verify that the retrieved entity’s sensitive fields are decrypted correctly.consider below image.
Key Points for Column-Level Encryption in Spring Boot
- Identify Sensitive Data:Clearly pinpoint the data fields containing sensitive information.
- Compliance Check:Ensure compliance with industry or legal standards for data security.
- Choose Strong Encryption:Select a robust encryption method, such as AES.
- Secure Key Handling:Implement secure key management, restricting access and rotating keys regularly.
- Configure Jasypt:Set up Jasypt with the right settings and protect your encryption password.
- Selective Encryption:Use JPA annotations to selectively encrypt specific fields.
- Custom Converters:Implement custom converters (e.g., StringCryptoConverter) for targeted encryption.
- Thorough Testing:Develop comprehensive tests to ensure encryption and decryption work correctly in various scenarios.
Share your thoughts in the comments
Please Login to comment...