Add Build Properties to a Spring Boot Application
Last Updated :
23 Apr, 2024
Spring Boot framework is an open-source framework for developing web applications with high performance and the Spring Boot makes it much easier to develop Spring-based applications developed by Java programming
In this article, we will learn how to add build properties to a Spring Boot Application. For this, we first need to create a build.properties file in the src/main/resources directory of our project folder. Next, we open it and define our custom build properties in the build.properties file. The application.properties file is used to define the configuration of the application, such as data connections, gateway access, and other configuration information.
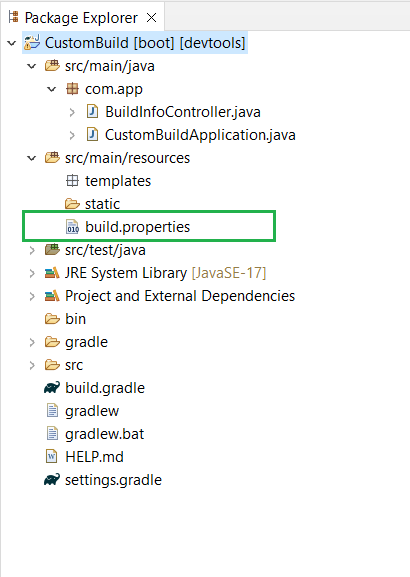
Project Folder Structure:
After creating the Spring Boot project using Spring Initializr, below we can see the project structure, where the build.properties file is highlighted.
Steps to Add Build Properties to a Spring Boot Application
Below are the steps to add build properties to a Spring Boot Application.
Step 1:
First, we will create a basic Spring Boot starter project using Spring Initializr and include the required dependencies for adding Build Properties to a Spring Boot Application.
Below are the required dependencies:
dependencies {
    implementation 'org.springframework.boot:spring-boot-starter-web'
    compileOnly 'org.projectlombok:lombok'
    developmentOnly 'org.springframework.boot:spring-boot-devtools'
    annotationProcessor 'org.projectlombok:lombok'
    testImplementation 'org.springframework.boot:spring-boot-starter-test'
}
main class method:
Java
package com.app;

import org.springframework.boot.SpringApplication;
import org.springframework.boot.autoconfigure.SpringBootApplication;

@SpringBootApplication
public class CustomBuildApplication {

    public static void main(String[] args) {
        SpringApplication.run(CustomBuildApplication.class, args);
    }

}
Step 2:
After that, we created a properties file named build.properties in the resource folder. In the build.properties file, we defined the required configuration. Below, we provide the contents of that file for your understanding. In the file, we defined the build version and timestamp.
spring.application.name=CustomBuild
build.version=1.0.0
build.timestamp=2024-04-08T12:00:00
Step 3:
After that, we modified some changes in the build.gradle file because we need to inform Spring that we created a custom properties file with custom configuration. The changes are mentioned below.
plugins {
    id 'java'
    id 'org.springframework.boot' version '3.2.4'
    id 'io.spring.dependency-management' version '1.1.4'
}

group = 'com.app'
version = '0.0.1-SNAPSHOT'

java {
    sourceCompatibility = '17'
}

configurations {
    compileOnly {
        extendsFrom annotationProcessor
    }
}

repositories {
    mavenCentral()
}

dependencies {
    implementation 'org.springframework.boot:spring-boot-starter-web'
    compileOnly 'org.projectlombok:lombok'
    developmentOnly 'org.springframework.boot:spring-boot-devtools'
    annotationProcessor 'org.projectlombok:lombok'
    testImplementation 'org.springframework.boot:spring-boot-starter-test'
}

tasks.named('test') {
    useJUnitPlatform()
}

processResources {
    inputs.property('buildProperties', file('src/main/resources/build.properties'))
    filesMatching('build.properties') {
        expand(project.properties)
    }
}

bootJar {
    dependsOn(processResources)
    from('src/main/resources')
}
Custom build properties:
Add some additional build properties in the build.gradle file. Below we have mentioned them.
processResources {
    inputs.property('buildProperties', file('src/main/resources/build.properties'))
    filesMatching('build.properties') {
        expand(project.properties)
    }
}

bootJar {
    dependsOn(processResources)
    from('src/main/resources')
}
Step 4:
- Now, we created a Java class in the project’s main package named BuildInfoController.
- This class is used for creating API endpoints and serves as a Controller class using the @RestController annotation.
- In this class, we declare two string values: version and timestamp.
- We then create a constructor where we call the loadProperties() method.
- This method is used for fetching property values from the build.properties file using Resource, ClassPathResource, and Properties interfaces.
- We create one API endpoint using a GET Mapping named build-info. In this API method, we print the build version and timestamp as the result.
http://localhost:8080/build-info
Java
package com.app;

import org.springframework.core.io.ClassPathResource;
import org.springframework.core.io.Resource;
import org.springframework.core.io.support.PropertiesLoaderUtils;
import org.springframework.web.bind.annotation.GetMapping;
import org.springframework.web.bind.annotation.RestController;

import java.io.IOException;
import java.util.Properties;

@RestController
public class BuildInfoController {

    private String buildVersion;
    private String buildTimestamp;

    // Constructor to load properties when the controller is initialized
    public BuildInfoController() {
        loadProperties();
    }

    // Method to load build properties from a file
    private void loadProperties() {
        try {
            Resource resource = new ClassPathResource("build.properties");
            Properties properties = PropertiesLoaderUtils.loadProperties(resource);
            buildVersion = properties.getProperty("build.version");
            buildTimestamp = properties.getProperty("build.timestamp");
        } catch (IOException e) {
            e.printStackTrace();
        }
    }

    // Endpoint to retrieve build information
    @GetMapping("/build-info")
    public String getBuildInfo() {
        return "Version: " + buildVersion + ", Build Time: " + buildTimestamp;
    }
}
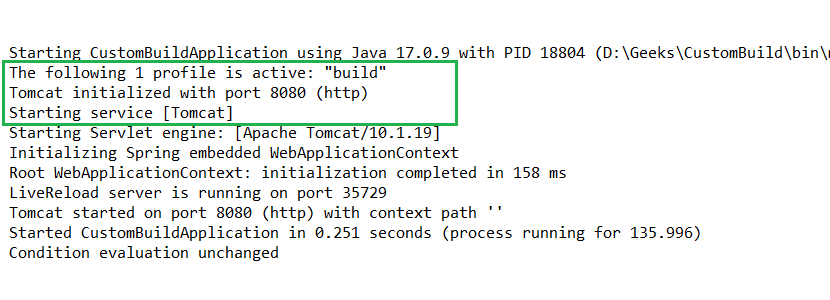
Step 5:
Once the entire logic is developed, we run this project as a Spring Boot App using the Apache Tomcat Server on port number 8080. Additionally, we run this project based on the build profile.
Step 6:
After running this project, we open the browser and hit the API, and we get the expected result. Below, we provide the result in the form of an image.

Share your thoughts in the comments
Please Login to comment...