AWS S3 (Simple Storage Service) is a cloud data storage service. It is one of the most popular services of AWS. It has high scalability, availability, security and is cost effective. S3 has different storage tiers depending on the use case. Some common use cases of AWS S3 are:
- Storage: It can be used for storing large amounts of data.
- Backup and Archive: S3 has different storage tiers based on how frequent the data is accessed which can be used to backup critical data at low costs.
- Static website: S3 offers static website hosting through HTML files stored in S3.
- Data lakes and big data analytics: Companies can use AWS S3 as a data lake and then run analytics on it for getting business insights and take critical decisions.
AWS Lambda
AWS Lambda is a serverless, event-driven compute service that lets you run code for virtually any type of application or backend service without provisioning or managing servers. Lambda functions run on demand i.e. they execute only when needed and you pay only for what you compute. Lambda is well integrated with may other AWS services. It supports a wide variety of programming languages.
Some common use cases for AWS Lambda are:
- File processing: You can use Lambda for processing files as they are uploaded in an S3 bucket or whenever some event triggers the function.
- Data and analytics: You can pass a data stream to your Lambda function and then create analysis from that.
- Website: Lambda can also be used for creating websites. This is cost effective because you are charged only for the time when the servers are running.
In this article, we will be using AWS Lambda for processing images.
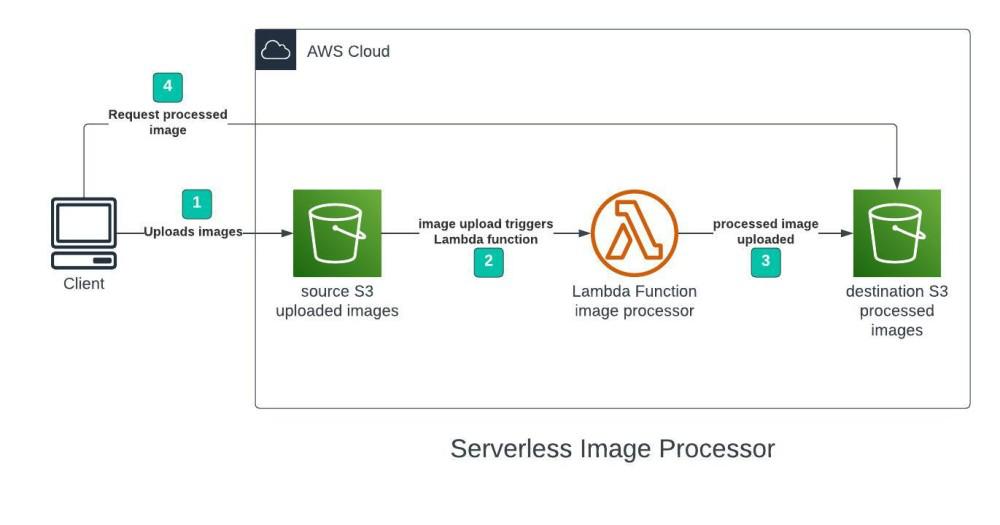
Serverless Image Processing Flow
- User uploads a file to the source S3 bucket (which is used for storing uploaded images).
- When the image is uploaded to a source S3 bucket, it triggers an event which invokes the Lambda function. The lambda function processes the image.
- Processed image is stored in the destination S3 bucket.
- The processed image is requested by the user.
Step 1 – Creating S3 buckets
We will use two S3 buckets:
- source Bucket: For storing uploaded images.
- destination Bucket: For storing processed images.
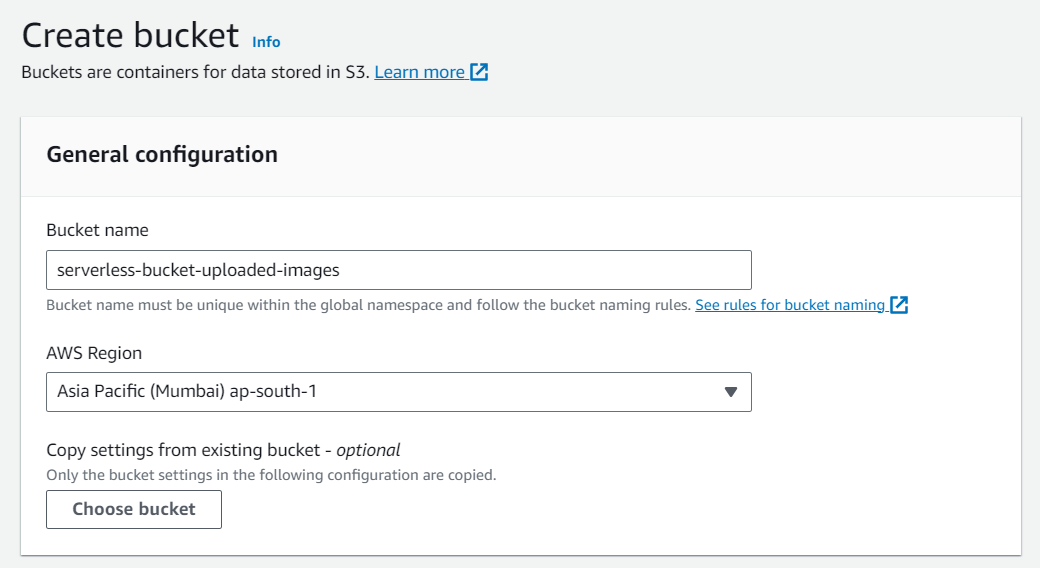
Go to S3 console and click Create bucket. Enter bucket name as ‘serverless-bucket-uploaded-images’. Choose any AWS region as ‘ap-south-1’.
Step 2 – Configuring S3 bucket policy
In ‘Block Public Access settings for this bucket’ section disable “block all public access”. You will get a warning that the bucket and its objects might become public. Agree to the warning. (Note: we are making this bucket public only for this project, it is not recommended to make an S3 bucket public if not needed).

Leave all other settings as default and create bucket. Similarly, create another bucket named ‘serverless-bucket-processed-images’ with the same region. This bucket will be used to store the processed images. Although we enabled public access while creating the buckets, we still need to attach a bucket policy to access the objects stored in it. (Policies in AWS are JSON documents which defines the permissions for performing actions on a certain resource.)
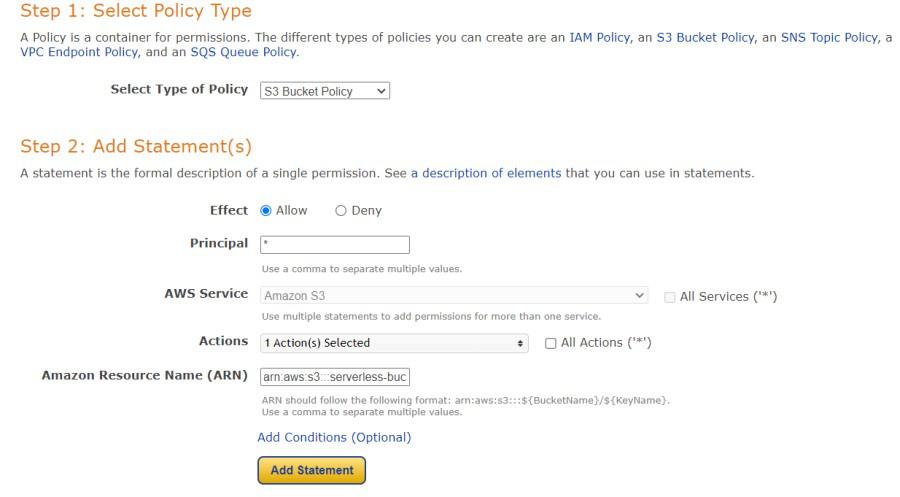
Go to your source bucket and then click on Permissions tab. Scroll to Bucket Policy tab. Click Edit. You will be redirected to the policy editor. Click on policy generator.
Enter the following settings:
- Type of policy: S3 Bucket Policy
- Effect:Allow
- Principal: *
- Actions: GetObject
- Amazon Resource Name (ARN): arn:aws:s3:::SOURCE_BUCKET_NAME/*
SOURCE_BUCKET_NAME is the name of the bucket used for uploading the images.
Policy generator page
Click Add Statement and then generate policy. Copy the JSON object.
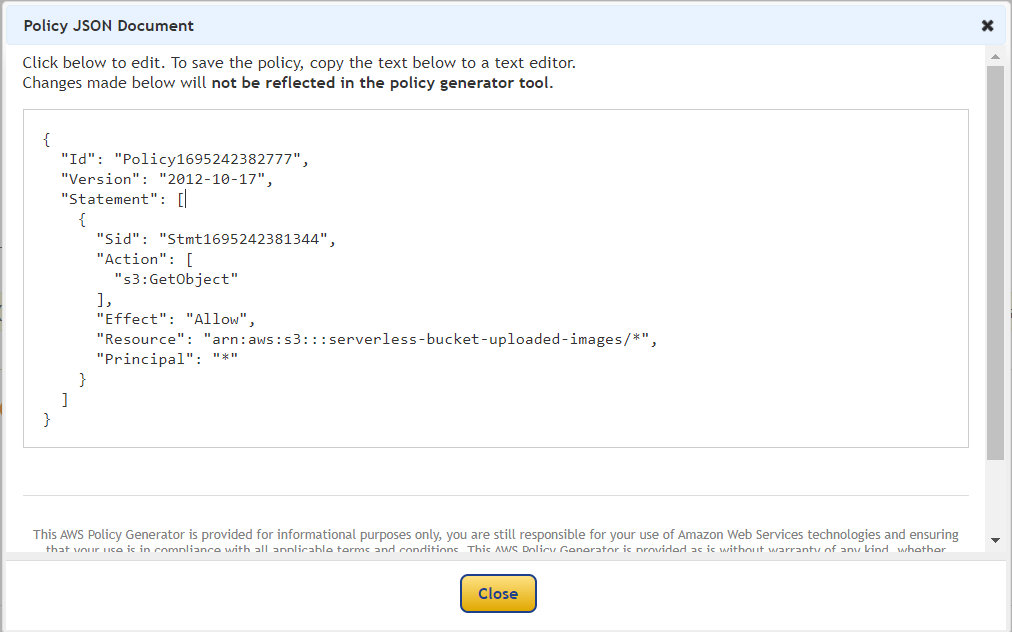
Paste it in the policy editor and then save changes.
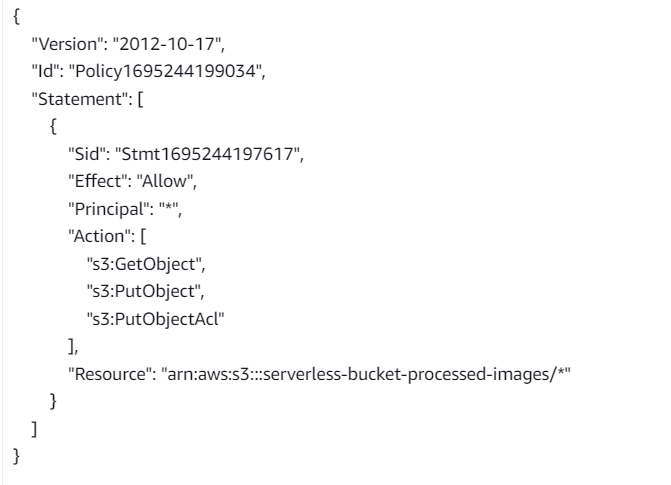
Follow same steps to attach a policy to the processed images S3 bucket. The policy settings for destination bucket are:
- Type of policy: S3 Bucket Policy
- Effect:Allow
- Principal: *
- Actions: GetObject, PutObject, and PutObjectAcl
- Amazon Resource Name (ARN): arn:aws:s3:::DESTINATION_BUCKET_NAME/*
DESTINATION_BUCKET_NAME is the name of the bucket used for storing processed images.
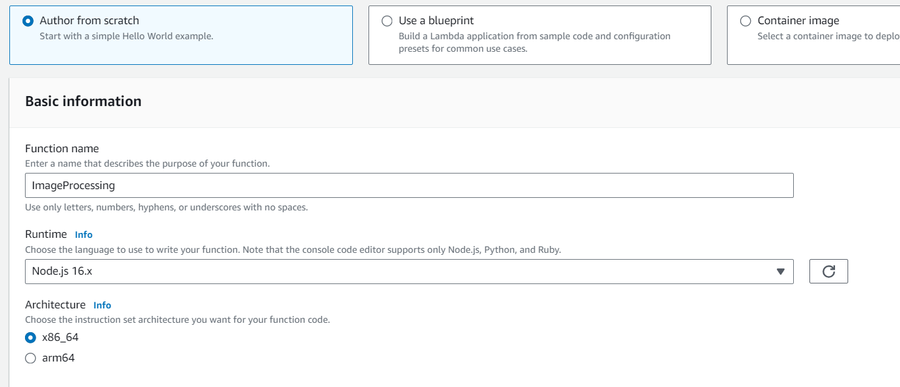
Step 3 – Creating Lambda function
Go to AWS Lambda console. Navigate to Functions section. Click Create Function and name it “ImageProcessing”. Select runtime as “NodeJS 16.x” and architecture as “x86_64”. Leave all other settings as default. Create the function.
In the code editor on the Lambda function page paste the following code. This function is executed whenenver an image is uploaded to our source S3 bucket and creates two images (thumbnail (300×300) and coverphoto(800×800)) and stores it in the destination S3 bucket. (Note: The value of processedImageBucket in the code should be set to the name of the destination bucket).
Javascript
const sharp = require("sharp");
const path = require("path");
const AWS = require("aws-sdk");
AWS.config.update({
region: "ap-south-1",
});
const s3 = new AWS.S3();
const processedImageBucket = "serverless-bucket-processed-images";
exports.handler = async (event, context, callback) => {
console.log("An object was added to S3 bucket", JSON.stringify(event));
let records = event.Records;
let size = records.length;
for (let index = 0; index < size; index++) {
let record = records[index];
console.log("Record: ", record);
let fileName = path.parse(record.s3.object.key).name;
let filePath = path.parse(record.s3.object.key).dir;
let fileExt = path.parse(record.s3.object.key).ext;
console.log("filePath:" + filePath + ", fileName:" + fileName + ", fileExt:" + fileExt);
let imageObjectParam = {
Bucket: record.s3.bucket.name,
Key: record.s3.object.key,
};
let imageObject = await s3.getObject(imageObjectParam).promise();
let resized_thumbnail = await sharp(imageObject.Body)
.resize({
width: 300,
height: 300,
fit: sharp.fit.cover,
})
.withMetadata()
.toBuffer();
console.log("thumbnail image created");
let resized_coverphoto = await sharp(imageObject.Body)
.resize({
width: 800,
height: 800,
fit: sharp.fit.cover,
})
.withMetadata()
.toBuffer();
console.log("coverphoto image created");
let thumbnailImageParam = {
Body: resized_thumbnail,
Bucket: processedImageBucket,
Key: fileName + "_thumbnail" + fileExt,
CacheControl: "max-age=3600",
ContentType: "image/" + fileExt.substring(1),
};
let result1 = await s3.putObject(thumbnailImageParam).promise();
console.log("thumbnail image uploaded:" + JSON.stringify(result1));
let coverphotoImageParam = {
Body: resized_coverphoto,
Bucket: processedImageBucket,
Key: fileName + "_coverphoto" + fileExt,
CacheControl: "max-age=3600",
ContentType: "image/" + fileExt.substring(1),
};
let result2 = await s3.putObject(coverphotoImageParam).promise();
console.log("coverphoto image uploaded:" + JSON.stringify(result2));
}
};
|
Save the code and click Deploy to deploy the changes.
Go to Configuration tab and Edit the general configuration. There set the timeout to 1 min (timeout is the maximum time for which a Lambda function will run after which it stops running). We need to increase the timeout because the image can take time to process. Click on Save changes.

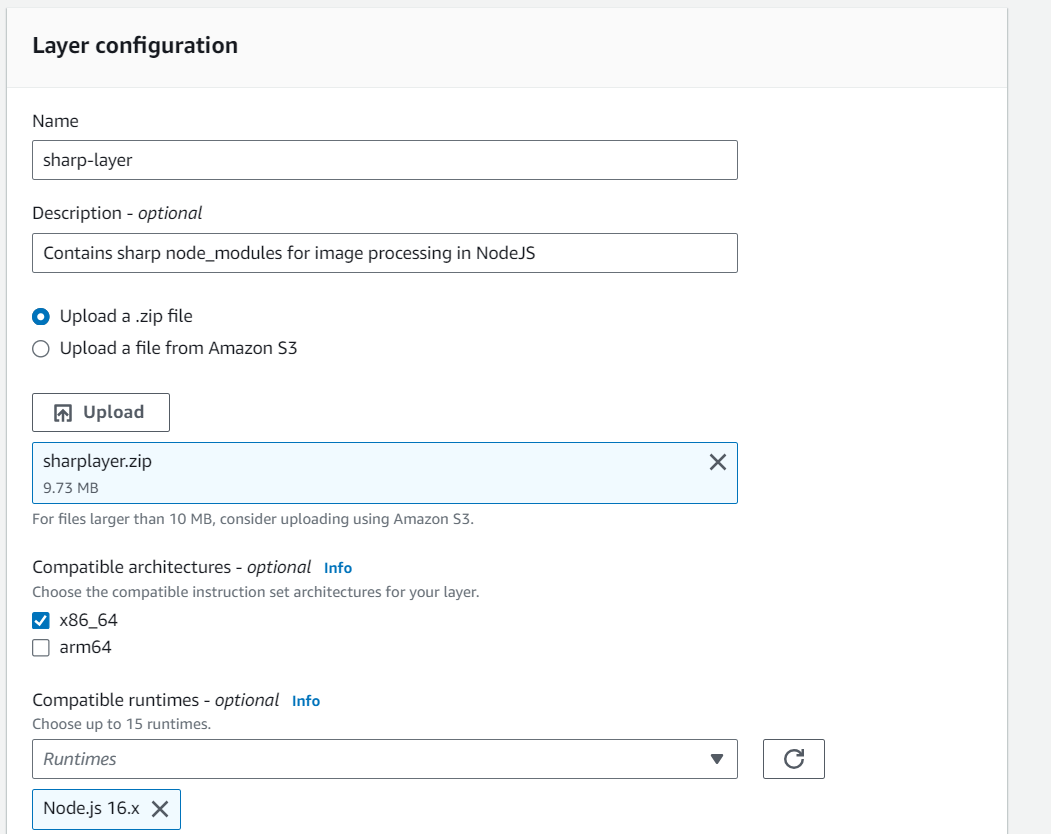
Step 4 – Creating Lambda layer and attaching it to Lambda function
Layers in Lambda is used to add dependencies to a Lambda Function. Lambda Layers reduces the code size of Lambda functions as we do not need to upload the dependencies with the function. It also useful for code reusability as we can reuse the layer with multiple functions if they require the same dependencies.
First we need to create a zip file with all the dependencies (node modules in our case) required by our Lambda function.
Create a folder “aws-serverless-image-processor”. Inside this directory create another directory “nodejs” (it is compulsory to name this as “nodejs”). Open a terminal an go to nodejs directory. Install sharp module with the following command (platform is linux because the Lambda function runs on a Linux machine so we require the node_modules for Linux).
npm install --arch=x64 --platform=linux sharp
Now create a zip file of the nodejs directory and name it “sharplayer.zip”.
Go to Layers in Lambda console. Click Create layer. Name it “sharp-layer”. Upload your nodejs “sharplayer.zip” file here. Select x86_64 architecture. Select NodeJS 16.x in compatible runtimes. Click on Create Layer.
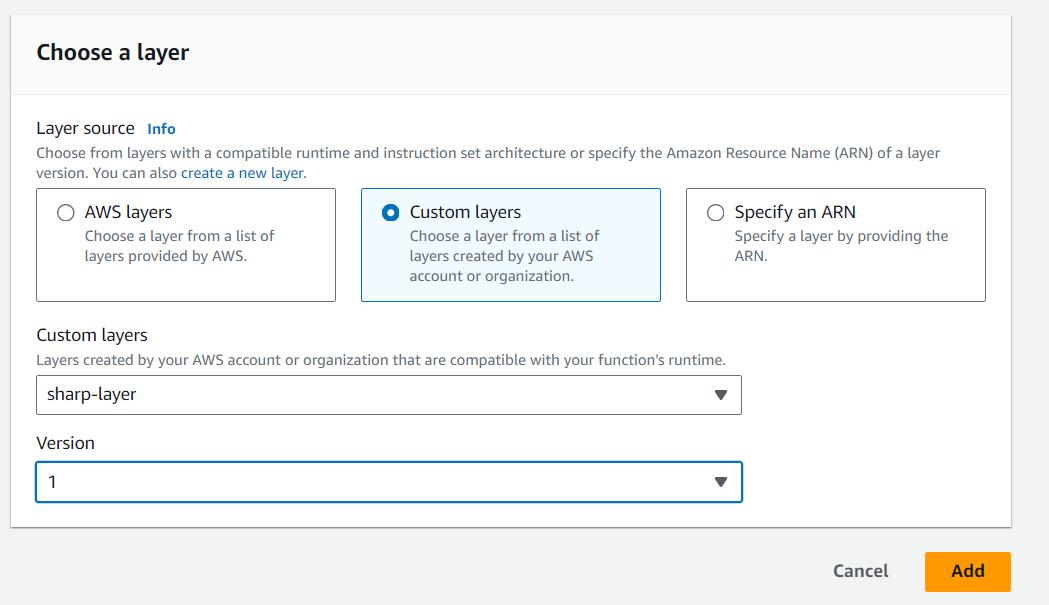
 Now go to your lambda function page. In Layers section click on Add layer button. Select Custom Layer. Choose “sharp-layer”. Select version 1
Step 5 – Creating S3 trigger
Now we need our Lambda function to know when an image is uploaded to the source bucket. We can do this by adding an event to the source S3 bucket and configure it to get triggered when an image is uploaded to the bucket which in turn invokes the Lambda function.
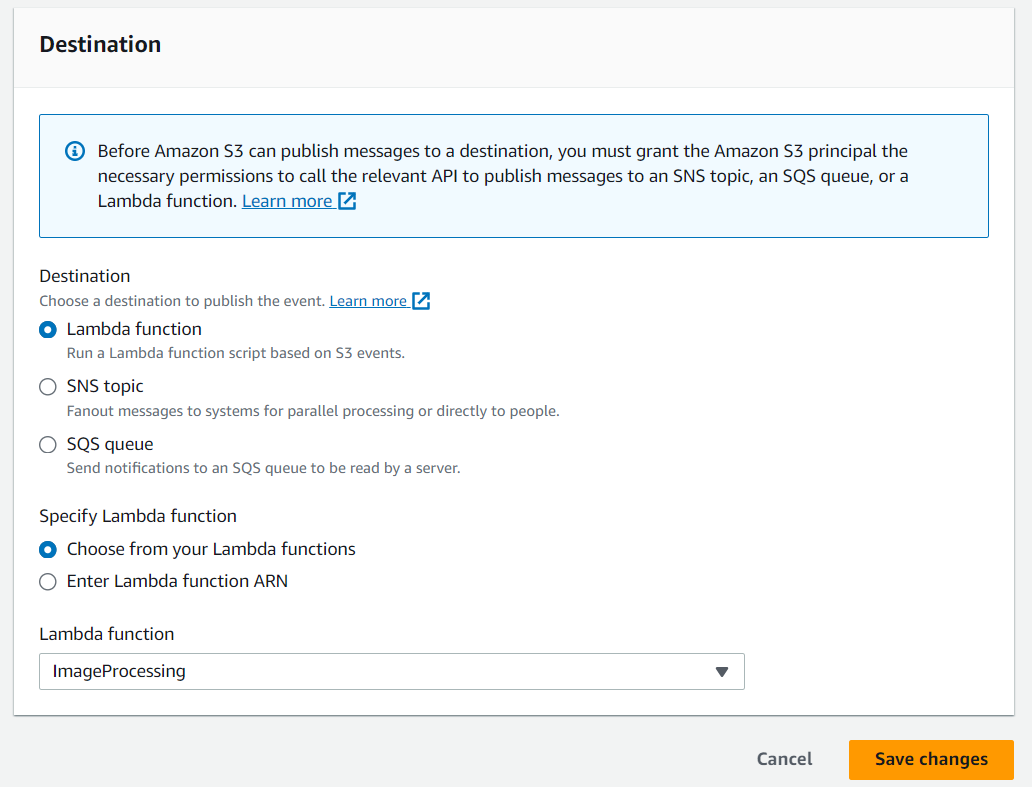
Go to S3 console. Select the source bucket (“serverless-bucket-uploaded-images”). Go to the Properties tab. Navigate to “Event Notifications”. Click “Create Event Notifications”.
Give an appropriate name to the event. Check the “All object create events”.
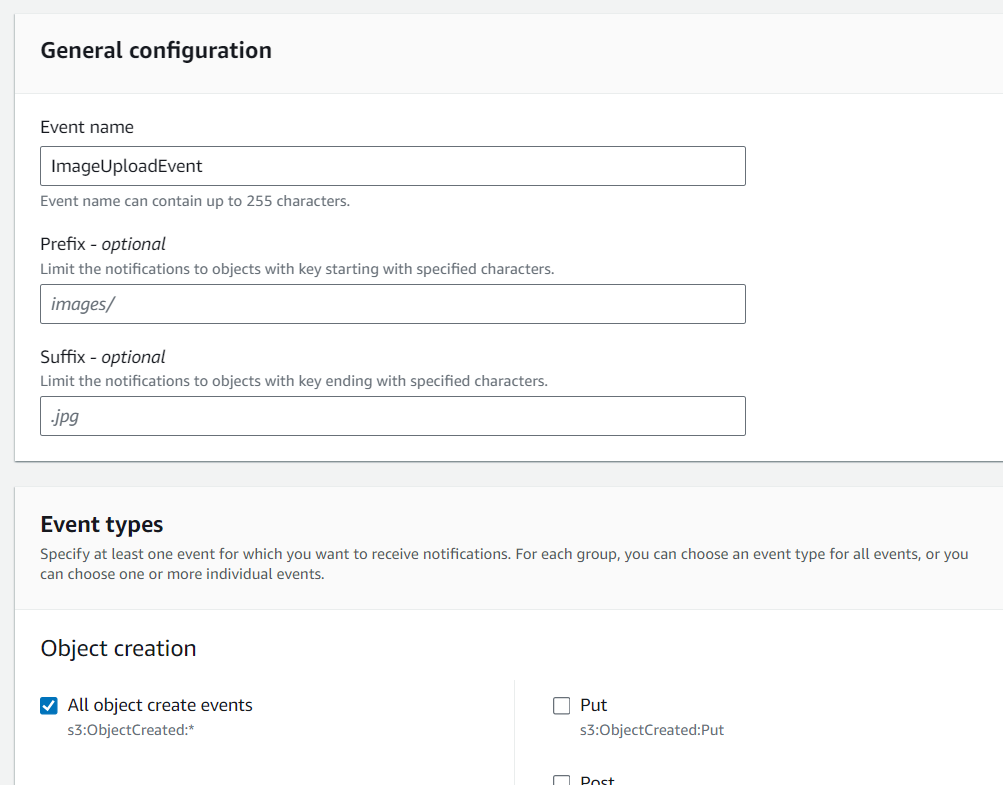
Navigate to the “Destination” and select your lambda function. Save changes.
Step 6 – Testing the application
Upload an image file to source S3 bucket (“serverless-bucket-uploaded-images”). Wait for few seconds and check the destination bucket (“serverless-bucket-processed-images”). There you will see two images (thumbnail and coverphoto).
Congratulations, you just built a serverless Image processing application.
Why Two Different Buckets?
We created two different buckets for this application because whenever the lambda function uploads the processed images to the source bucket it will create 2 triggers and the function will process the processed images once again which in creates 4 triggers. This creates an infinite loop and generated many images, so we created two buckets to prevent an infinite loop.
FAQ’s On Serverless Image Processing with AWS Lambda and S3
1. Why Two Different S3 Buckets Are Used For Uploaded And Processed Images?
Whenever the lambda function uploads the processed images to the source bucket it will create 2 triggers and the function will process the 2 images once again which then creates 4 triggers. This creates an infinite loop and generates many images, so we created two buckets to prevent an infinite loop.
2. How To See The Logs Of My Lambda Function ?
Go to CloudWatch > Log groups > ImageProcessing . There you will see multiple log streams with their corresponding time stamps. Click on any of them to see the logs.
3. Why Is The Processed Image Not Uploaded Into My S3 Bucket ?
Make sure you followed the tutorial properly. There can be several reasons for the processed image not being uploaded to the S3 bucket.
- Check the source code of you lambda function. The value of processedImageBucket variable should be the name of your destination S3 bucket where the processed images are to be stored. No type should be there.
- Make sure the bucket policy is configured correctly and it has all the permissions required for the S3 bucket.
- Check the timeout of your Lambda function in the Configuration tab. It should be around 30 s to 1 min. If the timeout is low then your Lambda function will be terminated before it can upload the processed image to the bucket.
- Make sure that the S3 trigger is set properly and the Lambda function is added to it. Check Step 5 once again.
4. Why Use Lambda Function Instead Of EC2 ?
EC2 instance is continuosly running and charged for the whole time. Lambda function runs only when it is requested. (when an image is uploaded) and it is charged only for the time it is runs. So depending on the use case Lambda function can be more cost effective than EC2.
5. Why Lambda Layer Is Used Instead Of Installing The Dependencies In The Code Itself?
You can include the dependencies in the code itself instead of creating a Lambda layer for it but doing so will increase the size of your code. Using Lambda layers you can create a separate layer for your dependencies and then reuse it in another Lambda function which requires same dependencies which reduces the code size and complexity as you do not have to include the dependencies in all functions. Instead you can just attach the layer to the Lambda functions in which it is required.
Share your thoughts in the comments
Please Login to comment...