Semantic UI Integrations for React
Last Updated :
24 Mar, 2022
Semantic UI is an open-source framework that uses CSS and jQuery to build great user interfaces. It is the same as a Bootstrap for use and has great different elements to use to make your website look more amazing. React is a UI library. It renders components written in JavaScript. You can build and render any components as per your usage.
Approach: Semantic UI has a bunch of components for user interface design. Let us create a React project and then we will create a UI that renders a Semantic UI component.
Creating React Project:
Step 1: To create a react app you need to install react modules through npx command. “Npx” is used instead of “npm” because you will be needing this command in your app’s lifecycle only once.
npx create-react-app project_name
Step 2: After creating your react project move into the folder to perform different operations.
cd project_name
Project Structure: After running the commands mentioned in the above steps, if you open the project in an editor you can see a similar project structure as shown below. The new component’s user makes or the code changes we will be performing will be done in the source folder.

Project_Structure
Step 3: Install Semantic UI components.
npm install semantic-ui-react semantic-ui-css
Step 4: Add this to the index.js file.
import 'semantic-ui-css/semantic.min.css'
Example 1: We will create a button that sends a Welcome message i.e. Alert whenever you click the button.
App.js
HTML
import React from "react";
import {Button,Icon} from 'semantic-ui-react'
class App extends React.Component {
call() {
alert("Welcome to GFG");
}
render() {
return ( < div style = {{margin: 100}} >
<h2 style = {{color: "green"}}> GeeksforGeeks < /h2>
<b><p> Semantic UI React Integration </p></b>
<hr /> <br />< strong > Alert button: < /strong>
<br /> < br />
<Button onClick = {this.call} className="icon"
labelPosition = 'right' >
Click here!
< Icon name='right bell' />
< /Button>
< /div>
);
}
}
export default App;
|
Step to run the application: Open the terminal and type the following command.
npm start
Output: Open your browser. It will by default open a tab with localhost running (http://localhost:3000/) and you can see the output shown in the image. Click on the button to see the welcome message.
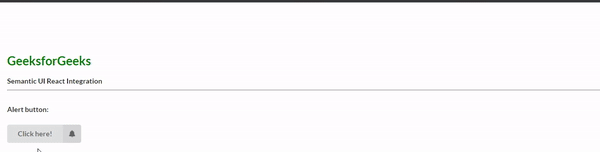
Semantic UI Button in React
Example 2: We will showcase a different types of Semantic UI inputs in React.
App.js
HTML
import React from "react";
import { Input } from 'semantic-ui-react';
class App extends React.Component {
render() {
return (
<div className="ui container"
style={{ textAlign:"center" }}>
<br /><br />
<h2 className="ui header green">
GeeksforGeeks
</h2>
<b><p>Semantic UI Input Labeled Variation in React</p></b>
<hr /><br />
<Input
label={{ basic: true, content: '$' }}
labelPosition='left'
placeholder='Enter amount...'
/><br /><br />
<Input action='Login' placeholder='Enter your Mail.' />
</div>
);
}
}
export default App;
|
Step to run the application: Open the terminal and type the following command.
npm start
Output: Open your browser. It will by default open a tab with localhost running (http://localhost:3000/) and you can see the different types of Semantic UI inputs as shown in the image.
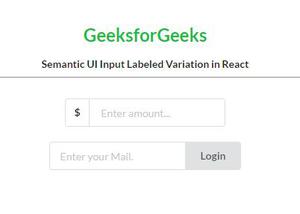
Semantic UI Input in React
Reference: https://react.semantic-ui.com/usage#install
Share your thoughts in the comments
Please Login to comment...