ReactJS Calculator App (Adding Functionality)
Last Updated :
27 Sep, 2023
Now, we had built the structure of our UI, but we haven’t added styles to it either we have added any functionality. So, in this article, we will try to make our Calculator app fully functional. Once our app becomes functional, we will add CSS to style the App.
So, let’s begin. The very first functionality we will add it for the click event of the buttons. To handle the click events, we will create a new function named handleClick and will add this function to our Calculator component class. But, the next thing to observe is that the buttons from “0-9” and operators like “+,-,*,/” will have different roles and other buttons like “=”, “Clear” and “Delete” have different roles. So, what we can do is inside the handleClick function we will use a switch..case statement to perform different operations on clicking different buttons.
We need to create two states for our Calculator application and update these two states according to the user inputs.
- Initially, the question named state will be initialized with an empty string then it will be used to store the user input.
- The answer names state will be initialized with an empty string then it will be used to store the result of the evaluation of user input stored in the state question.
Add the below code at the top of the class Calculator in the file calculator.js. This code will create the required states for us:
javascript
constructor() {
super();
this.state = {
question: '',
answer: ''
}
this.handleClick = this.handleClick.bind(this);
}
|
- Let’s just complete our handleClick function to update these states according to different button clicks. Add the below function to the class Calculator in the calculator.js file:
Javascript
function handleClick(event) {
const value = event.target.value;
switch (value) {
case "=": {
if (this.state.question !== "") {
var ans = "";
try {
ans = eval(this.state.question);
} catch (err) {
this.setState({ answer: "Math Error" });
}
if (ans === undefined) this.setState({ answer: "Math Error" });
else this.setState({ answer: ans, question: "" });
break;
}
}
case "Clear": {
this.setState({ question: "", answer: "" });
break;
}
case "Delete": {
var str = this.state.question;
str = str.substr(0, str.length - 1);
this.setState({ question: str });
break;
}
default: {
this.setState({ question: (this.state.question += value) });
break;
}
}
}
|
- We will add the below line everywhere in our Calculator component from where we are calling our Button Component to pass the handleClick function as props to the Button component:
handleClick = {this.handleClick}
- After adding this, we will go to the button.js file, and add the below attribute to the input field:
onClick = {props.handleClick}
- Let’s update our OutputScreen and OutputScreenRow components to accept props and pass the question and answer states from the Calculator component to the OutputScreen component as props.
Below is our final outputscreen.js file:
javascript
import React from "react";
import OutputScreenRow from "./outputScreenRow.js";
const OutputScreen = (props) => {
return (
<div className="screen">
<OutputScreenRow value={props.question} />
<OutputScreenRow value={props.answer} />
</div>
);
};
export default OutputScreen;
|
Below is our final outputscreenrow.js file:
javascript
import React from "react";
const OutputScreenRow = (props) => {
return (
<div className="screen-row">
<input type="text" readOnly value={props.value} />
</div>
);
};
export default OutputScreenRow;
|
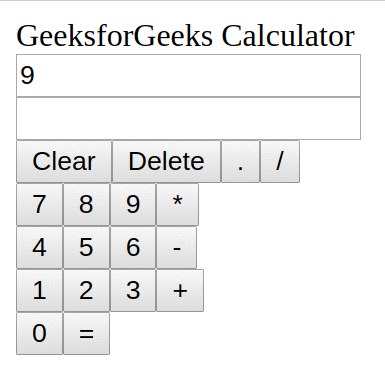
Output: You can see in the below image that our Calculator App is working fine and has the same functionality as what we saw in our first article.
ReactJS Calculator App ( Styling )
Share your thoughts in the comments
Please Login to comment...