React Native SafeAreaView
Last Updated :
28 Feb, 2024
React Native SafeAreaView renders content within the safe area boundaries of a device. The safe area refers to the display excluding the top status bar and front camera notch.
Syntax:
<SafeAreaView style={styles.safeArea}>
    {/*Content to render inside SafeAreaComponent*/}
</SafeAreaView>
Need of React Native SafeAreaView
If you use the normal View component in React Native, you have to take care of this situation by yourself and make sure all the UI components render within the safe boundaries of a device. But the SafeAreaView component takes away that headache from you and makes sure everything works fine on a device. Every component you write in SafeAreaView will render within the safe area boundaries of a device.
All smartphones nowadays come with an edge-to-edge display. But smartphones must have some space left for the front cameras. Therefore all smartphones come with a notch or punch hole on the screen to fit the camera inside. It makes designing an app difficult for the developers because sometimes UI components go under this notch and it disrupts the design.
Difference Between SafeAreaView and NormalAreaView Components
Below you can see the difference between a View component and a SafeAreaView component.
Normal View Component:
As you can see above, when we render a Text component in a View component, it goes out of the screen. It is because the smartphone notch, disrupts the whole design.
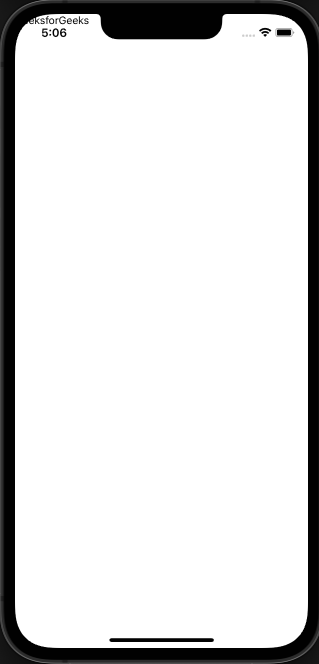
Normal View Component
SafeAreaView Component:
As you can clearly see the difference, when we render a Text component in a SafeAreView component, it makes sure to render content within the safe area boundaries of a device.
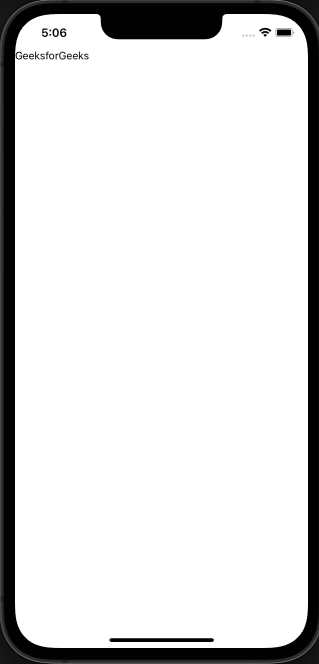
SafeAreaView Component
React Native SafeAreaView Examples
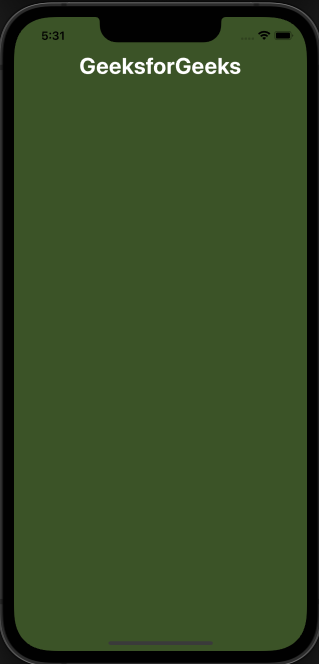
Example 1: render Text component in React Native SafeAreaView
In this example, we will render a Text component in SafeAreaView component. And because we are using SafeAreaView component, it will avoid the rounded corners and notch of the physical device and renders the content perfectly on the screen.
Javascript
import { StyleSheet, SafeAreaView, Text } from "react-native";
export default function App() {
return (
<SafeAreaView style={styles.container}>
<Text style={styles.title}>GeeksforGeeks</Text>
</SafeAreaView>
);
}
const styles = StyleSheet.create({
container: {
flex: 1,
backgroundColor: "#3B5323",
},
title: {
fontSize: 30,
fontWeight: "bold",
textAlign: "center",
color: "#fff",
},
});
|
Output:
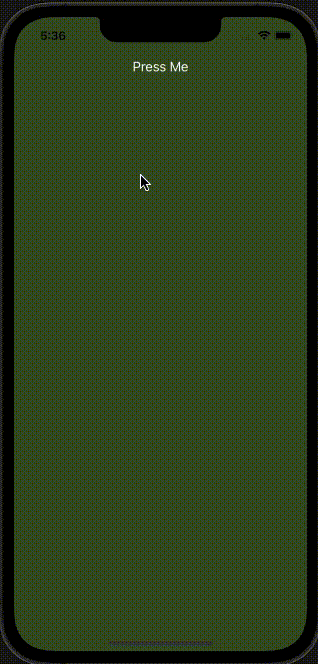
Example 2: Button component in React Native SafeAreaView
In this example, we will render a Button component in SafeAreaView component. And because we are using SafeAreaView component, it will avoid the rounded corners and notch of the physical device and renders the content perfectly on the screen.
Javascript
import { StyleSheet, SafeAreaView, Button } from "react-native";
export default function App() {
return (
<SafeAreaView style={styles.container}>
<Button
title="Press Me"
color="#fff"
onPress={() => {
alert("Welcome to GeeksforGeeks");
}}
/>
</SafeAreaView>
);
}
const styles = StyleSheet.create({
container: {
flex: 1,
backgroundColor: "#3B5323",
},
});
|
Output:
Reference: https://reactnative.dev/docs/safeareaview
Share your thoughts in the comments
Please Login to comment...