React is powerful because of its efficiency, adaptability, and simplicity. React has completely changed web development. React architecture patterns and best practices offer recommendations for organizing applications in a way that optimizes the readability, maintainability, and reusability of your code. We’ll look at some architecture patterns and best practices in this article to assist developers in creating React apps that are strong and scalable.

This article introduces us to the world of React architecture by decomposing difficult concepts into manageable steps. We’ll look at the operation of React architecture and its importance in creating cutting-edge online applications. You’ll get many architectural patterns and best practices that improve your code’s organization, scalability, and efficiency.
Master full stack web dev with React & Node Check Out: Full Stack Development with React & Node JS – Live
What is React Architecture?
React is like a toolbox for building websites. It’s made up of different parts that help developers create interactive and user-friendly web pages. The way these parts are organized and work together is what we call React architecture.
React architecture is like a blueprint for building websites or web applications using React. It’s a way of organizing and structuring the different parts of your code so that everything works together smoothly. Think of it as a plan that helps you to know where to put things and how they should interact with each other. This architecture includes how components are designed, how data flows between react components, and how they manage things like user interactions and changes in the application state. Overall, React architecture provides a framework for creating web experiences that are easy to understand, maintain, and build.
Why is React Architecture Important in Web Development?
Think of React architecture as the blueprint for building a house. Just like a well-thought-out plan ensures a sturdy and comfortable home, a good React architecture ensures that websites are easy to build, maintain, and use.
Here’s why React architecture matters:
- Easy to Fix and Update: With a good React architecture, if something goes wrong on a website, it’s easier to figure out what’s broken and fix it. It’s like having a map that guides you to the problem area.
- Can Grow with the Website: As websites get bigger and more complex, a solid React architecture allows them to grow smoothly. It’s like laying a strong foundation for a building that can support extra floors if needed.
- Reuse What You Already Have: React lets developers reuse pieces of code called components. A good architecture makes it easy to reuse these components across different parts of a website, saving time and effort.
- Make Websites Faster: A well-organized React architecture helps websites load quickly and respond fast to user actions. It’s like making sure the roads are clear for smooth traffic flow.
- Work Together Better: When developers collaborate on building a website, having a clear React architecture helps everyone understand how things fit together. It’s like having a common language that everyone speaks.
React Architecture Pattern and Best Practices
1. Navigating a Directory Structure
You should always make your project in a structured form, so that it will be good and easily manageable by you anytime and other also get to know about the flow of the program. I am giving you an example whenever we are making a react project using the following command:
npx create-react-app <project_name>
It will give a structured form and all files will be easy to track in it.
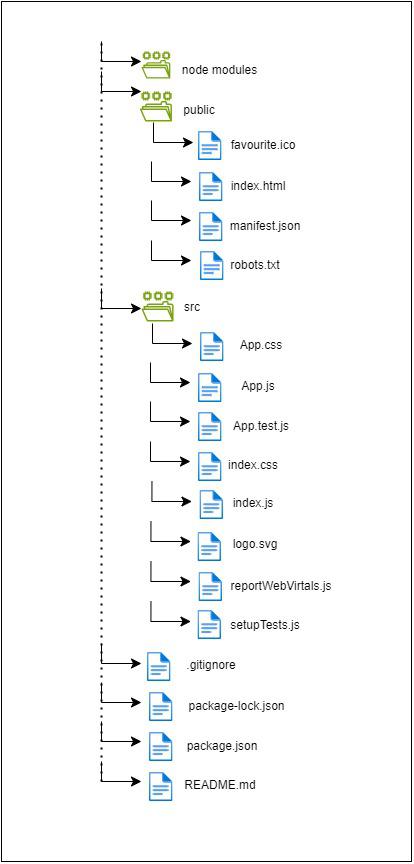
Structure of React App
This is the structure when we try create-react-app. These files are important to making any React application, We will look at some files to understand the workings of the react project.
- index.html: This file contains the basic structure of our web application, It is necessary to render the DOM of our application.
- index.js: This file is the first file executed and and an App.js file in it, then all the components will be rendered after it.
- App.js: It contains the App function which may have all the components to render one by one.
- index.css and App.css: These both files are for styling the web page. index.css has styling to index.css and App.css has the styling for our App function and its elements. Styling may vary depending on the classes and ids of the stylesheet.
- package.json: It contains all the dependencies available in our application and our script to start our server.
2. Common Modules
React has many advantages, and one of them is unopinionated which means we can divide the project in any way, we just have to link them so that react will understand the flow of the project. Structure does not matter, if you have to create modules you can create them according to your convenience. Those modules are reusable so, if you want to reuse the same module in your react application you can do so anytime and anywhere in your project.
A common module is used for the reusable functionality and we can create our custom hooks, and custom components and any try our logic to create a module in the react application. Modules or components are shared across your project with a directory/folder for reuse anywhere in the project. Dividing your project into small modules is a good habit for your project, It will help you to easily find any errors and modifications, and easy to maintain your code.
3. Add Custom Components in their own folders
Adding custom component to your project is a very important task, in this, you will get to know how you can create your custom component like taking input from customers/users or adding new features to the project.
Think of a simple project that will calculate the interest rate of a bank calculate the amount and give the interest rate/total amount after maturity.
- Create a folder component inside your src folder/directory.
- Create another folder named Interest inside the components folder/directory.
- Create a file called “InterestRate.js” inside your Intrest filter.
- Add a function to that file called as “InterestRate()” and complete the function of interest rate according to requirement.
- To give a nice UI you create “InterestRate.css”.
- Now export the function IntrestRate and import that component to the App.js file.
CSS
/* src/components/Interest/InrestRate.css */
.interest-calculator {
    max-width: 400px;
    margin: 0 auto;
    padding: 20px;
    border: 1px solid #ccc;
    border-radius: 5px;
}

.input-form label {
    display: block;
    margin-bottom: 5px;
}

.input-form input[type="number"],
.input-form input[type="text"],
.input-form button {
    width: 100%;
    padding: 8px;
    margin-bottom: 10px;
    border: 1px solid #ccc;
    border-radius: 5px;
}

.input-form button {
    background-color: #007bff;
    color: #fff;
    cursor: pointer;
}

.input-form button:hover {
    background-color: #0056b3;
}

.result {
    margin-top: 20px;
    padding: 10px;
    border: 1px solid #007bff;
    border-radius: 5px;
    background-color: #f9f9f9;
}
// src/components/Interest/IntrestRate.js
import React, { useState } from 'react';
import './IntrestRate.css'; // Import CSS file

const IntrestRate = () => {
    const [principal, setPrincipal] = useState('');
    const [duration, setDuration] = useState('');
    const [name, setName] = useState('');
    const [result, setResult] = useState(null);

    const handleSubmit = (event) => {
        event.preventDefault();

        // Calculate interest
        const interest = (parseFloat(principal) * 5 * parseFloat(duration)) / 100; // Assuming interest rate is 5%
        const totalAmount = parseFloat(principal) + interest;
        const interestRate = (interest / parseFloat(principal)) * 100;

        // Set result and hide form
        setResult({ interestRate: interestRate.toFixed(2), totalAmount: totalAmount.toFixed(2) });
    };

    return (
        <div className="interest-calculator">
            {result ? (
                <div className="result">
                    <h3>Result for {name}:</h3>
                    <p>Interest Rate: {result.interestRate}%</p>
                    <p>Total Amount after Maturity: ${result.totalAmount}</p>
                </div>
            ) : (
                <form className="input-form" onSubmit={handleSubmit}>
                    <label htmlFor="principal">Principal Amount:</label>
                    <input type="number" id="principal" value={principal} onChange={(e) => setPrincipal(e.target.value)} required /><br /><br />

                    <label htmlFor="duration">Duration (in years):</label>
                    <input type="number" id="duration" value={duration} onChange={(e) => setDuration(e.target.value)} required /><br /><br />

                    <label htmlFor="name">Name:</label>
                    <input type="text" id="name" value={name} onChange={(e) => setName(e.target.value)} required /><br /><br />

                    <button type="submit">Calculate</button>
                </form>
            )}
        </div>
    );
};

export default IntrestRate;
// App.js

import logo from './logo.svg';
import './App.css';
import IntrestRate from './components/Intrest/IntrestRate'

function App() {
  return (
    <div className="App">
      <IntrestRate />
    </div>
  );
}

export default App;
4. Create Custom Hooks
Custom Hooks are also a good idea to reduce the function’s duplicity and the time taken to write the code. Now, we will try to create our custom hook which can change the “light” mode to “dark” mode. Custom hooks can be used in our entire project and these hooks use the prefix “use“. Now let’s try to create a custom hook.
- Create another folder called Hooks inside your src directory.
- Now create a file named useDarkMode inside that Hooks folder.
- Add your logic to toggle the mode.
- Now add this functionality to the IntrestRate.js file.
CSS
/* Add these files to your main css file or IntrestRate.css file to use it*/
/* Light mode styles */
.light-mode {
    background-color: #fff;
    color: #333;
}

.light-mode button {
    background-color: #007bff;
    color: #fff;
}

/* Dark mode styles */
.dark-mode {
    background-color: #333;
    color: #fff;
}

.dark-mode button {
    background-color: #fff;
    color: #333;
}
// src/hooks/useDarkMode.js
import { useEffect, useState } from 'react';

const useDarkMode = () => {
    const [isDarkMode, setIsDarkMode] = useState(false);

    useEffect(() => {
        const currentMode = localStorage.getItem('darkMode');
        setIsDarkMode(currentMode === 'true');
    }, []);

    const toggleDarkMode = () => {
        const newMode = !isDarkMode;
        setIsDarkMode(newMode);
        localStorage.setItem('darkMode', newMode);
    };

    return [isDarkMode, toggleDarkMode];
};

export default useDarkMode;
// src/components/Interest/InterestCalculator.js
//modified file
import React, { useState } from 'react';
import './IntrestRate.css'; // Import CSS file
import useDarkMode from '../Hooks/useDarkMode'; // Adding our Custom hooks
const IntrestRate = () => {
    const [principal, setPrincipal] = useState('');
    const [duration, setDuration] = useState('');
    const [name, setName] = useState('');
    const [result, setResult] = useState(null);
    const [isDarkMode, toggleDarkMode] = useDarkMode();// state for toggling the mode

    const handleSubmit = (event) => {
        event.preventDefault();

        // Calculate interest
        const interest = (parseFloat(principal) * 5 * parseFloat(duration)) / 100; // Assuming interest rate is 5%
        const totalAmount = parseFloat(principal) + interest;
        const interestRate = (interest / parseFloat(principal)) * 100;

        // Set result and hide form
        setResult({ interestRate: interestRate.toFixed(2), totalAmount: totalAmount.toFixed(2) });
    };

    return (
        <div className={isDarkMode ? 'dark-mode' : 'light-mode'}>//use class to set the css
        <div className="interest-calculator">
            {result ? (
                <div className="result">
                    <h3>Result for {name}:</h3>
                    <p>Interest Rate: {result.interestRate}%</p>
                    <p>Total Amount after Maturity: ${result.totalAmount}</p>
                </div>
            ) : (
                <form className="input-form" onSubmit={handleSubmit}>
                    <label htmlFor="principal">Principal Amount:</label>
                    <input type="number" id="principal" value={principal} onChange={(e) => setPrincipal(e.target.value)} required /><br /><br />

                    <label htmlFor="duration">Duration (in years):</label>
                    <input type="number" id="duration" value={duration} onChange={(e) => setDuration(e.target.value)} required /><br /><br />

                    <label htmlFor="name">Name:</label>
                    <input type="text" id="name" value={name} onChange={(e) => setName(e.target.value)} required /><br /><br />

                    <button type="submit">Calculate</button>
                </form>

            )}
            <button onClick={toggleDarkMode}>// Button to toggle between theme.
                Toggle Dark Mode
            </button>
        </div>
        </div>
    );
};

export default IntrestRate;
5. State Management
State management is very important work in your react project, you can manage your state in a component as well using the useState hook present in react but it is highly recommended that when your react application is very large and complex or your project needs many states. So you can use redux or flux library present in the react. These libraries are very useful for state management.
To use redux in your react application you can follow the steps given bellow:
- install the dependency using this command.
npm install redux react-redux
or
yarn add redux react-redux
- Set up a Redux store in your application. This is the central place that holds the entire state of your application.
- Create a file named store.js or configureStore.js to configure your Redux store.
- Create Reducers: Reducers specify how the application’s state changes in response to actions sent to the store. Create reducers for each slice of the state.
- Create Actions: Actions are payloads of information that send data from your application to your store. They are the only source of information for the store.
- Create Action Creators: Action creators are functions that create actions. They simplify the process of creating actions and make the code more readable.
- Connect Redux to React Components: Use the connect function from react-redux to connect your React components to the Redux store.
- Provider Component: Wrap your root component with the Provider component from react-redux to make the Redux store available to all components.
- That’s it! You’ve now successfully integrated Redux into your React application.
JavaScript
// store.js
import { createStore } from 'redux';
import rootReducer from './reducers'; // Import your root reducer

const store = createStore(rootReducer);

export default store;
// reducers.js
import { combineReducers } from 'redux';
import someReducer from './someReducer';

const rootReducer = combineReducers({
  someReducer,
  // Add more reducers as needed
});

export default rootReducer;
// actions.js
export const increment = () => {
  return {
    type: 'INCREMENT'
  };
};

export const decrement = () => {
  return {
    type: 'DECREMENT'
  };
};
// MyComponent.js
import React from 'react';
import { connect } from 'react-redux';
import { increment, decrement } from './actions';

const MyComponent = ({ count, increment, decrement }) => {
  return (
    <div>
      <p>Count: {count}</p>
      <button onClick={increment}>Increment</button>
      <button onClick={decrement}>Decrement</button>
    </div>
  );
};

const mapStateToProps = (state) => {
  return {
    count: state.someReducer.count // assuming 'count' is a property in your reducer state
  };
};

export default connect(mapStateToProps, { increment, decrement })(MyComponent);
// index.js
import React from 'react';
import ReactDOM from 'react-dom';
import { Provider } from 'react-redux';
import store from './store';
import App from './App';

ReactDOM.render(
  <Provider store={store}>
    <App />
  </Provider>,
  document.getElementById('root')
);
6. Separate Logic and Design
It is good practice to divide the components into different directories to have different types of components in different directories. You can create two separate folders one is for Designs which contains all the designs needed in your project and another is for Logics. This will help you better understand and maintain your code easily.
For example, you can create two folders one named Logic, and another named Design. Logic will contain your components, hooks, functions, etc. You can use them anywhere. The design folder contains your stylesheets, headers, footers, sidebars, etc. which gives a nice look to your website.
7. Use Absolute Imports
To use absolute imports, you have to modify some code in your React application. It will help you to import the absolute path instead of doing ‘./components/……’ or something like that. You can use “import ComponentName from ‘@/component…/ComponentName'”.
This will helps you to understand where the file is located and it helps others to understand that what is the structure of the project without burden. Step to use Absolute imports:
npm install react-app-rewired customize-cra --save-dev
- In your root directory, Create a config-overrides.js file.
- Update package.json Scripts: Update your package.json scripts to use react-app-rewired instead of react-scripts.
"scripts": {
  "start": "react-app-rewired start",
  "build": "react-app-rewired build",
  "test": "react-app-rewired test",
  "eject": "react-scripts eject"
}- Use Absolute Imports: Now you can use absolute imports in your code by prefixing the path with the alias you configured (@ in this example).
- For example, if you have a file MyComponent.js located at src/components/MyComponent.js, you can import it like this:
import MyComponent from '@/components/MyComponent';
JavaScript
// config-overrides.js
const { addWebpackAlias, override } = require('customize-cra');
const path = require('path');

module.exports = override(
  addWebpackAlias({
    '@': path.resolve(__dirname, 'src')
  })
);
8. The Utils directory
The utils directory contains the helper function required in the project which is used in any components. These functions are often reusable and can be used in various parts of your codebase. Here’s how you can organize and use a utils directory in your project:
- Create the Directory: First, create a utils directory within your project’s source code directory.
- Add Utility Functions: Inside the utils directory, add files that contain your utility functions. These functions can perform tasks such as formatting data, making API requests, manipulating strings, handling dates, etc.
- Export Utility Functions: In each utility file, export the functions you want to use in other parts of your application.
- Import and Use: In other files of your application, import the utility functions you need and use them as required.
9. Avoiding creating a single Context for everything
Creating a single Context for your react application can lead to performance issues like unwanted re-rendering. It is not advisable to use this. You can do the following things to better the project.
- Identify Related Data.
- Create Multiple Contexts.
- Use Context Providers Strategically
- Split Contexts by Concerns
- Avoid Over-Nesting Contexts.
- Use Context Composition.
- Use React.memo and useCallback.
10. CSS in JavaScript
You can add CSS in the React application to give you a good UI and a better look for your application. There are many ways to add CSS to your React application. You can create a global file for CSS that will contain all the styles, You can also add styling to the component file or you can create separate files for separate components. Styling is very essential to give a nice look to the components and it makes your project nice.
React Architecture Best Practices
- Simple Component Structure: Make sure your react project will have a simple component structure. It should not have a complex structure so that it will be easy to understand. This will help you to debug, modify, and add features to your React application.
- Efficient State Management: You should manage the states of your react application efficiently so that every state change will re-render according to the requirements. It should not re-render unnecessarily.
- Clear Prop Passing: Passing data to the react components is very useful and necessary. You have to make it in such a way that it will pass the props to the components.
- Reusable Components: React’s components are reusable, this is the advantage of the React application. You should not make one components and functions multiple times, it makes the application more complex and slow.
- Optimized Rendering: It is performed by minimizing unnecessary re-renders. You should use techniques like shouldComponentUpdate or React.memo to prevent components from re-rendering when their props or state is not changed.
Also Read
Conclusion
React architecture patterns and best practices serve as a roadmap to building your high-quality React applications. By adhering to principles such as component-based architecture, state management, and performance optimization, you can create applications that are easier to maintain, scale, and complete over time. React architecture and the patterns are very important to make sure your react project will be efficient, load fast, have better performance, and have good quality all these things will be given by following the architecture and the pattern of react.
Share your thoughts in the comments
Please Login to comment...