Python Pillow – Writing Text on Image
Last Updated :
13 Jul, 2021
In this article, we will see how to write text on images with the Python Pillow module.
Installation
This module is not preloaded with Python. So to install it execute the following command in the command-line:
pip install pillow
Stepwise implementation:
Step 1: Import Pillow library
To complete this task the functions required from the Pillow library are: Image, ImageDraw, ImageFont. All these functions are imported as:
from PIL import Image, ImageDraw, ImageFont
Step 2: Open an image
In this step, the image on which we are going to add text is imported and open by using the “Image.open(‘Image_name’)”. In the given case the gfg logo is used to add the text on it. The image name is gfg_logo.jpeg. So, it is written as:
img = Image.open(‘gfg_logo.jpeg’)
Step 3: Image Conversion
In this step, we convert our image into an editable format by using “ImageDraw.Draw(‘variable used to store the image in above step’)”. In the given case this is written as:
d1 = ImageDraw.Draw(img)
Step 4: Font style.
This step is optional. It is for those who want their text to look cool or stylish because someone won’t select any font style then the system takes the default font style. At first download the font style file from https://ttfonts.net/font/1004_Mistral.htm . After downloading the file use the function ImageFont.truetype(‘adddress_of_font_style’, font_style). In given cases this is written as:
myFont = ImageFont.truetype(‘/home/raghav/PycharmProjects/gfg/Mistral.ttf’, 20)
Step 5: Render the text
This is the main step in which the whole properties of the font get decided. This is written as:
d1.text((65, 10), “Sample text”, fill =(255, 0, 0),font=myFont)
- Starting Coordinates: Pillow library uses a Cartesian pixel coordinate system, with (0,0) in the upper left corner.
- Text: String between single or double quotations
- Text color in RGB format: For the color, you want you can check it to Google for its RGB color code and use.
- Font style: Download the font from Google and use it.
Step 6: Show and Save result.
The final step is to display the modified image on the screen for this img.show() function is used and to store the image img.save(“results.jpeg”) is used.
Below is the implementation:

Input Image
Python3
from PIL import Image, ImageDraw, ImageFont
img = Image.open('gfg_logo.jpeg')
d1 = ImageDraw.Draw(img)
myFont = ImageFont.truetype('/home/raghav/PycharmProjects/gfg/Mistral.ttf', 20)
d1.text((65, 10), "Sample text", fill =(255, 0, 0),font=myFont)
img.show()
img.save("results.jpeg")
|
Output:
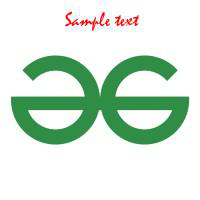
Image after modification
Example 1: To change the location of the text change the coordinates in step 5.
The dimensions are changed from (65,100) to (65,170). So, the location of text goes down because from (x,y) coordinates the value of y-coordinate gets increased as shown in the output.
Python3
from PIL import Image, ImageDraw, ImageFont
img = Image.open('gfg_logo.jpeg')
d1 = ImageDraw.Draw(img)
myFont = ImageFont.truetype('/home/raghav/PycharmProjects/gfg/Mistral.ttf', 20)
d1.text((65, 170), "Sample text", fill =(255, 0, 0),font=myFont)
img.show()
img.save("results.jpeg")
|
Output:
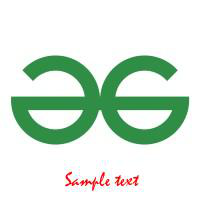
Image after changing it’s coordinates
Example 2: To change the color of the text again change in step 5.
There are RGB colour code on which Pillow work (R,G,B) R for RED, G for GREEN, B for Blue. In above case the R and B value is 0 and G value is 255 i.e. Maximum. So, the colour of text changes to green as shown in output.
Python3
from PIL import Image, ImageDraw, ImageFont
img = Image.open('gfg_logo.jpeg')
d1 = ImageDraw.Draw(img)
myFont = ImageFont.truetype('/home/raghav/PycharmProjects/gfg/Mistral.ttf', 20)
d1.text((65, 170), "Sample text", fill =(0, 255, 0),font=myFont)
img.show()
img.save("results.jpeg")
|
Output:
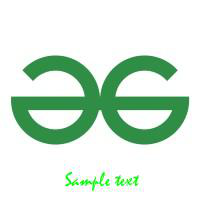
Image after changing colour of text
Example 3: To change the text change the text field in step 5.
Python3
from PIL import Image, ImageDraw, ImageFont
img = Image.open('gfg_logo.jpeg')
d1 = ImageDraw.Draw(img)
myFont = ImageFont.truetype('/home/raghav/PycharmProjects/gfg/Mistral.ttf', 20)
d1.text((65, 170), "Sample text 2", fill=(0, 255, 0), font=myFont)
img.show()
img.save("results.jpeg")
|
Output:
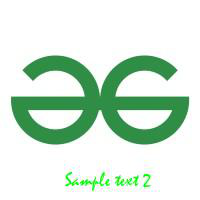
Image after changing text field
Example 4: To change the size of the text go to step 4 and change the size.
Python3
from PIL import Image, ImageDraw, ImageFont
img = Image.open('gfg_logo.jpeg')
d1 = ImageDraw.Draw(img)
myFont = ImageFont.truetype('/home/raghav/PycharmProjects/gfg/Mistral.ttf', 30)
d1.text((65, 170), "Sample text", fill = (0, 255, 0),font=myFont)
img.show()
img.save("results.jpeg")
|
Output:
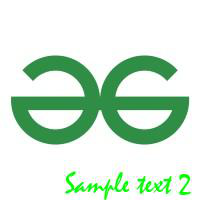
Image after changing text size
Example 5: To change the text font go to step 4.
Python3
from PIL import Image, ImageDraw, ImageFont
img = Image.open('gfg_logo.jpeg')
d1 = ImageDraw.Draw(img)
myFont = ImageFont.truetype('/home/raghav/PycharmProjects/gfg/00006_44s.ttf', 30)
d1.text((0, 170), "Sample text", fill =(0, 255, 0),font=myFont)
img.show()
img.save("results.jpeg")
|
Output:

Image after changing font style
Like Article
Suggest improvement
Share your thoughts in the comments
Please Login to comment...