Python | Creating tensors using different functions in Tensorflow
Last Updated :
21 Nov, 2018
Tensorflow is an open-source machine learning framework that is used for complex numerical computation. It was developed by the Google Brain team in Google. Tensorflow can train and run deep neural networks that can be used to develop several AI applications.
What is a Tensor?
A tensor can be described as a n-dimensional numerical array. A tensor can be called a generalized matrix. It could be a 0-D matrix (a single number), 1-D matrix (a vector), 2-D matrix or any higher dimensional structure. A tensor is identified by three parameters viz., rank, shape and size. The number of dimensions of the tensor is said to be its rank. The number of columns and rows that the tensor has, is said to be its shape. And, the data type assigned to the tensor’s elements is said to be its type.
Importance of Tensor in Tensorflow:
A tensor can be called as the central data type of Tensorflow. It is because tensors are the fundamental components of computation inside the Tensorflow framework. As the name suggests, Tensorflow is a framework that involves defining and running computations involving tensors.
Let’s discuss all the different ways to create tensors in Tensorflow.
Method #1: Creating tensor using the constant() function.
The most popular function for creating tensors in Tensorflow is the constant() function. We need to give values or list of values as argument for creating tensor. If the values given are of type integer, then int32 is the default data type. And if the values given are of floating type, then float32 is the default data type.
import tensorflow as tf
t1 = tf.constant([1, 2, 3])
t2 = tf.constant([[1.1, 2.2, 3.3], [4, 5, 6]])
t3 = tf.constant([[1, 2, 3], [4, 5, 6], [7, 8, 9]])
t4 = tf.constant(["String_one", "String_two", "String_three"])
t5 = tf.constant([1.2, 2.3, 3.4], tf.float16, [3], 'N3', False)
sess = tf.Session()
print(t1)
print(sess.run(t1))
print("\n")
print(t2)
print(sess.run(t2))
print("\n")
print(t3)
print(sess.run(t3))
print("\n")
print(t4)
print(sess.run(t4))
print("\n")
print(t5)
print(sess.run(t5))
|
Output:
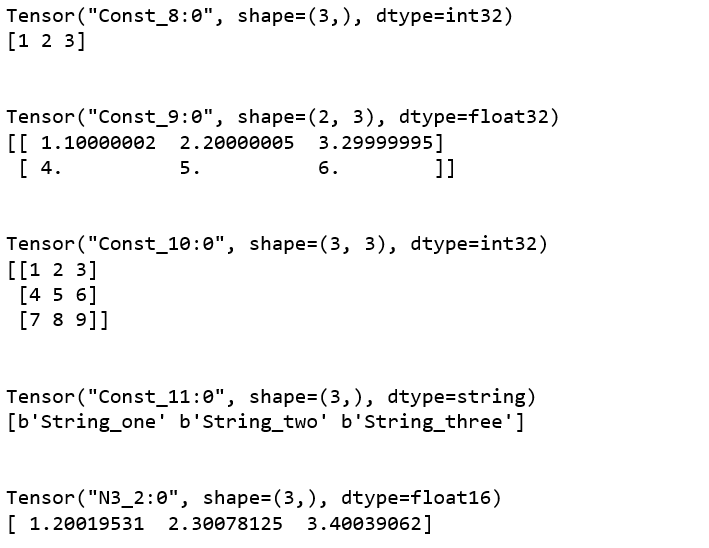
Here, t1 is a one-dimensional tensor and has three integer values of datatype int32. t2 is a two-dimensional tensor and it contains floating-point values of datatype float32. t3 is a three-dimensional tensor and it contains integer values of datatype int32. t4 is a one-dimensional having three strings of datatype string. In t5, we have given it a name ‘N3’, specified the datatype as ‘float16’ and given the value of shape as 3. Since the shape value of t5 is 3, we cannot pass more than 3 elements in it. Otherwise, it will throw an error.
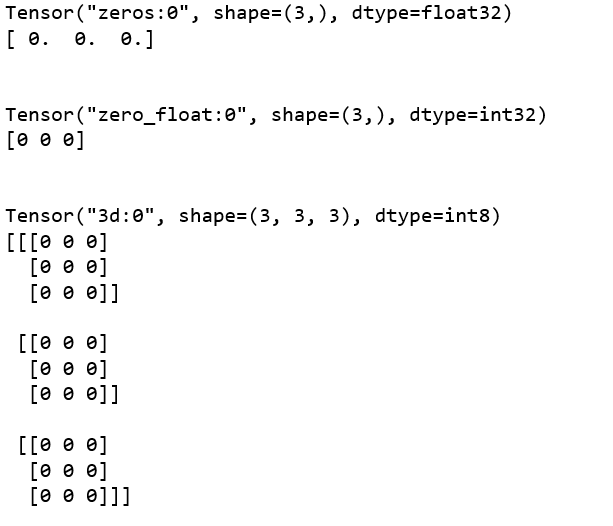
Method #2: Creating tensor using the zeros() function.
The zeros() function is used to create tensor with all of its elements as zero. The shape of the tensor is the only required argument.
import tensorflow as tf
zero_int = tf.zeros([3])
zero_float = tf.zeros([3], tf.int32, 'zero_float')
zero_3d = tf.zeros([3, 3, 3], tf.int8, '3d')
sess = tf.Session()
print(zero_int)
print(sess.run(zero_int))
print("\n")
print(zero_float)
print(sess.run(zero_float))
print("\n")
print(zero_3d)
print(sess.run(zero_3d))
|
Output:
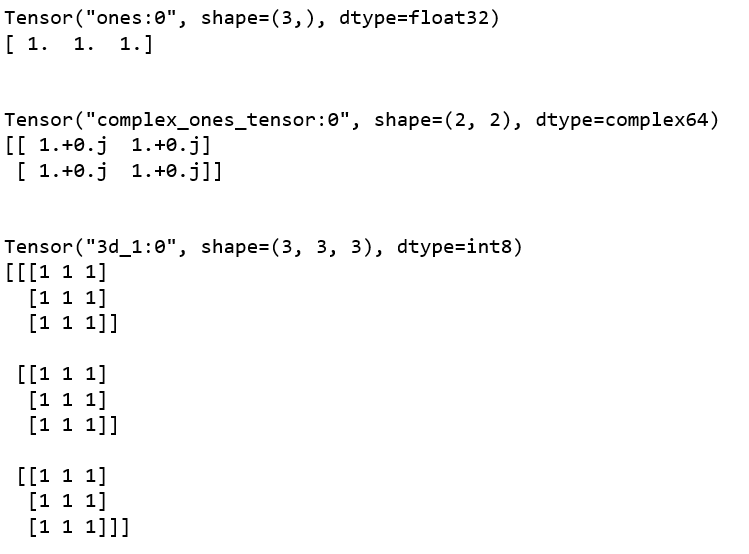
Method #3: Creating tensor using the “ones()” function.
The ones() function basically does the same thing as the zeros() function, but the elements are one in this case instead of zero.
import tensorflow as tf
one_float = tf.ones([3])
one_complex = tf.ones([2, 2], tf.complex64, 'complex_ones_tensor')
one_3d = tf.ones([3, 3, 3], tf.int8, '3d')
sess = tf.Session()
print(one_float)
print(sess.run(one_float))
print("\n")
print(one_complex)
print(sess.run(one_complex))
print("\n")
print(one_3d)
print(sess.run(one_3d))
|
Output:
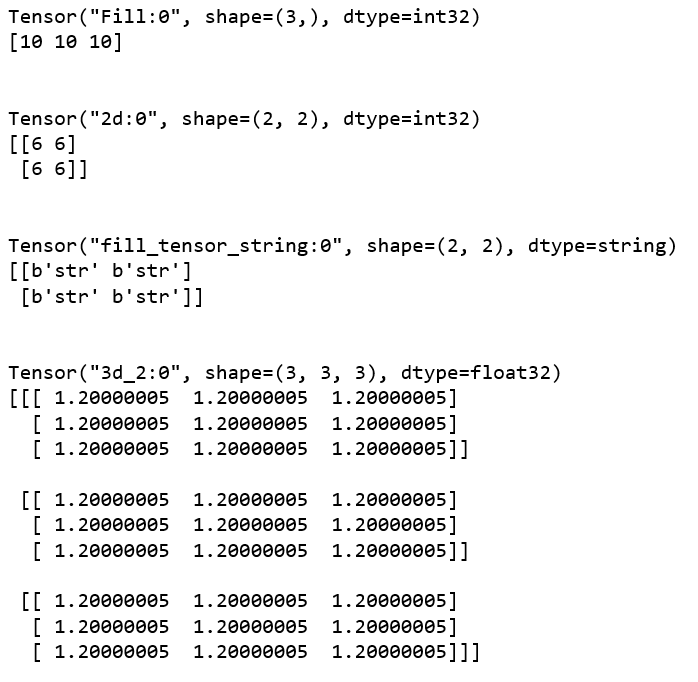
Method #4: Creating tensor using the fill() function.
The fill() function is used to create tensors with all the elements in the tensor having the same value. The value of the element is to be passed as an argument and the datatype depends upon that value passed.
import tensorflow as tf
fill_1d = tf.fill([3], 10)
fill_2d = tf.fill([2, 2], 6, '2d')
fill_string = tf.fill([2, 2], "str", 'fill_tensor_string')
fill_3d = tf.fill([3, 3, 3], 1.2, '3d')
sess = tf.Session()
print(fill_1d)
print(sess.run(fill_1d))
print("\n")
print(fill_2d)
print(sess.run(fill_2d))
print("\n")
print(fill_string)
print(sess.run(fill_string))
print("\n")
print(fill_3d)
print(sess.run(fill_3d))
|
Output:
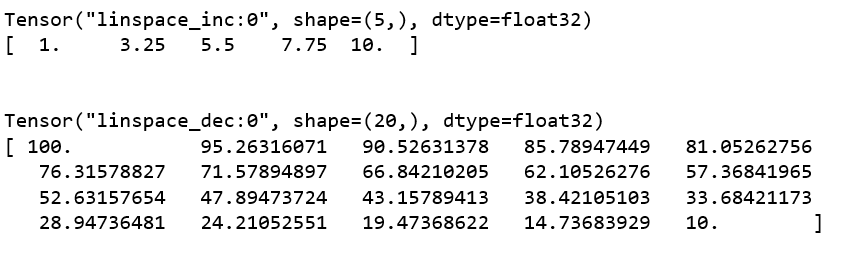
Method #5: Creating tensors using the linspace() function.
The linspace() function is used in creating tensors in which we specify the starting value, ending value and the number of elements as arguments and the elements of the tensor changes its values based on the arguments.
import tensorflow as tf
linspace_inc = tf.linspace(1.0, 10.0, 5, "linspace_inc")
linspace_dec = tf.linspace(100.0, 10.0, 20, "linspace_dec")
sess = tf.Session()
print(linspace_inc)
print(sess.run(linspace_inc))
print("\n")
print(linspace_dec)
print(sess.run(linspace_dec))
|
Output:
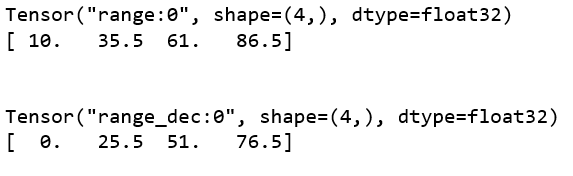
Method #6: Creating tensors using the range() function.
The range() function is almost the same as the linspace() function. The only difference is that in the range() function, we specify a value called delta, that is used to calculate the successive elements of the tensor, instead of the number of elements in the linspace() function.
import tensorflow as tf
range_inc = tf.range(10.0, 100.0, delta = 25.5)
range_dec = tf.range(100.0, delta = 25.5, name ="range_dec")
sess = tf.Session()
print(range_inc)
print(sess.run(range_inc))
print("\n")
print(range_dec)
print(sess.run(range_dec))
|
Output:
Share your thoughts in the comments
Please Login to comment...