Print Left View of a Binary Tree
Last Updated :
02 May, 2023
Given a Binary Tree, the task is to print the left view of the Binary Tree. The left view of a Binary Tree is a set of leftmost nodes for every level.
Examples:
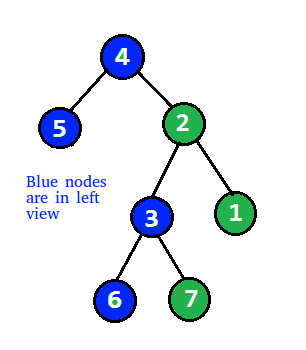
Input:
4
/ \
5 2
/ \
3 1
/ \
6 7
Output: 4 5 3 6
Explanation:
Input:
1
/ \
2 3
\
4
\
5
\
6
Output: 1 2 4 5 6
Print Left View of a Binary Tree Using Recursion:
Keep track of the level of a node by passing the level as a parameter to all recursive calls and also keep track of the maximum level. Whenever, we see a node whose level is more than maximum level so far, we print the node because this is the first node in its level
Note: We traverse the left subtree before right subtree.
Below is the implementation of the above idea.
C++
#include <bits/stdc++.h>
using namespace std;
struct Node {
int data;
struct Node *left, *right;
};
struct Node* newNode(int item)
{
struct Node* temp
= (struct Node*)malloc(sizeof(struct Node));
temp->data = item;
temp->left = temp->right = NULL;
return temp;
}
void leftViewUtil(struct Node* root, int level,
int* max_level)
{
if (root == NULL)
return;
if (*max_level < level) {
cout << root->data << " ";
*max_level = level;
}
leftViewUtil(root->left, level + 1, max_level);
leftViewUtil(root->right, level + 1, max_level);
}
void leftView(struct Node* root)
{
int max_level = 0;
leftViewUtil(root, 1, &max_level);
}
int main()
{
Node* root = newNode(10);
root->left = newNode(2);
root->right = newNode(3);
root->left->left = newNode(7);
root->left->right = newNode(8);
root->right->right = newNode(15);
root->right->left = newNode(12);
root->right->right->left = newNode(14);
leftView(root);
return 0;
}
|
C
#include <stdio.h>
#include <stdlib.h>
struct node {
int data;
struct node *left, *right;
};
struct node* newNode(int item)
{
struct node* temp
= (struct node*)malloc(sizeof(struct node));
temp->data = item;
temp->left = temp->right = NULL;
return temp;
}
void leftViewUtil(struct node* root, int level,
int* max_level)
{
if (root == NULL)
return;
if (*max_level < level) {
printf("%d ", root->data);
*max_level = level;
}
leftViewUtil(root->left, level + 1, max_level);
leftViewUtil(root->right, level + 1, max_level);
}
void leftView(struct node* root)
{
int max_level = 0;
leftViewUtil(root, 1, &max_level);
}
int main()
{
struct node* root = newNode(10);
root->left = newNode(2);
root->right = newNode(3);
root->left->left = newNode(7);
root->left->right = newNode(8);
root->right->right = newNode(15);
root->right->left = newNode(12);
root->right->right->left = newNode(14);
leftView(root);
return 0;
}
|
Java
class Node {
int data;
Node left, right;
public Node(int item)
{
data = item;
left = right = null;
}
}
class BinaryTree {
Node root;
static int max_level = 0;
void leftViewUtil(Node node, int level)
{
if (node == null)
return;
if (max_level < level) {
System.out.print(node.data + " ");
max_level = level;
}
leftViewUtil(node.left, level + 1);
leftViewUtil(node.right, level + 1);
}
void leftView()
{
max_level = 0;
leftViewUtil(root, 1);
}
public static void main(String args[])
{
BinaryTree tree = new BinaryTree();
tree.root = new Node(10);
tree.root.left = new Node(2);
tree.root.right = new Node(3);
tree.root.left.left = new Node(7);
tree.root.left.right = new Node(8);
tree.root.right.right = new Node(15);
tree.root.right.left = new Node(12);
tree.root.right.right.left = new Node(14);
tree.leftView();
}
}
|
Python3
class Node:
def __init__(self, data):
self.data = data
self.left = None
self.right = None
def leftViewUtil(root, level, max_level):
if root is None:
return
if (max_level[0] < level):
print (root.data, end = " ")
max_level[0] = level
leftViewUtil(root.left, level + 1, max_level)
leftViewUtil(root.right, level + 1, max_level)
def leftView(root):
max_level = [0]
leftViewUtil(root, 1, max_level)
if __name__ == '__main__':
root = Node(10)
root.left = Node(2)
root.right = Node(3)
root.left.left = Node(7)
root.left.right = Node(8)
root.right.right = Node(15)
root.right.left = Node(12)
root.right.right.left = Node(14)
leftView(root)
|
C#
using System;
public class Node {
public int data;
public Node left, right;
public Node(int item)
{
data = item;
left = right = null;
}
}
public class BinaryTree {
public Node root;
public static int max_level = 0;
public virtual void leftViewUtil(Node node, int level)
{
if (node == null) {
return;
}
if (max_level < level) {
Console.Write(node.data + " ");
max_level = level;
}
leftViewUtil(node.left, level + 1);
leftViewUtil(node.right, level + 1);
}
public virtual void leftView()
{
leftViewUtil(root, 1);
}
public static void Main(string[] args)
{
BinaryTree tree = new BinaryTree();
tree.root = new Node(10);
tree.root.left = new Node(2);
tree.root.right = new Node(3);
tree.root.left.left = new Node(7);
tree.root.left.right = new Node(8);
tree.root.right.right = new Node(15);
tree.root.right.left = new Node(12);
tree.root.right.right.left = new Node(14);
tree.leftView();
}
}
|
Javascript
<script>
class Node
{
constructor(item)
{
this.data = item;
this.left = null;
this.right = null;
}
}
var root ;
var max_level = 0;
function leftViewUtil(node, level)
{
if (node == null)
{
return;
}
if (max_level < level)
{
document.write(" " + node.data);
max_level = level;
}
leftViewUtil(node.left, level + 1);
leftViewUtil(node.right, level + 1);
}
function leftView()
{
leftViewUtil(root, 1);
}
root = Node(10)
root.left = new Node(2)
root.right = new Node(3)
root.left.left = new Node(7)
root.left.right = new Node(8)
root.right.right = new Node(15)
root.right.left = new Node(12)
root.right.right.left = new Node(14)
leftView();
</script>
|
Time Complexity: O(N), The function does a simple traversal of the tree, so the complexity is O(n).
Auxiliary Space: O(h), due to the stack space during recursive call. ‘h’ here is the height of the binary tree.
Print Left View of a Binary Tree Using Level Order Traversal:
Below is the idea to solve the problem:
The left view contains all nodes that are the first nodes in their levels. A simple solution is to do level order traversal and print the first node in every level.
Follow the below step to Implement the idea:
- Do level order traversal of the tree.
- For each level keep a track of the current level and print the first encountered node of this level.
- Move to the next level.
Below is the implementation of the above approach:
C++
#include<bits/stdc++.h>
using namespace std;
struct Node
{
int data;
struct Node *left, *right;
};
Node* newNode(int data)
{
Node *temp = new Node;
temp->data = data;
temp->left = temp->right = NULL;
return temp;
}
void printLeftView(Node* root)
{
if (!root)
return;
queue<Node*> q;
q.push(root);
while (!q.empty())
{
int n = q.size();
for(int i = 1; i <= n; i++)
{
Node* temp = q.front();
q.pop();
if (i == 1)
cout<<temp->data<<" ";
if (temp->left != NULL)
q.push(temp->left);
if (temp->right != NULL)
q.push(temp->right);
}
}
}
int main()
{
Node* root = newNode(10);
root->left = newNode(2);
root->right = newNode(3);
root->left->left = newNode(7);
root->left->right = newNode(8);
root->right->right = newNode(15);
root->right->left = newNode(12);
root->right->right->left = newNode(14);
printLeftView(root);
}
|
Java
import java.util.*;
public class PrintRightView {
private static class Node {
int data;
Node left, right;
public Node(int data)
{
this.data = data;
this.left = null;
this.right = null;
}
}
private static void printLeftView(Node root)
{
if (root == null)
return;
Queue<Node> queue = new LinkedList<>();
queue.add(root);
while (!queue.isEmpty()) {
int n = queue.size();
for (int i = 1; i <= n; i++) {
Node temp = queue.poll();
if (i == 1)
System.out.print(temp.data + " ");
if (temp.left != null)
queue.add(temp.left);
if (temp.right != null)
queue.add(temp.right);
}
}
}
public static void main(String[] args)
{
Node root = new Node(10);
root.left = new Node(2);
root.right = new Node(3);
root.left.left = new Node(7);
root.left.right = new Node(8);
root.right.right = new Node(15);
root.right.left = new Node(12);
root.right.right.left = new Node(14);
printLeftView(root);
}
}
|
Python3
class newNode:
def __init__(self, key):
self.data = key
self.left = None
self.right = None
self.hd = 0
def printLeftView(root):
if (not root):
return
q = []
q.append(root)
while (len(q)):
n = len(q)
for i in range(1, n + 1):
temp = q[0]
q.pop(0)
if (i == 1):
print(temp.data, end=" ")
if (temp.left != None):
q.append(temp.left)
if (temp.right != None):
q.append(temp.right)
if __name__ == '__main__':
root = newNode(10)
root.left = newNode(2)
root.right = newNode(3)
root.left.left = newNode(7)
root.left.right = newNode(8)
root.right.right = newNode(15)
root.right.left = newNode(12)
root.right.right.left = newNode(14)
printLeftView(root)
|
C#
using System;
using System.Collections.Generic;
public class PrintRightView {
private class Node {
public int data;
public Node left, right;
public Node(int data)
{
this.data = data;
this.left = null;
this.right = null;
}
}
private static void printRightView(Node root)
{
if (root == null)
return;
Queue<Node> queue = new Queue<Node>();
queue.Enqueue(root);
while (queue.Count != 0) {
int n = queue.Count;
for (int i = 1; i <= n; i++) {
Node temp = queue.Dequeue();
if (i == 1)
Console.Write(temp.data + " ");
if (temp.left != null)
queue.Enqueue(temp.left);
if (temp.right != null)
queue.Enqueue(temp.right);
}
}
}
public static void Main(String[] args)
{
Node root = new Node(10);
root.left = new Node(2);
root.right = new Node(3);
root.left.left = new Node(7);
root.left.right = new Node(8);
root.right.right = new Node(15);
root.right.left = new Node(12);
root.right.right.left = new Node(14);
printRightView(root);
}
}
|
Javascript
<script>
class newNode{
constructor(key){
this.data = key
this.left = null
this.right = null
this.hd = 0
}
}
function printLeftView(root){
if (root == null)
return
let q = []
q.push(root)
while (q.length){
let n = q.length
for(let i=1;i< n + 1;i++){
let temp = q.shift()
if (i == 1)
document.write(temp.data," ")
if (temp.left != null)
q.push(temp.left)
if (temp.right != null)
q.push(temp.right)
}
}
}
let root = new newNode(10)
root.left = new newNode(2)
root.right = new newNode(3)
root.left.left = new newNode(7)
root.left.right = new newNode(8)
root.right.right = new newNode(15)
root.right.left = new newNode(12)
root.right.right.left = new newNode(14)
printLeftView(root)
</script>
|
Time Complexity: O(N), where n is the number of nodes in the binary tree.
Auxiliary Space: O(N) since using space for auxiliary queue
Print Left View of a Binary Tree Using queue and a null pointer:
Below is the idea to solve the problem:
Use queue and a null pointer to mark the first element of each level. Insert a null pointer in the first and as the null pointer is reached mark bool as true and take the next element as left view element.
Below is the Implementation of the above approach:
C++
#include <bits/stdc++.h>
using namespace std;
struct Node {
int data;
struct Node *left, *right;
};
struct Node* newNode(int item)
{
struct Node* temp
= (struct Node*)malloc(sizeof(struct Node));
temp->data = item;
temp->left = temp->right = NULL;
return temp;
}
vector<int> leftView(Node* root)
{
vector<int> ans;
if (!root)
return ans;
queue<Node*> q;
q.push(root);
q.push(NULL);
bool ok = true;
while (!q.empty()) {
auto it = q.front();
q.pop();
if (it == NULL) {
if (ok == false)
ok = true;
if (q.size() == 0)
break;
else
q.push(NULL);
}
else {
if (ok) {
ans.push_back(it->data);
ok = false;
}
if (it->left)
q.push(it->left);
if (it->right)
q.push(it->right);
}
}
return ans;
}
int main()
{
Node* root = newNode(10);
root->left = newNode(2);
root->right = newNode(3);
root->left->left = newNode(7);
root->left->right = newNode(8);
root->right->right = newNode(15);
root->right->left = newNode(12);
root->right->right->left = newNode(14);
vector<int> vec = leftView(root);
for (int x : vec)
cout << x << " ";
cout << endl;
return 0;
}
|
Java
import java.util.*;
class GFG {
static class Node {
int data;
Node left, right;
public Node(int item)
{
data = item;
left = right = null;
}
};
public static ArrayList<Integer> leftView(Node root)
{
ArrayList<Integer> ans = new ArrayList<>();
if (root == null) {
return ans;
}
Queue<Node> q = new LinkedList<>();
q.add(root);
q.add(null);
boolean ok = true;
while (!q.isEmpty()) {
Node it = q.poll();
if (it == null) {
if (ok == false) {
ok = true;
}
if (q.size() == 0)
break;
else {
q.add(null);
}
}
else {
if (ok) {
ans.add(it.data);
ok = false;
}
if (it.left != null) {
q.add(it.left);
}
if (it.right != null) {
q.add(it.right);
}
}
}
return ans;
}
public static void main(String[] args)
{
Node root = new Node(10);
root.left = new Node(2);
root.right = new Node(3);
root.left.left = new Node(7);
root.left.right = new Node(8);
root.right.right = new Node(15);
root.right.left = new Node(12);
root.right.right.left = new Node(14);
ArrayList<Integer> vec = leftView(root);
for (int x : vec) {
System.out.print(x + " ");
}
System.out.println();
}
}
|
Python3
class Node:
def __init__(self, data):
self.data = data
self.left = None
self.right = None
def leftView(root):
ans = []
if not root:
return ans
q = []
q.append(root)
q.append(None)
ok = True
while len(q) != 0:
it = q[0]
del q[0]
if it == None:
if ok == False:
ok = True
if len(q) == 0:
break
else:
q.append(None)
else:
if ok:
ans.append(it.data)
ok = False
if it.left != None:
q.append(it.left)
if it.right != None:
q.append(it.right)
return ans
if __name__ == '__main__':
root = Node(10)
root.left = Node(2)
root.right = Node(3)
root.left.left = Node(7)
root.left.right = Node(8)
root.right.right = Node(15)
root.right.left = Node(12)
root.right.right.left = Node(14)
vec = leftView(root)
for x in vec:
print(x, end=" ")
print()
|
C#
using System;
using System.Collections.Generic;
class GFG {
public class Node {
public int data;
public Node left, right;
public Node(int item)
{
data = item;
left = right = null;
}
};
public static List<int> leftView(Node root)
{
List<int> ans = new List<int>();
if (root == null) {
return ans;
}
Queue<Node> q = new Queue<Node>();
q.Enqueue(root);
q.Enqueue(null);
bool ok = true;
while (q.Count != 0) {
Node it = q.Dequeue();
if (it == null) {
if (ok == false) {
ok = true;
}
if (q.Count == 0)
break;
else {
q.Enqueue(null);
}
}
else {
if (ok) {
ans.Add(it.data);
ok = false;
}
if (it.left != null) {
q.Enqueue(it.left);
}
if (it.right != null) {
q.Enqueue(it.right);
}
}
}
return ans;
}
public static void Main()
{
Node root = new Node(10);
root.left = new Node(2);
root.right = new Node(3);
root.left.left = new Node(7);
root.left.right = new Node(8);
root.right.right = new Node(15);
root.right.left = new Node(12);
root.right.right.left = new Node(14);
List<int> vec = leftView(root);
foreach(var x in vec) Console.Write(x + " ");
Console.WriteLine();
}
}
|
Javascript
class Node{
constructor(key){
this.data = key
this.left = null
this.right = null
}
}
function leftView(root){
ans = []
if (root == null)
return ans
let q = []
q.push(root)
q.push(null)
let ok = true
while (q.length){
let it = q.shift()
if(it == null){
if(ok == false){
ok = true
}
if(q.length == 0){
break
}
else{
q.push(null)
}
}
else{
if(ok){
ans.push(it.data)
ok = false
}
if(it.left != null){
q.push(it.left)
}
if(it.right != null){
q.push(it.right)
}
}
}
return ans
}
let root = new Node(10)
root.left = new Node(2)
root.right = new Node(3)
root.left.left = new Node(7)
root.left.right = new Node(8)
root.right.right = new Node(15)
root.right.left = new Node(12)
root.right.right.left = new Node(14)
let vec = leftView(root)
for(let i = 0; i<vec.length; i++){
document.write(vec[i]);
}
|
Time Complexity: O(N) where N is the total number of nodes.
Auxiliary Space: O(N) due to the space occupied by queue.
Share your thoughts in the comments
Please Login to comment...