Next JS 13 App Router
Last Updated :
13 Feb, 2024
Routing refers to the process of determining how an application responds to a client request to a particular endpoint or URL. When a user clicks a link, enters a URL in the browser, or performs some action that changes the current URL, the routing mechanism decides which content or component to display on the page.
In this article, we will learn about Next.js 13 App router. Routing is an important concept in building single-page applications (SPAs) and dynamic web applications where navigating between pages updates the content on the page without a full reload, providing a smoother and more seamless user experience.
Next.js 13 App Router Usage
Next.js 13 App Router provides Hierarchical File Structure routing. which provides features such as shared layout, nested routing, loading states, error handling, 404 not found page, and many more.
Next.js 13 uses File System based routing in which App Router works in a /app directory. In this directory, Folders are used to define the route and nested route, and in that folders files such as page.js, error.js, layout.js,, and loading.js are used to create UI components.
page.js File & Nested Routing
A page.js is a component that contains a UI elements, which are displayed when you move to any route. Next.js 13 App Router automatically consider the page.js file when you move to any route and content of it is rendered on display. This file is not optional.
Nested Route is a route that is contained within another route. This allows you to create a hierarchy of routes, which can be useful for organizing your application’s content.
For example, you have created a cloths folder in a app directory and inside that folder you have created a men and women folder and inside both the folder you have created a page.js component. So if you want to open men cloths section you can access it by using http://localhost:3000/cloths/men and if you want to open women cloths section you can access it by using http://localhost:3000/cloths/women and the content written inside page.js will be displayed.
layout.js File
A layout.js file is a component that is shared between multiple page.js (UI). It allow you to create common shared structure for multiple pages. This file is not optional your Application should must have a one layout.js file in a root directory. Root directory layout file is used as a container for whole application. Root level layout files contains main html and body structure of an application and inside body tag you have to put all children components.
For example, You have to create a navigation bar and that should be applied to every page in a application, So you can create that navigation in a layout.js file.
error.js File
A error.js file is a component that is displayed when any error is occurred. It is used to create a custom error page that is displayed to the user when an error occurs. error.js file will automatically wraps the page inside a React error boundary so whenever any error will occurs inside the folder where error.js file is placed, it will automatically replaces it with error.js file. This file is optional.
not-found.js
A not-found.js component that is displayed when user tries to enter wrong route that doesn’t exist in our website. By using it you can create a custom 404 Not Found Page. This file is optional.
loading.js
A loading.js component that is displayed during page transitions when content is being fetched from the server. If the content is already present in cache memory, such as when a user revisits a page they’ve previously loaded, the loader may not be displayed. This file is optional.
To know in detail about loading.js, read this article: loading.js Component
Steps to use App Router in Next.js 13
Step 1: Create Next.js App
Open the terminal and create a new Next.js application using the following command:
npx create-next-app@latest gfg
Step 2: Move to Project Folder
After creating your project folder (i.e. gfg ), move to it by using the following command:
cd gfg
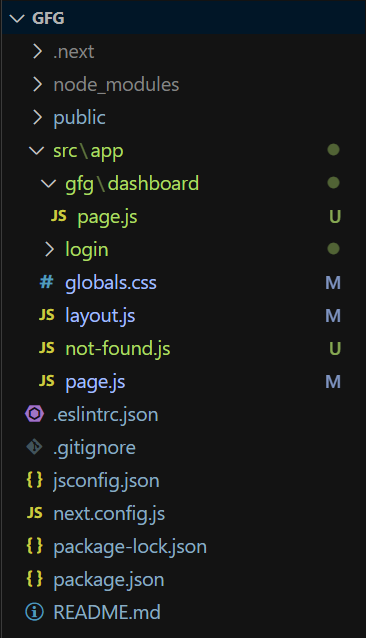
Project Structure
The project structure will look like this.
Example:
Step 1: layout.js file
Replace the below code with layout.js file code, It contains a Navigation bar that will be displayed to all the components and it also wrap all the child component.
Javascript
import { Inter } from 'next/font/google'
import './globals.css'
import Link from 'next/link'
const inter = Inter({ subsets: ['latin'] })
export const metadata = {
title: 'Create Next App',
description: 'Generated by create next app',
}
export default function RootLayout({ children }) {
return (
<html lang="en">
<body className={inter.className}>
<ul>
<li><Link href={'/'}>Home Page</Link></li>
<li><Link href={'/login'}>Login Page</Link></li>
<li><Link href={'/gfg/dashboard'}>Dashboard Page</Link></li>
<li><Link href={'/this-page-not-exist'}>This page Does not exist</Link></li>
</ul>
{children}
</body>
</html>
)
}
|
Step 2: Root level Page.js
This file will be displayed when you are at a root. Replace the below code with the code inside page.js file.
Javascript
export default function Page() {
return (
<>
<h1>GeeksForGeeks Home Page</h1>
</>
)
}
|
Step 3: Create not-found.js File
Create not-found.js File inside a app root directory. This file will be displayed if you try to open a route that doesn’t exist in web application.
Javascript
export default function Page() {
return (
<>
<hr /><h1>404 Page not found</h1><hr />
</>
)
}
|
Step 4: Create Login route
Inside app root directory, create a folder named login and inside that folder create a page.js file that will served when you open a login route.
Javascript
export default function Page() {
return (
<>
<h1>Login Page</h1>
</>
)
}
|
Step 5: Create Nested Route : /gfg/dashboard
Inside app directory, create a folder named gfg and inside that folder create another folder dashboard and in dashboard folder create page.js file that will be served when you open a route /gfg/dashboard route.
Javascript
export default function Page(){
return(
<>
<h1>Dashboard Page</h1>
</>
)
}
|
Running the Application
To run the application: Enter the following command in your terminal.
npm run dev
Output:

Share your thoughts in the comments
Please Login to comment...