If there is a scenario where you need your entire application to be in portrait mode or landscape mode or one of the Activity should be in portrait mode and all the other activities should be set at auto screen orientation, then here this article makes you do that in simple steps. So in this article, we are going to learn the following two things.
- How to make the entire application to be in portrait mode or landscape mode? Here is a preview of an entire application to be in portrait mode:
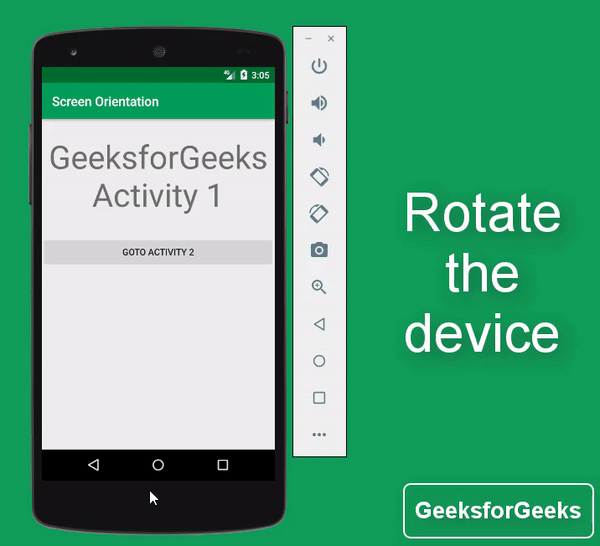
- And how to make one of the Activity should be in portrait mode and all the other activities should be set at auto screen orientation? Here is a preview for the same:
Steps for Locking Screen Orientation
Step 1: Create a New Project
To create a new project in Android Studio please refer to How to Create/Start a New Project in Android Studio. Note that select Java as the programming language. Rename the MainActivity file as Activity1 and acticity_main as layout_activity_1 (renaming is done to avoid confusion between two activities).
Note: To rename the file click on the MainActivity -> Right-click -> Refactor -> Rename and similarly do for acticity_main file.
Step 2: Create another empty activity
Now create another empty activity by right click on app -> New -> Activity -> Empty Activity and rename the activity with Activity2 and also rename the layout name as layout_activity_2. Refer below images if you are unable to get the above steps.
Step 3: Working with the layout_activity_1.xml file
One needs to include text and button in the layout_activity_1. So open the layout_activity_1.xml and add widgets TextView and Button as these are been included so that we can differentiate the 2 activities.
layout_activity_1.xml
<? xml version = "1.0" encoding = "utf-8" ?> < RelativeLayout android:layout_width = "match_parent" android:layout_height = "match_parent" tools:context = ".Activity1" tools:ignore = "HardCodedText" > < TextView android:id = "@+id/text_1" android:layout_width = "wrap_content" android:layout_height = "wrap_content" android:layout_alignParentStart = "true" android:layout_alignParentEnd = "true" android:layout_marginTop = "24dp" android:gravity = "center_horizontal" android:text = "GeeksforGeeks\nActivity 1" android:textSize = "50sp" app:layout_constraintBottom_toBottomOf = "parent" app:layout_constraintLeft_toLeftOf = "parent" app:layout_constraintRight_toRightOf = "parent" app:layout_constraintTop_toTopOf = "parent" /> <!--make sure you give the button widget id--> < Button android:id = "@+id/goto_activity_2" android:layout_width = "wrap_content" android:layout_height = "wrap_content" android:layout_below = "@+id/text_1" android:layout_alignParentStart = "true" android:layout_alignParentEnd = "true" android:layout_marginTop = "32dp" android:text = "Goto Activity 2" app:layout_constraintLeft_toLeftOf = "parent" app:layout_constraintRight_toRightOf = "parent" /> </ RelativeLayout > |
Output UI is produced as:
Step 4: Woking with the Activity1.java file
Now you need to handle the above Goto Activity 2 button. So now open Activity1.java and handles the button as invoking the following code. Refer this for Explicit Intents: Android | Implicit and Explicit Intents with Examples and for handling click events of buttons in android you may refer to this: Handling Click events in Button | Android.
Activity1.java
import androidx.appcompat.app.AppCompatActivity; import android.content.Intent; import android.os.Bundle; import android.view.View; import android.widget.Button; public class Activity1 extends AppCompatActivity { // Invoke the button widget Button gotoActivity2; @Override protected void onCreate(Bundle savedInstanceState) { super .onCreate(savedInstanceState); setContentView(R.layout.layout_activity_1); // Register the button with button ID gotoActivity2 = findViewById(R.id.goto_activity_2); // Set onclick Listener for the button as : // So that it can goto Activity2 gotoActivity2.setOnClickListener( new View.OnClickListener() { @Override public void onClick(View view) { Intent i = new Intent(Activity1. this , Activity2. class ); startActivity(i); } }); } } |
Step 5: Working with the layout_activity_2.xml file
Now open the layout_activity_2.xml and add widgets TextView and Button.
layout_activity_2.xml
<? xml version = "1.0" encoding = "utf-8" ?> < RelativeLayout android:layout_width = "match_parent" android:layout_height = "match_parent" tools:context = ".Activity1" tools:ignore = "HardCodedText" > < TextView android:id = "@+id/text_2" android:layout_width = "wrap_content" android:layout_height = "wrap_content" android:layout_alignParentStart = "true" android:layout_alignParentEnd = "true" android:layout_marginTop = "24dp" android:gravity = "center_horizontal" android:text = "GeeksforGeeks\nActivity 2" android:textSize = "50sp" app:layout_constraintBottom_toBottomOf = "parent" app:layout_constraintLeft_toLeftOf = "parent" app:layout_constraintRight_toRightOf = "parent" app:layout_constraintTop_toTopOf = "parent" /> < Button android:id = "@+id/goto_activity_1" android:layout_width = "wrap_content" android:layout_height = "wrap_content" android:layout_below = "@+id/text_2" android:layout_alignParentStart = "true" android:layout_alignParentEnd = "true" android:layout_marginTop = "32dp" android:text = "Goto Activity 1" app:layout_constraintLeft_toLeftOf = "parent" app:layout_constraintRight_toRightOf = "parent" /> </ RelativeLayout > |
Output UI is produced as :
Step 6: Woking with the Activity2.java file
We need to handle the above Goto Activity 1 button. To handle this button open Activity2.java and invoke the following code:
Activity2.java
import androidx.appcompat.app.AppCompatActivity; import android.content.Intent; import android.os.Bundle; import android.view.View; import android.widget.Button; public class Activity2 extends AppCompatActivity { // Invoke the button widget Button gotoActivity1; @Override protected void onCreate(Bundle savedInstanceState) { super .onCreate(savedInstanceState); setContentView(R.layout.layout_activity_2); // Register the button with appropriate button ID gotoActivity1 = findViewById(R.id.goto_activity_1); // Set onClick Listener for the button as : // So that it goes to Activity1 gotoActivity1.setOnClickListener( new View.OnClickListener() { @Override public void onClick(View view) { Intent i = new Intent(Activity2. this , Activity1. class ); startActivity(i); } }); } } |
Step 7: Now you are done with the interaction between two activities, you have created two activities and now your app should behave as follows.
Step 8: How to make the entire application to be in portrait mode or landscape mode?
Now we will discuss how to make the entire application to be in portrait mode (irrespective of the activities in the app will be in strictly portrait mode).
- Now open the AndroidManifest file by going to the app -> src -> main -> AndroidManifest.xml you can see the below image to get the file :
- In this project, we have only created two activities so there will be only two activity attributes visible.
- Now you need to invoke android:screenOrientation=”portrait” to be in the portrait mode. If you want the activity to be in landscape mode then one need invoke the android:screenOrientation=”landscape”.
- Now you will get the red line under the above screenOrientation attributes. So we need to invoke the other attribute tools:ignore=”LockedOrientationActivity” where the screenOrientation attribute is invoked, to ignore the locked screen orientation.
- Now The AndroidManifest.xml file should be like like the following:
AndroidManifest.xml
<? xml version = "1.0" encoding = "utf-8" ?> package = "com.adityamshidlyali.activity1" > < application android:allowBackup = "true" android:icon = "@mipmap/ic_launcher" android:label = "@string/app_name" android:roundIcon = "@mipmap/ic_launcher_round" android:supportsRtl = "true" android:theme = "@style/AppTheme" > <!--You need to look at the screenOrientation attribute below, is set at portrait only--> < activity android:name = ".Activity2" android:screenOrientation = "portrait" tools:ignore = "LockedOrientationActivity" > </ activity > <!--You need to look at the screenOrientation attribute below, is set at portrait only--> < activity android:name = ".Activity1" android:screenOrientation = "portrait" tools:ignore = "LockedOrientationActivity" > < intent-filter > < action android:name = "android.intent.action.MAIN" /> < category android:name = "android.intent.category.LAUNCHER" /> </ intent-filter > </ activity > </ application > </ manifest > |
- Now we have included android:screenOrientation=”portrait” and tools:ignore=”LockedOrientationActivity” for only two activities as we have only two activities in our projects. If you have more than two or it may be one you need to include these attributes to all the activities so that you can lock your entire application to be in portrait mode.
- If you press any one of these icons your emulator device should rotate which are under the toolbar of the emulator:
- After rotating your device app should behave like:
- Its done we have made the entire application to be in portrait mode. Similarly one can make the entire application to be in landscape mode by invoking the following attribute:
android:screenOrientation=”landscape”
Step 9: How to make any one of the activities to be in portrait mode?
- Now we will make the first activity that is Activity1 to be strictly in portrait mode and Activity2 to be in auto orientation.
- Here you have to invoke the android:screenOrientation=”portrait” (“landscape” for landscape mode) and tools:ignore=”LockedOrientationActivity” in anyone of the activity of your choice. Here this has been invoked only for the Activity1. Activity2 is in the auto orientation.
- Again open the AndroidManifest.xml file and by invoking the following code we will make the Activity1 to be strictly in the portrait mode and we make the Activity2 to auto screen orientation.
AndroidManifest.xml
<? xml version = "1.0" encoding = "utf-8" ?> package = "com.adityamshidlyali.activity1" > < application android:allowBackup = "true" android:icon = "@mipmap/ic_launcher" android:label = "@string/app_name" android:roundIcon = "@mipmap/ic_launcher_round" android:supportsRtl = "true" android:theme = "@style/AppTheme" > < activity android:name = ".Activity2" ></ activity > <!--You need to look at the screenOrientation attribute below, is set at portrait only--> < activity android:name = ".Activity1" android:screenOrientation = "portrait" tools:ignore = "LockedOrientationActivity" > < intent-filter > < action android:name = "android.intent.action.MAIN" /> < category android:name = "android.intent.category.LAUNCHER" /> </ intent-filter > </ activity > </ application > </ manifest > |
- After modification of the AndroidManifest file the app should behave like:
Attention reader! Don’t stop learning now. Get hold of all the important Java Foundation and Collections concepts with the Fundamentals of Java and Java Collections Course at a student-friendly price and become industry ready.