Kubernetes Configuration File is the main tool for creating and configuring components in Kubernetes. Components in a Kubernetes cluster can be created in two ways – either by giving commands to the CLI or by creating a configuration file. The advantage of having a Configuration file is that it’s simpler, less confusing, and crucial for automating tasks.
In this article, we will discuss everything about a Kubernetes Configuration file – what a configuration file is? Parts of the configuration file, where do we store Configuration Files? and a tutorial on how to work on a configuration file.
Configuration File
Components in a Kubernetes cluster can be created in two ways –
- By giving kubectl commands to the CLI.
- By creating a Configuration file.
Kubernetes Configuration File is the main tool for creating and configuring components in Kubernetes. It is the preferred way of creating components in a Kubernetes Cluster and there are infinite reasons for that – it helps in automation, it can be version controlled, easier to customize rather than adding multiple flags in the CLI, it can be documented, and many other reasons as well.
Parts of a Configuration file
A Configuration file can be divided into three parts:
1. Metadata
Metadata is part of the Kubernetes Configuration file where we have the data that will help to identify the object. The name of the component is present inside the metadata part of the configuration file, other than that we also have UID, optional namespace, etc.
apiVersion: apps/v1
kind: Deployment
metadata:
  name: sample-app
  labels:
    app: sample
  annotations:
    metadata.example.com/title: "my conf File"
    metadata.example.com/author: "Shubham Singh"
    metadata.example.com/properties:
      format: "YAML"
...
2. Specification
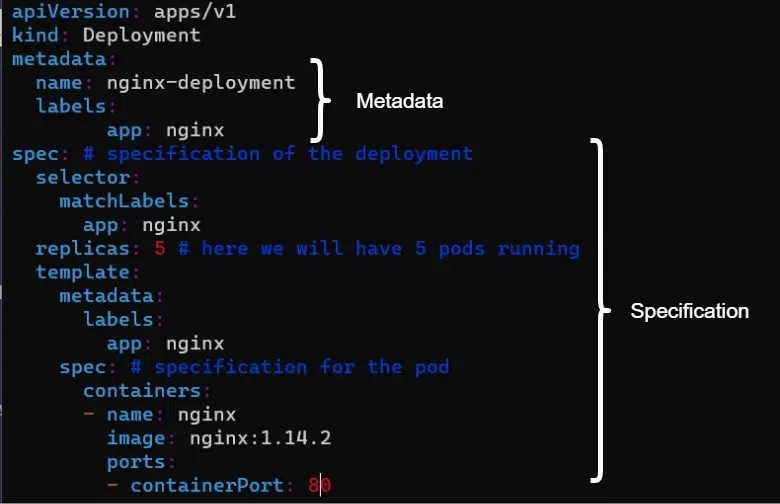
Here is an example of a Deployment configuration file for Kubernetes, have a look at the spec part of the file.
apiVersion: apps/v1
kind: Deployment
metadata:
  name: nginx-deployment
  labels:
        app: nginx
spec: # specification of the deployment
  selector:
    matchLabels:
      app: nginx
  replicas: 5 # here we will have 5 pods running
  template:
    metadata:
      labels:
        app: nginx
    spec: # specification for the pod
      containers:
      - name: nginx
        image: nginx:1.14.2
        ports:
        - containerPort: 80
Here is an example of a Service configuration like, you will again find specification in the file.
apiVersion: v1
kind: Service
metadata:
  name: gfg-service
spec:
  selector:
    app: nginx
  ports:
    - protocol: TCP
      port: 80
      targetPort: 9376
Each component’s configuration file has a specification where you basically put every kind of configuration that you want to apply for that component.
3. Status
Status is not specified by the developer, it is automatically generated and edited by Kubernetes. The way it works is that Kubernetes will compare what is a desired State? And what is the actual State or the actual status of that component? If the actual status and desired state do not match then Kubernetes tries to figure out what needs to be fixed. This is the basis of the self-healing feature of Kubernetes.
For example, Look at the Deployment configuration file below, here we have specified that we want to replicas five of nginx deployment. When we actually create the deployment using this configuration file, Kubernetes will add here the status of your deployment and it will update that states continuously.
apiVersion: apps/v1
kind: Deployment
metadata:
    name: nginx-deployment
    labels: ""
spec:
    replicas: 5
    selector: ""
    template: ""
Let’s say if a status at some point will have just one replica.
status:
    availableReplicas: 1
    conditions:
    - lastTransitionTime: "2020-01-24T10:54:597"
         lastUpdateTime: "2020-01-24T10:54:597"
         message: Deployment has minimum availability.
         reason: MinimumReplicasAvailable
         status: "True"
         type: Available
     - lastTransitionTime: "2020-01-24T10:54:567"
         lastUpdateTime: "2020-01-24T10:54:597"
         message: ReplicaSet "nginx-deployment-7d64f4b
         reason: NewReplicaSetAvailable
         status: "True"
         type: Progressing
    observedGeneration: 1
    readyReplicas: 1
    replicas: 1
    updatedReplicas: 1
Then Kubernetes will compare that status with the specification and we’ll know there is a problem there and other replicas needs to be created. Now Kubernetes will try to fix it until the number of replicas become five.
You must be wondering where does Kubernetes get the status data to automatically update it? This information comes from the etcd, the cluster brain and one of the master processes that actually stores the cluster data. It is etcd that holds at any time, the current status of any Kubernetes component and that is where the status information comes from.
Format
The most common format of the configuration files is YAML which stands for “Yet Another Markup Language” or “YAML Ain’t Markup Language”. YAML is pretty straightforward to understand and is a very simple format but it is very strict about the indentations.
So for creating larger configuration files we you some kind of YAML validator online.
Where do we store Configuration Files?
It is a usual practice to store configuration files with the code. Because since the Deployment and Service is gonna be applied to the application, it is a good practice to store these configuration files in your application code. Therefore it will be part of the whole infrastructure as code concept or you can also have its own git repository just for the configuration files.
Components of a Configuration File
Let’s discuss some important components of a configuration file:
1. Templates
Templates part of the configuration file is the blueprint for the Pods.
template:
    metadata:
      labels:
        app: nginx
    spec:
      containers:
      - name: nginx
        image: nginx:1.14.2
        ports:
        - containerPort: 80
Before learning about Templates we should know that Deployments manage the Pods that are below them. Whenever we edit something in a deployment, it cascades down to all the Pods that it manages and whenever we have to create some Pods, we would actually create a Deployment and it will take care of the rest. In configuration, the template part in the specification part of a Deployment handles the blueprint of the Pods. you see the template also has its own metadata and specification so it’s basically a configuration file inside of a configuration file. This configuration applies to a pod. Pod has its own configuration inside of Deployments.
2. Labels and Selectors
In the configuration file, the connection is established is using Labels and Selectors. Metadata contains the Labels and the Specification contains the Selectors. For example in our Deployment file:
apiVersion: apps/v1
kind: Deployment
metadata:
  name: nginx-deployment
     labels:
        app: nginx
spec:
  selector:
    matchLabels:
      app: nginx
  replicas: 5 # here we will have 5 pods running
  template:
    metadata:
      labels:
        app: nginx
    spec:
      containers:
      - name: nginx
        image: nginx:1.14.2
        ports:
        - containerPort: 8000
In metadata we give components like Deployment or Pod, a key value pair. It could be any key value pair, for example here we are using ‘app: nginx’. (we are talking about the Pods section. The label just sticks to the component. This means that since we have our Pods using this blueprint Label ‘app: nginx’ and we are here telling the Deployment to match all the labels with ‘app: nginx’ using
selector:
    matchLabels:
      app: nginx
to create that connection, so this way Deployment will know which Pods belong to it.
Now Deployment has its own label ‘app: nginx’ and these labels are used by the Service Selector:
apiVersion: v1
kind: Service
metadata:
  name: gfg-service
spec:
  selector:
    app: nginx
  ports:
    - protocol: TCP
      port: 80
      targetPort: 8000
In the Specification of a service, we define a Selector which basically makes a connection between the Service and the Deployment or it’s Pods. This way Service knows which Pods belong to that Service and that connection is made through the Selector of the Label.
3. Ports
The Service configuration has its ports configuration. Service has a port where the service itself is accessible. so if Service sends a request to nginx Service, here it needs to send it on port 80
ports:
    - protocol: TCP
      port: 80
but the service needs to know which Pod it should forward the request but also at which port is that Pod listening and that is the targetPort.
targetPort: 8000
so this tagetPort should match the Container Port in our Deployment.
ports:
        - containerPort: 8000
Kubernetes Configuration File tutorial
Follow this tutorial step by step in order to create Services and Deployments using configuration files in Kubernetes.
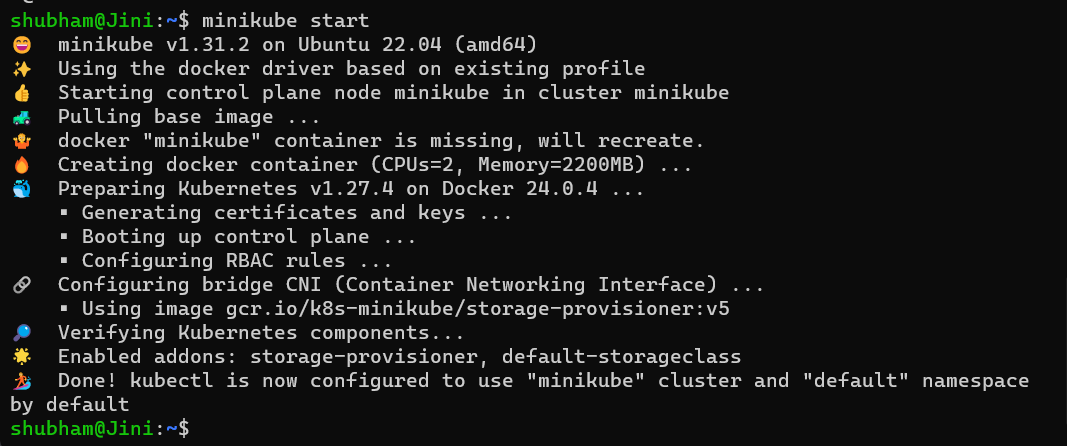
Step 0. You can skip this step if you already have a Kubernetes Cluster running in your machine. But in case you don’t have a Cluster running enter the following command to create Kubernetes locally using minikube:
minikube start
Minikube is a one-node Kubernetes cluster where master processes and work processes both run on one node. According to the official documentation of Minikube.
Step1. Create a Deployment configuration file called gfg-depl.yaml
touch gfg-depl.yaml
and add the following code inside the configuration file:
apiVersion: apps/v1
kind: Deployment
metadata:
  name: gfg-deployment
  labels:
    app: nginx
spec:
  selector:
    matchLabels:
      app: nginx
  replicas: 5 # here we will have 5 pods running
  template:
    metadata:
      labels:
        app: nginx
    spec:
      containers:
      - name: nginx
        image: nginx:1.14.2
        ports:
        - containerPort: 8000
Here we are creating 5 replicas of the Pods and we are using nginx container image.
Step 2. Now Similarly create a Service in kuberneets configuration file called gfg-service.yaml
touch gfg-service.yaml
And add the following code into it:
apiVersion: v1
kind: Service
metadata:
  name: gfg-service
spec:
  selector:
    app: nginx
  ports:
    - protocol: TCP
      port: 80
      targetPort: 8000
Step 3. Now we can apply the configuration files, starting with the Deployment:
kubectl apply -f gfg-depl.yaml
This will create a Deployment called “nginx-deployment”. This will give you a similar output:

Step 4. Similarly create the Service by applying the gfg-service.yaml file:
kubectl apply -f gfg-service.yaml
This will create a Service called “gfg-service”. You will get a similar output:

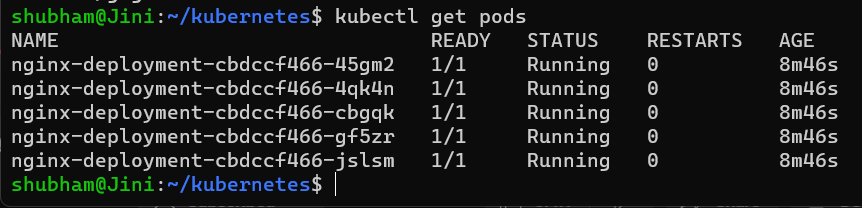
Step 5. Now if we check how many Pods are running by entering the following command:
kubectl get pods
We will see that we have 5 replicas running like we defined in your gfg-depl.yaml configuration file. We get this output:
Step 6. And we can also find out the Services that are running using this command:
kubectl get service
And you will see that we have our gfg-service running and it is listening on the Port 80:

Step 7. Now let’s confirm the endpoints of our service, enter the following command in the terminal to get detailed information about a service:
kubectl describe service gfg-service
You will get a similar output:

We can see that the endpoints are at port 8000 as specified by us in the gfg-service.yaml file.
Step 8. Let’s checkout the Status that is automatically generated by Kubernetes. Enter the following command in the terminal. This command gives the entire yaml file of our Deployment including stuff added by the Kubernetes itself:
kubectl get deployment nginx-deployment -o yaml

You will get an entire file generated, this is only the status part of that file. This really helps during the debugging part. And that is it. That is how we use the Kubernetes Configuration files to create Deployments, Pods, Services etc.
Step 9. Before moving ahead, let’s delete the Deployment and the service we create:
kubectl delete deployment nginx-deployment
kubectl delete service gfg-service
Conclusion
Configuration file is essential for creating components in a Kubernetes Cluster and a far better way than typing commands in the CLI. Reasons are endless – that it helps in automation, it can be version controlled, easier to customize rather than adding multiple flags in the CLI, it can be documented, and many other reasons as well.
Make sure to go through the entire article and do the tutorial on your own by making some changes in the configuration files, that is the best way to practice working with Configuration files. Also make sure to then check your .yaml file with any YAML validator online. We hope that this article helped you improve your understanding about Configuration files and that you gained valuable information out of it.
FAQs on Kubernetes Configuration File – Step by Step Tutorial
1. What are the formats supported by Kubernetes Configuration file?
The formats that are supported by Kubernetes Configuration file are:
- YAML (YAML Ain’t Markup Language)
- JSON (JavaScript Object Notation)
2. How can we implement the configuration files?
You can implement the configuration files by the following command:
kubectl apply -f [FILE NAME]
3. What is the full form of config?
The full form of config is configuration.
4. Can we create Configuration file in JSON
Yes, we can create configuration file in JSON (JavaScript Object Notation) format.
5. What is the use of templates in a Kubernetes Configuration File?
Templates part of the configuration file is the blueprint for the Pods.
Share your thoughts in the comments
Please Login to comment...