Dirb is an online directory scanner that searches web servers for hidden files, directories, and pages. It is a free and open-source utility included in the Kali Linux distribution, a popular operating system for penetration testing and ethical hacking. Dirb may be used to detect typical web server folders and files, such as admin pages, backup files, and configuration files. It operates by sending HTTP queries to the server and analyzing the answers to identify the existence of a file or directory.
Working
It features an internal word list file with roughly 4000 words for brute force attacks. There are many updated wordlists accessible on the internet that may be utilized as well. Dirb scans every directory or object of a website or server for the terms in its wordlist. There might be an admin panel or a subfolder that is under assault. The trick is to locate the things, which are usually hidden.
Installation of Dirb on Kali Linux
Generally, Dirb is pre-installed in Kali Linux but in case you are using some different Linux distro other than Kali Linux then use the following command in the terminal (Command Line Interface):
sudo apt-get install dirb
After using the above command, the output will look similar to as shown in the below screenshot.
The package manager may vary corresponding to different Linux distros. Here in the case of Debian, you are using apt.
Other than this, Dirb can be downloaded from the following sources too.
After installation, it can be verified using just a simple instruction
dirb
The output will contain the version information and the help menu.
Usage of Dirb
Example 1: Scanning single domain
Once installed, you can start using Dirb by opening a terminal window and typing the following command:
dirb http://example.com
At the place of http://example.com, you can use the URL (Uniform Resource Locator) of your choice of target. With its default wordlist, it will start brute forcing directories with around 4600 words.
The results list includes the response code and the size of the file for each ping. In addition, dirb begins examining the folder’s files, returning the response code 200. It uses the wordlist to search all folders and presents the results.
If you want to scan a target with a different wordlist, then it can be done easily using the following command:
dirb http://www.example.com -w wordlist.txt
You can also specify the path of the wordlist instead of the direct filename in case you are in a different directory.
Example 2: Using multiple wordlists
The usual wordlist_files common.txt is used by the aforementioned attack, but we are able to alter this word list and can choose a different wordlist for directory traversal. To examine all of the accessible wordlists, you must take the following route.
cd /usr/share/wordlists/dirb && ls -la
cd /usr/share/wordlists/dirb/vulns && ls -la
Output can be seen in the below screenshots:
Dirb may be used to search for certain susceptible items inside specific web technologies. Each web technology has its own set of flaws. They are not all alike. Dirb can assist us in looking for certain susceptible things that are specific to technology. In Kali, dirb uses specialized wordlists to look for these delicate and frequently used techs. The wordlist shown in the above screenshots can be used for directory traversing corresponding to the type of target.
For each of the various vulnerabilities to test, as you can see above, there are a variety of file lists. Use apache.txt to test your Apache web server if you wish to.
Example 3: Default Working
By default, Dirb uses common.txt as a wordlist which we can find in below mentioned directory.
/usr/share/wordlists/dirb
And there’s no need to mention this default wordlist while using Dirb in default mode. Dirb can be used in default mode by using the below snippet:
dirb http://example.com
Example 4: Saving Output to a file
We save the result of the dirb scan onto a file for the purpose of record management, improved reading, and future references. To do this, we’ll use the dirb scan option -o, which allows us to save the results as a text file.
dirb http://example.com -o result.txt
This will simply create a new file output.txt and will save the results of the scan in it.
As the -o switch is used, the output will get saved in the results.txt file. Let’s check on that file:
Example 5: Limiting enumeration with specific extensions
The -X option of the dirb scan can be used in a variety of circumstances where we need to retrieve the directories on the target server that have a particular suffix. This parameter takes the file extension name and then scans the target server or computer for files with the specified extension.
dirb http://example.com -X .php
This way the output will only contain .php results. Output is in the below screenshot:
Example 6: Ignoring specific status codes
The Status-Code element is a three-digit integer whose first digit designates the answer class and who’s last two digits serve no classification purpose. As shown below, we are using the -N option on code 302 in this assault. This can be achieved by using a flag -N with desired value to ignore the status code.
dirb http://example.com -N 302
It will ignore the pages/directories which will respond to 302 as a status code.
Example 7: Speed Delaying
When working in various situations, there are some environments that we encounter that cannot manage the flood caused by the dirb scan; it is crucial that we postpone the scan for a while in these environments. Using the dirb scan’s -z option makes this simple to accomplish. The duration is given in milliseconds for this parameter. We have given dirb a 100-second delay, just as in the sample we’ve provided.
dirb://example.com -z 100
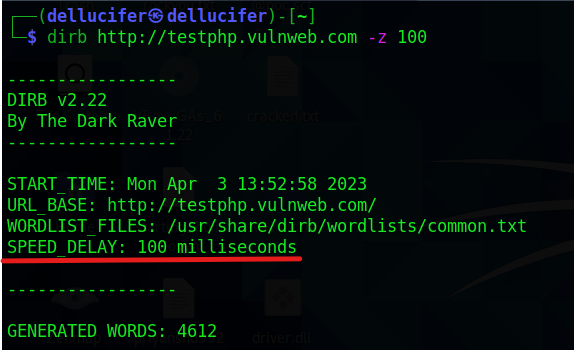
speed delay
As mentioned, it will delay by 100 milliseconds.
Example 8: Without recursiveness
By default, the dirb search traverses all folders. It entails scanning a path and then moving around within it to look for additional subcategories. However, we configured the dirb to not search recursively in some circumstances where there is not enough time. The -r option can be used to accomplish this.
dirb http://example.com -r
The output of this will be something like this:
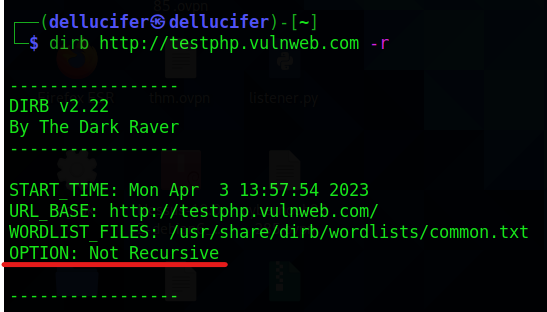
without recursively
In this case, dirb will not scan the directories recursively.
Example 9: Showing non-existing pages
An HTTP response number of 404 indicates that a website’s server was unable to locate the page you were attempting to access. Individual websites frequently alter the 404 Not Found error notices. In some cases, we also need to locate the 404 sites, which dirb by default ignores. We will use the -v option to locate those sites.
dirb http://example.com -v
It will show the output in a verbose mode which means it will show all the requests that dirb is sending to the target web.

verbose mode
Example 10: HTTP AUTHORIZATION (-u user: pass)
The 401-status code and WWW-Authenticate answer header are the foundation of all HTTP authentication/authentication methods. Basic HTTP security methods are the most popular. User name and password are sent by the client in base64-encoded, plaintext form.
So, using dirb, we used the instruction below to get around this type of authentication:
dirb http://testphp.vulnweb.com/login.php -u test:test
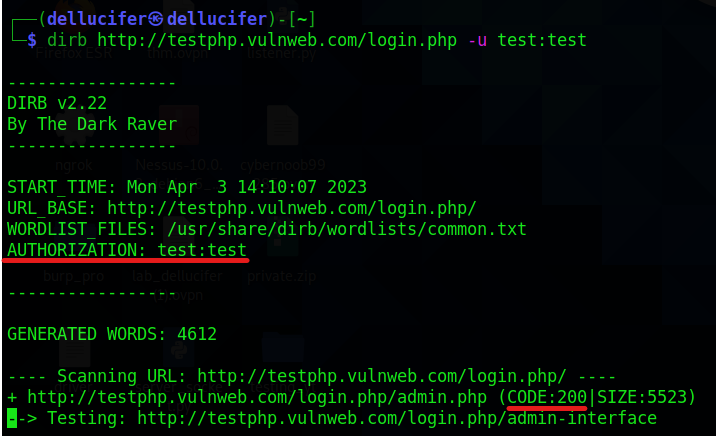
-u test:test
The outcome is that the target URL displays Status-code 200 for the test: test and authorized identity.
Example 11: Custom User-Agent
Scanning a website using a custom user-agent:
dirb http://www.example.com -a “Mozilla/5.0 (Windows NT 10.0; Win64; x64) AppleWebKit/537.36 (KHTML, like Gecko) Chrome/58.0.3029.110 Safari/537.36 Edge/16.16299”
The output of this instruction will look like the below-shown screenshot:

This will send requests using the custom user-agent which is provided in the instruction. For more information regarding user agents, read this article user-agents.
Conclusion
Overall, Dirb is a strong tool for locating hidden directories and files on web servers. Yet, it is critical to utilize it ethically and with the website owner’s consent. Unethical usage of Dirb may result in legal ramifications. The primary goal is to support expert online application monitoring. Particularly in testing that involves security. It plugs some gaps that conventional online vulnerability analyzers do not. Dirb searches for particular web items that other general CGI analyzers are unable to search for. It neither searches for flaws nor looks for potentially vulnerable online material.
Share your thoughts in the comments
Please Login to comment...