Input Types in GraphQL Schema
Last Updated :
30 Jan, 2024
GraphQL is an open-source Query Language for APIs that allows us to query only the data we require, unlike the REST framework which returns the entire data as is configured in its API. With GraphQL, we can maintain a Schema that defines what data we can query from the server, and we can define a proper contractual schema like this between the client and the server. In this article, we will learn about the Union Types in GraphQL Schema, and implement our resolver for it in Node.JS.
What are Input Types?
Input types in GraphQL determine the overall structure of the data that can be provided in the queries, or mutations arguments, and represent the overall structure of the data in any GraphQL operation.
Defining Input Types in GraphQL Schema
Input types in declared using the input keyword in GraphQL, and they are used to define the types for input arguments in a GraphQL query API. These arguments, then, define the structure of how the API request data structure would look like. Let’s take a look at the example below –
input UserInput {
  username: String!
  email: String!
  password: String!
}
Here, UserInput is an input type that suggests that the UserInput query accepts username, email, and password only in its request data structure.
Using Input Types in Mutations
In GraphQL mutations, the input fields are mostly used to represent the data that the mutations accept in the arguments. They help in determining which fields are valid, and which are invalid, while invoking a mutation.
Now, let’s create a basic Schema with an input type, and create our own resolver to see it in action.
Using Input Types in Queries
Step 1: Define the Schema
- To define the GraphQL schema, Create a file and save it with .graphql extension.
- For example we can name the file as schema.graphql.
In the below schema, we will define
- UserInput type that will represent the data while creating a new user
- User type that will represent the user item in the users list
- Query type that will represent the queries that can be made against the API
- Mutation type that will represent the mutations that can be made to update the data against the API
Javascript
const typeDefs = `
input UserInput {
username: String
email: String
password: String
}
type User {
id: ID
username: String
email: String
}
type Query {
users: [User]
}
type Mutation {
registerUser(input: UserInput): User
}
`;
module.exports = {
typeDefs,
};
|
Step 2: Validating Input Types
Now, we will add validation to the above GraphQL Schema Input types, and make the fields as non-nullable (!), so that the fields must be present while performing any query or mutation.
Javascript
const typeDefs = `
input UserInput {
username: String!
email: String!
password: String!
}
type User {
id: ID!
username: String!
email: String!
}
type Query {
users: [User]
}
type Mutation {
registerUser(input: UserInput!): User
}
`;
module.exports = {
typeDefs,
};
|
Step 3: Handling Input Types in Resolvers
Let’s set up the server, save the file as server.js and we will implement resolvers. Resolver functions are responsible for resolving the queries that are defined in the schema. Here, we will create a “users” resolver that will be responsible for resolving the “users” query, and we will return the users list, that we will create and store on the server itself. We will also create a “registerUser” resolver for the “registerUser” mutation that will add a new user to the users array, based on the user input passed into its argument.
Then, we will create an executable schema using the “makeExecutableSchema” function that will combine our schema and resolvers, and create an executable GraphQL schema.
At last, we will create and initialise our App using express, and start the app.
Filename: server.js
Javascript
const express = require('express');
const { graphqlHTTP } = require('express-graphql');
const { makeExecutableSchema } = require('graphql-tools');
const { typeDefs } = require('./schema.graphql');
const users = [];
const resolvers = {
Query: {
users: () => users,
},
Mutation: {
registerUser: (_, { input }) => {
const newUser = {
id: String(users.length + 1),
...input,
};
users.push(newUser);
return newUser;
},
},
};
const schema = makeExecutableSchema({ typeDefs, resolvers });
const app = express();
app.use(
'/graphql',
graphqlHTTP({
schema,
graphiql: true,
})
);
const PORT = process.env.PORT || 3000;
app.listen(PORT, () => {
console.log(`Server running on http:
});
|
Step 4: Start the server
To start the server run the below command in the terminal.
node server.js
Output:
The output of the above query will look like below –
Server running on http://localhost:3000/graphql
Step 5: Executing Mutations with Input Types
To test the query, execute the below query in the GraphiQL interface.
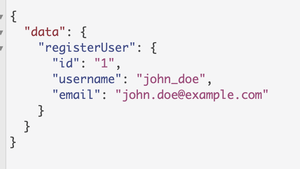
In the below query, we will call the mutation field, “registerUser”, and pass the inputs containing the data that needs to be inserted into the DB. After the insertion is successful, the mutation returns the id, username, and email in the response.
mutation {
  registerUser(input: {
    username: "john_doe",
    email: "john.doe@example.com",
    password: "password123"
  }) {
    id
    username
    email
  }
}
Output:
The output of the above query will look like below –
Conclusion
In this article, we learned about the Input type in GraphQL Schema, and how we use it provide types for input arguments in a GraphQL API. We also created a Node.JS server, with a GraphQL schema, and a resolver for it to see it in action. Input type is a powerful type that can help us ensure consistency in the data shared between client and server, and also enforce input validations for the data that .
Share your thoughts in the comments
Please Login to comment...