How to Work with Databases using Spring Boot?
Last Updated :
07 Jun, 2023
First, let’s start by understanding what Spring Boot is. Spring Boot is a framework that simplifies the process of building and deploying applications by providing a set of pre-configured tools and dependencies. It is built on top of the Spring framework and provides a lightweight and opinionated approach to building applications.
Now, let’s move on to databases. A database is a collection of data that is stored in an organized manner. Databases are used to store and retrieve information for various applications. There are different types of databases, such as SQL and NoSQL databases, each with its own strengths and weaknesses.
To work with databases in Spring Boot, we will be using the Spring Data JPA module. JPA stands for Java Persistence API, which is a specification for managing relational data in Java applications. Spring Data JPA provides a set of abstractions on top of JPA that makes it easier to work with databases in Spring Boot
Setting up the Project
Before we start working with databases, we need to set up a Spring Boot project. You can use any IDE of your choice, but for this guide, we’ll be using IntelliJ IDEA.
- Open IntelliJ IDEA and select “New Project” from the welcome screen.
- Select “Spring Initializr” from the left menu and click “Next”.
- Enter a group and artifact ID for your project, then click “Next”.
- Select the “Spring Web” and “Spring Data JPA” dependencies, then click “Next”.
- Choose a location for your project and click “Finish”.
After the project setup, below are the steps to follow when working with databases in Spring Boot:
Step 1. Define the database configuration in the application.properties file
Spring Boot allows you to define the database configuration in a properties file. This file is usually named application.properties and is located in the src/main/resources folder. You can define the database URL, username, password, and driver class in this file. Below is an example of how you can define the database configuration in the application.properties file:
spring.datasource.url=jdbc:mysql://localhost:3306/mydatabase
spring.datasource.username=root
spring.datasource.password=123456
spring.datasource.driver-class-name=com.mysql.jdbc.Driver
In the above example, we are using a MySQL database, and we have defined the database URL, username, password, and driver class.
Step 2. Create a model class
Next, you need to create a model class that represents the data you want to store in the database. This class should have fields corresponding to the database table’s columns. Let’s say we want to store information about books in our database. We can create a Book model class as follows.
Java
@Entity
@Table(name = "books")
public class Book {
@Id
@GeneratedValue(strategy = GenerationType.IDENTITY)
private Long id;
private String title;
private String author;
private int yearPublished;
public Book() {
}
public Book(String title, String author, int yearPublished) {
this.title = title;
this.author = author;
this.yearPublished = yearPublished;
}
public Long getId() {
return id;
}
public String getTitle() {
return title;
}
public String getAuthor() {
return author;
}
public int getYearPublished() {
return yearPublished;
}
public void setId(Long id) {
this.id = id;
}
public void setTitle(String title) {
this.title = title;
}
public void setAuthor(String author) {
this.author = author;
}
public void setYearPublished(int yearPublished) {
this.yearPublished = yearPublished;
}
}
|
The above code is an example of a Java class called Book.
- The @Entity annotation is used to indicate that this class represents a database table. The @Table(name = “books”) annotation specifies the name of the table in the database that this class represents (in this case, the table name is “books”).
- The class has four instance variables: id, title, author, and yearPublished.
- The @Id annotation is used to indicate that the id instance variable is the primary key for the database table. The @GeneratedValue(strategy = GenerationType.IDENTITY) annotation specifies that the values for the id column will be automatically generated by the database.
- The class has two constructors. The first is a default constructor that takes no parameters and does not do anything. The second constructor takes three parameters (title, author, and yearPublished) and sets the corresponding instance variables.
- The class has getters and setters for all four instance variables. The getters allow you to retrieve the values of the instance variables, and the setters allow you to set the values of the instance variables
Step 3. Create a repository interface
After creating the model class, you need to create a repository interface. This interface should extend the JpaRepository interface provided by Spring Data JPA. This interface defines a set of methods for performing CRUD (Create, Read, Update, Delete) operations on the database. We need to create a repository interface for the Book model. Below is an example.
Java
@Repository
public interface BookRepository extends JpaRepository<Book, Long> {
}
|
In the above example, we have annotated the interface with @Repository to indicate that it is a Spring component that manages the interaction with the database. We have also extended the JpaRepository interface and specified the entity type (Book) and the ID type (Long).
Step 4. Use the repository in the service layer
Now that you have a repository interface, you can use it in the service layer. The service layer is responsible for implementing business logic and using the repository to interact with the database. Let’s create a BookService class that will use the BookRepository to perform CRUD operations on the database:
Java
@Service
public class BookService {
@Autowired
private BookRepository bookRepository;
public List<Book> getAllBooks() {
return bookRepository.findAll();
}
public Book getBookById(Long id) {
return bookRepository.findById(id).orElse(null);
}
public Book createBook(Book book) {
return bookRepository.save(book);
}
public Book updateBook(Long id, Book book) {
Book existingBook = bookRepository.findById(id).orElse(null);
if (existingBook != null) {
existingBook.setTitle(book.getTitle());
existingBook.setAuthor(book.getAuthor());
existingBook.setYearPublished(book.getYearPublished());
return bookRepository.save(existingBook);
} else {
return null;
}
}
public void deleteBook(Long id) {
bookRepository.deleteById(id);
}
}
|
The above Java class called BookService provides CRUD (Create, Read, Update, Delete) operations for a Book entity using Spring Framework’s BookRepository interface. Here’s a brief explanation of the methods:
- getAllBooks(): returns a list of all books from the repository.
- getBookById(Long id): returns a specific book by its ID from the repository.
- createBook(Book book): creates a new book entity in the repository and returns it.
- updateBook(Long id, Book book): updates an existing book entity with the given ID and returns it.
- deleteBook(Long id): deletes an existing book entity with the given ID from the repository.
- The @Autowired annotation is used to inject the bookRepository dependency into the BookService class. The orElse(null) method is used to handle the case where the book with the given ID is not found in the repository and returns null in that case.
Overall, this class provides a simple interface to interact with a database or other persistence mechanisms to perform CRUD operations on a Book entity.
Step 5. Use the service layer in the controller
Finally, you can use the service layer in the controller to handle HTTP requests and responses. The controller is responsible for handling incoming HTTP requests, calling the appropriate service method, and returning a response to the client. Let’s create a BookController class that will handle HTTP requests and use the BookService to perform CRUD operations on the database:
Java
@RestController
@RequestMapping("/books")
public class BookController {
@Autowired
private BookService bookService;
@GetMapping("")
public List<Book> getAllBooks() {
return bookService.getAllBooks();
}
@GetMapping("/{id}")
public Book getBookById(@PathVariable Long id) {
return bookService.getBookById(id);
}
@PostMapping("")
public Book createBook(@RequestBody Book book) {
return bookService.createBook(book);
}
@PutMapping("/{id}")
public Book updateBook(@PathVariable Long id, @RequestBody Book book) {
return bookService.updateBook(id, book);
}
@DeleteMapping("/{id}")
public void deleteBook(@PathVariable Long id) {
bookService.deleteBook(id);
}
}
|
The BookController class is a Java class that provides REST API endpoints for the Book entity. The purpose of this class is to map incoming HTTP requests to methods that handle those requests and return a response. Let’s take a look at the methods in this class:
- @GetMapping(“”): This method maps to the root /books endpoint and returns a list of all books by calling the getAllBooks() method of the BookService class.
- @GetMapping(“/{id}”): This method maps to the /books/{id} endpoint and returns a specific book by its ID by calling the getBookById() method of the BookService class. The @PathVariable annotation extracts the id parameter from the request URL.
- @PostMapping(“”): This method maps to the root /books endpoint and creates a new book entity by calling the createBook() method of the BookService class with the request body as the Book parameter. The @RequestBody annotation is used to bind the request body to the book parameter.
- @PutMapping(“/{id}”): This method maps to the /books/{id} endpoint and updates an existing book entity with the given ID by calling the updateBook() method of the BookService class with the id and request body as parameters. The @PathVariable annotation is used to extract the id parameter from the request URL, and the @RequestBody annotation is used to bind the request body to the book parameter.
- @DeleteMapping(“/{id}”): This method maps to the /books/{id} endpoint and deletes an existing book entity with the given ID by calling the deleteBook() method of the BookService class. The @PathVariable annotation extracts the id parameter from the request URL.
- The @Autowired annotation is used to inject the bookService dependency into the BookController class, which allows us to call methods from the BookService class to perform CRUD operations on the Book entity.
Overall, the BookController class provides a REST API interface to interact with the BookService class and perform CRUD operations on the Book entity.
Testing our Implemented API
A detailed explanation of how to test each endpoint of this REST API controller using Postman:
- GET /books – To test the getAllBooks() method, open Postman and create a new GET request. Enter the URL http://localhost:8080/books in the request URL field, and then click the Send button. The server should return a list of all the books in the system as a JSON array in the response body.
- GET /books/{id} – To test the getBookById() method, create a new GET request in Postman and enter the URL http://localhost:8080/books/{id} in the request URL field, where {id} is the ID of the book you want to retrieve. Then click the Send button. The server should return the book with the specified ID as a JSON object in the response body.
- POST /books – To test the createBook() method, create a new POST request in Postman and enter the URL http://localhost:8080/books in the request URL field. Then, in the Body tab, select the option “raw” and choose the data format as JSON. In the request body, enter a JSON object representing the book you want to create. The book object should have the following attributes: title, author, isbn, publisher, publishedDate, description, pageCount, thumbnailUrl, language, previewLink. Then click the Send button. The server should create the book and return it as a JSON object in the response body.
- PUT /books/{id} – To test the updateBook() method, create a new PUT request in Postman and enter the URL http://localhost:8080/books/{id} in the request URL field, where {id} is the ID of the book you want to update. Then, in the Body tab, select the option “raw” and choose the data format as JSON. In the request body, enter a JSON object representing the updated book. The book object should have the same attributes as when creating a book. Then click the Send button. The server should update the book with the specified ID and return it as a JSON object in the response body.
- DELETE /books/{id} – To test the deleteBook() method, create a new DELETE request in Postman and enter the URL http://localhost:8080/books/{id} in the request URL field, where {id} is the ID of the book you want to delete. Then click the Send button. The server should delete the book with the specified ID and return a 204 No Content response if the deletion was successful.
Output Screenshots
(1) GET /books/{id}:
(2) POST /books:
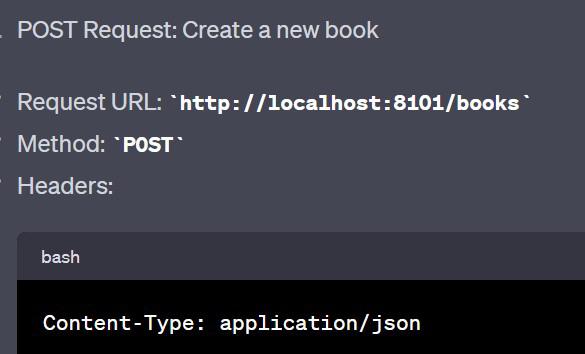
Create Book Request
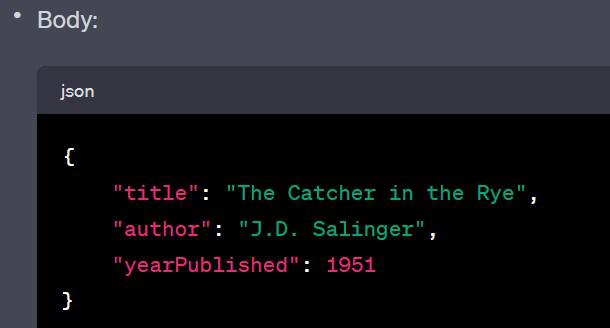
Create Book Request
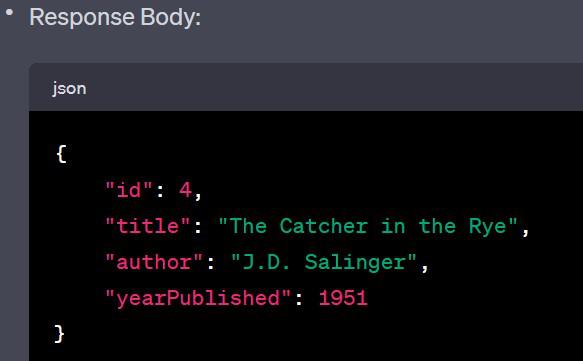
Create Book Response
Make sure that the server hosting the REST API is running and that you have the correct URL and port number. If you encounter any errors or unexpected behavior, review the code and check that the API endpoints are being correctly implemented.
Share your thoughts in the comments
Please Login to comment...