How to use AuthGuard For Angular 17 routes?
Last Updated :
01 May, 2024
In Angular applications, it is often necessary to protect certain routes to prevent unauthorized access. The Angular Router provides a feature called Route Guards, which allows you to control access to routes based on specific conditions. One of the commonly used Route Guards is AuthGuard, which checks if the user is authenticated before allowing access to a particular route. In this article, we will explore how to set up and use the AuthGuard in an Angular 17 application.
Prerequisites:
Approach
- Create AuthGuard Service: Start by creating an AuthGuard service in your Angular app. Implement the
CanActivate interface to control access to routes based on user authentication. - Authenticate Users: Implement authentication logic within the AuthGuard service to determine if a user is authenticated and allowed to access a route.
- Provide the AuthGuard: Ensure the AuthGuard service is provided either at the root level or within a specific module to make it available throughout the app.
- Apply AuthGuard to Routes: Add the AuthGuard to the routes that require protection by specifying it in the
canActivate property of the route definition. - Handle Redirects: Handle redirection for unauthorized users within the AuthGuard service to ensure a smooth user experience and prevent unauthorized access to protected routes.
Steps to use AuthGuard
Step 1: Create an angular application
Once you have the prerequisites, you can use the below commands to create an angular application.
ng new auth-gaurds
cd auth-gaurds
Step 2: Create routes to protect
Before we create and implement the auth guard, first we need to make some components we need to protect. We will create two components auth and dashboard,
ng g c auth
ng g c dashboard
We will create a simple auth service file so it will be easy to manage auth state in our application. Also we will update our app.router.ts and app, auth and dashboard components to have a basic skeleton of a real world application.
Step 3: Create Auth Service:
We can use the below command to create the service file using angular cli.
ng g s auth
Folder Structure:
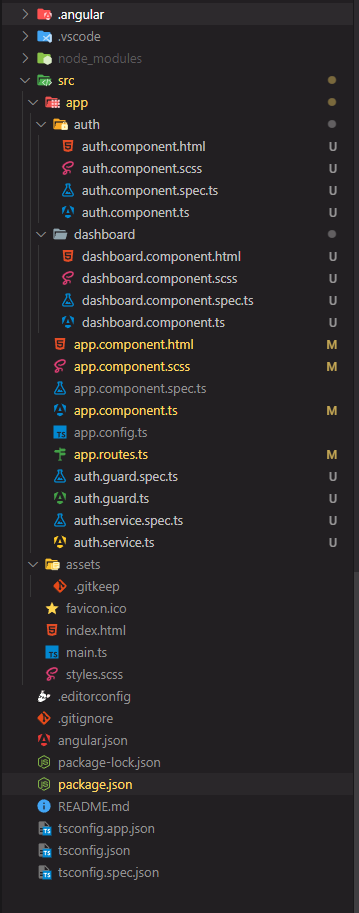
Dependencies:
"dependencies": {
    "@angular/animations": "^17.2.0",
    "@angular/common": "^17.2.0",
    "@angular/compiler": "^17.2.0",
    "@angular/core": "^17.2.0",
    "@angular/forms": "^17.2.0",
    "@angular/platform-browser": "^17.2.0",
    "@angular/platform-browser-dynamic": "^17.2.0",
    "@angular/router": "^17.2.0",
    "rxjs": "~7.8.0",
    "tslib": "^2.3.0",
    "zone.js": "~0.14.3"
  }
Example: This example demonsrates Angular routes.
HTML
<!-- auth.component.html -->

<div>
    <p class="title">Sign In</p>
    <form [formGroup]="signInForm" (ngSubmit)="signIn()">
        <input type="email" name="email" formControlName="email">
        <br>
        <button type="submit">Sign In</button>
    </form>
</div>
<!-- dashboard.component.html -->
<div>
    <p class="title">Dashboard</p>
    <p>Welcome, {{ email }}</p>
    <button (click)="signOut()">Sign Out</button>
</div>
<!-- app.component.html -->

<nav>
    <a routerLink="/dashboard" routerLinkActive="active">Dashboard</a>
    <a routerLink="/auth" routerLinkActive="active">Sign In</a>
</nav>

<router-outlet></router-outlet>
/* auth.component.scss */

div {
    width: 600px;
    border: 1px solid #ccc;
    padding: 16px;
    margin: 16px auto;

    p {
        font-size: 28px;
    }

    input {
        width: 100%;
        margin-bottom: 8px;
    }

    button,
    input {
        height: 40px;
        font-size: large;
    }
}
/* dashboard.component.scss */

div {
    width: 600px;
    border: 1px solid #ccc;
    padding: 16px;
    margin: 16px auto;

    p {
        font-size: 28px;
    }

    button {
        height: 40px;
        font-size: large;
    }
}
/* app.component.scss */

nav {
    width: 600px;
    margin: 0 auto;
    padding: 16px;

    display: flex;
    justify-content: space-between;

    font-size: 20px;

    a {
        color: black;
    }

    a:hover {
        cursor: pointer;
        text-decoration: underline;
    }

    .active {
        color: blue;
    }
}
// auth.component.ts

import { Component } from '@angular/core';
import {
    FormControl,
    FormGroup,
    ReactiveFormsModule,
    Validators,
} from '@angular/forms';
import { AuthService } from '../auth.service';

@Component({
    selector: 'app-auth',
    standalone: true,
    imports: [ReactiveFormsModule],
    templateUrl: './auth.component.html',
    styleUrl: './auth.component.scss',
})
export class AuthComponent {
    signInForm = new FormGroup({
        email: new FormControl<string>('', [Validators.required]),
    });

    constructor(private authService: AuthService) { }

    signIn() {
        if (this.signInForm.valid) {
            this.authService.signIn(this.signInForm.value.email as string);
        }
    }
}
//auth.service.ts

import { Injectable } from '@angular/core';
import { Router } from '@angular/router';
import { BehaviorSubject } from 'rxjs';

@Injectable({
    providedIn: 'root',
})
export class AuthService {
    public isAuth = new BehaviorSubject<boolean>(false);

    constructor(private router: Router) {
        this.autoSignIn();
    }

    autoSignIn() {
        if (localStorage.getItem('email')) {
            this.isAuth.next(true);
            this.router.navigate(['/dashboard']);
        }
    }

    signIn(email: string) {
        localStorage.setItem('email', email);
        this.isAuth.next(true);
        this.router.navigate(['/dashboard']);
    }

    signOut() {
        localStorage.removeItem('email');
        this.isAuth.next(false);
        this.router.navigate(['/auth']);
    }
}
// dashboard.component.ts

import { Component } from '@angular/core';
import { AuthService } from '../auth.service';

@Component({
    selector: 'app-dashboard',
    standalone: true,
    imports: [],
    templateUrl: './dashboard.component.html',
    styleUrl: './dashboard.component.scss',
})
export class DashboardComponent {
    email = localStorage.getItem('email');

    constructor(private authService: AuthService) { }

    signOut() {
        this.authService.signOut();
    }
}
// app.component.ts

import { Component } from '@angular/core';
import { RouterLink, RouterLinkActive, RouterOutlet } from '@angular/router';
import { AuthService } from './auth.service';

@Component({
    selector: 'app-root',
    standalone: true,
    imports: [RouterOutlet, RouterLink, RouterLinkActive],
    templateUrl: './app.component.html',
    styleUrl: './app.component.scss',
})
export class AppComponent {
    title = 'auth-gaurds';

    constructor(public authService: AuthService) { }
}
Once you have made this changes, you should have a simple working application as shown below.
No auth guard
Step 4: Protecting dashboard route
Notice that when we are not signed in and we try to click the dashboard nav anchor, we can still see the dashboard component. Well, we will need to create an auth guard in order to protect it.
Before we create the file let us see types of auth guard available in angular.
- CanActivate: Guards the entry to a route, deciding if the user can access it or not (e.g., authentication check).
- CanActivateChild: Guards the entry to child routes within a parent route, allowing or denying access to specific child routes.
- CanDeactivate: Guards the exit from a route or component, prompting the user before navigating away (e.g., unsaved changes check).
- CanMatch: Guards whether a specific route should be considered during navigation or not, dynamically enabling or disabling routes based on conditions.
We will of course create a CanActivate guard in order to protect the dashboard route.
ng g g auth
You will be prompted to select type for the guard, you can select CanActivate here.

Types of guards
Step 5: Implementing the auth gaurd
Now we need to use the guard we created, for this we can update our app.router.ts as below
JavaScript
// app.router.ts

import { Routes } from '@angular/router';
import { authGuard } from './auth.guard';

export const routes: Routes = [
    {
        path: 'auth',
        loadComponent: () =>
            import('./auth/auth.component').then((m) => m.AuthComponent),
    },
    {
        path: 'dashboard',
        loadComponent: () =>
            import('./dashboard/dashboard.component').then(
                (m) => m.DashboardComponent
            ),
        canActivate: [authGuard],
    },
];
// auth.guard.ts

import { inject } from '@angular/core';
import { CanActivateFn, Router } from '@angular/router';
import { AuthService } from './auth.service';

export const authGuard: CanActivateFn = (route, state) => {
    const authService = inject(AuthService);
    const router = inject(Router);

    if (authService.isAuth.value == false) {
        router.navigate(['/auth']);
        return false;
    }

    return authService.isAuth.value;
};
Once we have added authGuard to canActivate property, we can see that we can no longer visit the dashboard route when we aren’t signed in.
With auth guard
Share your thoughts in the comments
Please Login to comment...