How to Update the Java Version in Windows?
Last Updated :
02 Jan, 2023
Java is a high-level, robust, object-oriented, and secure programming language that was developed in the year 1995 by Sun Microsystems (which is now part of Oracle group), and James Gosling is known as the father of Java. It is a general-purpose programming language intended to let programmers write once, and run anywhere, meaning that compiled Java code is compatible to run on all platforms that support Java without the need to recompile which is a major advantage.
Java Update
Java Update is a feature that keeps your windows computer up to date with the latest Java releases. You can use Java’s update feature to manually force an available update on windows. But, when you have auto update enabled, your system periodically checks for new versions of Java and updates it automatically.
Auto Update in Java
We can get the auto-update feature in Java
First, you need to check whether the windows check for update automatically you can do this by following the steps:
- Open the start by clicking on the windows logo on the bottom left side of the screen, and the start menu will pop up.
- Now type configures Java and clicks on configure Java option from the list of matching programs, this will open Java control panel.
- Once Java Control Panel is launched click on the update tab to access settings.
- Select the Check for Updates Automatically check box for enabling Java updates to check for updates automatically.
Now, whenever an update is available you will receive a notification asking your permission to download the update, and a tooltip balloon appears on your Windows desktop. To install the new update, click on the notification dialog.
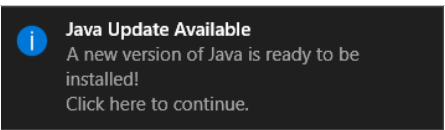
Update Notification for Java
Now an Update Available dialog appears. To start the installation, click Update. Otherwise, you can click Later to install the update at a later time. When the installation is complete a dialog appears where you can click Finish to complete the installation.
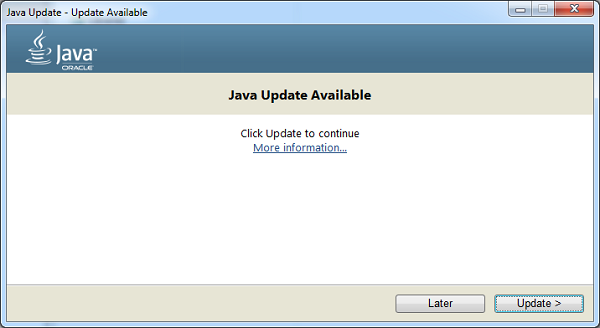
An update Available dialog box
Using the Update Schedule, you can change the frequency for updates accordingly: daily, weekly, or monthly (default). To do this follow the given steps:
- From the Java Control panel click on the Update tab, then select Advanced, now the Automatic Update Advanced Settings dialog will appear.
- Here you can change the frequency and the date and time for the Java Update, finally click OK.
Java Update scheduler will check for newer Java updates and notify you at the scheduled frequency.
Java Manual Update
1. Open the Start option by clicking the Windows logo in the bottom-left corner of the screen. The Start menu will pop up.
.png)
Main Screen with start option
2. Type in configure java in the search box and searches for matching programs will be displayed.
.png)
List of matches
3. Click on configure java option from the list of matching programs and the Java Control Panel will open.
.png)
Java Control Panel
4. Click on the update option in the Java control panel and then click on the Update now option at the bottom-right corner of the window and this initiates the Java to look for new updates.
.png)
Java Control Panel after clicking on the Update tab
5. If Java finds an available update, follow any on-screen prompts that appear to confirm the update, then allow your computer to install the latest version of Java.
You cannot update to a new version of Java if you receive a dialog box saying that you are already running the latest version of Java.
.png)
This notification appears when you are using the latest Java version
Finally, if you are not sure about the Java version then go to the official link to update to the latest version.
Share your thoughts in the comments
Please Login to comment...