How to Style an Active Link in VueJS ?
Last Updated :
05 Jan, 2024
In single-page applications effective navigation becomes crucial. In this article, we’ll explore how to style active links in Vue.js using the popular routing library, Vue-router.
Steps to Setup the Project Environment
Step 1: Create a VueJS application using the below command.
npm create vue@latest
Step 2: Navigate to the project that you have just created by this command.
cd your-project-name
Step 3: Run this command to install all packages
npm install
Step 4: Now, Set up vue router using below command.
npm install vue-router@4
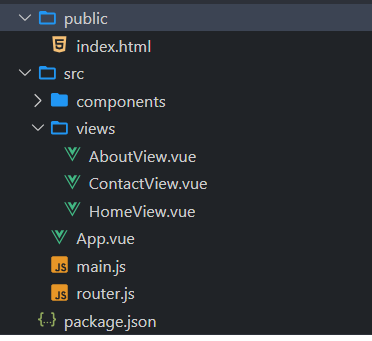
Step 5: Create a folder inside src named views. Inside it, we will put all our components.
Step 6: Create components inside the views folder as listed below:
- AboutView.vue
- ContactView.vue
- HomeView.vue
Step 7: Create another file inside src named router.js. It will handle the routes of the application.
Step 8: Now Create a navbar inside the App.vue file to navigate easily around the webpage.
Step 9: Add the below code to main.js. It is the starting point of our application.
// main.js file
const { createApp } = require('vue');
import App from './App.vue';
import createRouter from './router';
createApp(App).use(createRouter()).mount('#app');
Project Structure:
Using router-link-exact-active class
Vue-router automatically adds a class called router-link-active to the active router-link in your code. You can use this class to style the active link and do modifications in your project.
Syntax:
.router-link-exact-active {
  //your styles here
}
Example: The below JavaScript codes will help you implement the router-link-exact-active class to apply style in active links.
Javascript
<!-- App.vue file -->
<script>
import
{
RouterView,
RouterLink,
useRouter,
useRoute
} from 'vue-router';
const router = useRouter();
const route = useRoute();
export default {
name: '#app',
};
</script>
<template>
<nav>
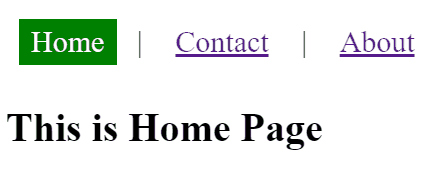
<RouterLink to="/">Home</RouterLink> |
<RouterLink to="/contact">Contact</RouterLink> |
<RouterLink to="/about">About</RouterLink>
</nav>
<RouterView />
</template>
<style>
nav {
width: 100%;
font-size: 24px;
}
nav a {
display: inline-block;
padding: 5px 10px;
margin: 10px;
}
nav a.router-link-exact-active {
background-color: green;
color: #fff;
text-decoration: none;
}
</style>
|
Javascript
import {
createRouter,
createWebHistory }
from 'vue-router';
import HomeView
from './views/HomeView.vue';
import ContactView
from './views/ContactView.vue';
import AboutView
from './views/AboutView.vue';
const router = () =>
createRouter({
history: createWebHistory(),
routes: [
{
path: '/',
name: 'home',
component: HomeView,
},
{
path: '/about',
name: 'about',
component: AboutView,
},
{
path: '/contact',
name: 'contact',
component: ContactView,
},
],
});
export default router;
|
Javascript
const { createApp } = require('vue');
import App from './App.vue';
import createRouter from './router';
createApp(App).
use(createRouter()).
mount('#app');
|
Javascript
<!-- views -> AboutView.vue file -->
<template>
<h1>This is About Page</h1>
</template>
<script>
export default {};
</script>
|
Javascript
<!-- views -> ContactView.vue file -->
<template>
<h1>This is Contact Page</h1>
</template>
<script>
export default {}
</script>
|
Javascript
<!-- views -> HomeView.vue file -->
<template>
<h1>This is Home Page</h1>
</template>
<script>
export default {}
</script>
|
Output:

Conditional class binding
You can conditionally bind a class based on the route using Vue.js class binding. We adjust the condition in the “:class” binding based on the specific requirements.
NOTE: All the other files will be same as in the previous example except the App.vue file.
Syntax:
<RouterLink to="/" class="{ 'active-link': $route.path === '/' }>Home</RouterLink>
.active-link {
  // Your styles here
}
Example: The below JavaScript codes will help you implement the conditional class binding method to apply style in active links.
Javascript
<!-- App.vue file -->
<script>
import {
RouterView,
RouterLink,
useRouter,
useRoute }
from "vue-router";
const router = useRouter();
const route = useRoute();
export default {
name: '#app',
};
</script>
<template>
<nav>
<RouterLink
to="/"
:class=
"{ 'active-link': $route.path === '/' }">
Home
</RouterLink> |
<RouterLink
to="/contact"
:class=
"{ 'active-link': $route.path === '/contact' }">
Contact
</RouterLink> |
<RouterLink
to="/about"
:class=
"{ 'active-link': $route.path === '/about' }">
About
</RouterLink>
</nav>
<RouterView />
</template>
<style>
nav {
width: 100%;
font-size: 24px;
}
nav a {
display: inline-block;
padding: 5px 10px;
margin: 10px;
}
nav a.active-link {
background-color: green;
color: #fff;
text-decoration: none;
}
</style>
|
Javascript
import {
createRouter,
createWebHistory }
from 'vue-router';
import HomeView
from './views/HomeView.vue';
import ContactView
from './views/ContactView.vue';
import AboutView
from './views/AboutView.vue';
const router = () =>
createRouter({
history: createWebHistory(),
routes: [
{
path: '/',
name: 'home',
component: HomeView,
},
{
path: '/about',
name: 'about',
component: AboutView,
},
{
path: '/contact',
name: 'contact',
component: ContactView,
},
],
});
export default router;
|
Javascript
const { createApp } = require('vue');
import App from './App.vue';
import createRouter from './router';
createApp(App).use(createRouter()).mount('#app');
|
Javascript
<!-- views -> AboutView.vue file -->
<template>
<h1>This is About Page</h1>
</template>
<script>
export default {};
</script>
|
Javascript
<!-- views -> ContactView.vue file -->
<template>
<h1>This is Contact Page</h1>
</template>
<script>
export default {}
</script>
|
Javascript
<!-- views -> HomeView.vue file -->
<template>
<h1>This is Home Page</h1>
</template>
<script>
export default {}
</script>
|
Output:
Share your thoughts in the comments
Please Login to comment...