How to Integrate Paypal in Node ?
Last Updated :
28 Mar, 2024
In today’s digital age, online payments have become an integral part of e-commerce and web applications. Among the myriad of payment gateways available, PayPal stands out as one of the most widely used and trusted platforms. Integrating PayPal into your Node.js application can streamline the payment process and enhance user experience.
In this article, we’ll explore various approaches to integrating PayPal into a Node.js application, covering installation, configuration, and implementation steps.
Approach 1: Using PayPal REST API:
- This approach involves directly interacting with the PayPal REST API endpoints using HTTP requests.
- Developers can send requests for various operations such as creating payments, executing payments, and handling webhooks.
- It offers flexibility and control over the integration process but requires handling HTTP requests manually.
Approach 2: Using PayPal SDKs:
- PayPal provides SDKs for various programming languages, including Node.js.
- Developers can leverage the official PayPal Node.js SDK to simplify the integration process.
- The SDK abstracts the API calls and provides higher-level functions for common tasks such as creating payments and handling transactions.
Approach 3: Using npm Packages:
- There are npm packages available, such as paypal-rest-sdk, that wrap the PayPal REST API and provide a more Node.js-friendly interface.
- These packages streamline the integration process by abstracting away low-level HTTP request handling and providing easy-to-use methods for interacting with PayPal services.
Steps to Create NodeJS App and Installing Module:
Step 1: Create the new NodeJS app using the following command.
npm init -y
Step 2: Install the required packages in your server using the following command.
npm install paypal-rest-sdk
The Updated Dependencies in package.json File are look like:
"dependencies": {
  "paypal-rest-sdk": "^1.0.0"
}
Get an access token:
Your access token authorizes you to use the PayPal REST API server. To call a REST API in your integration, exchange your client ID and secret for an access token in an OAuth 2.0 token call. For more on OAuth 2.0 basic authentication, see RFC 2617 Basic Authentication Scheme.
Postman
- Download Postman for your environment.
- In Postman, select the POST method.
- Enter the https://api-m.sandbox.paypal.com/v1/oauth2/token request URL.
- On the Authorization tab, select the Basic Auth type.
- Type your client ID in the Username box, and type your secret in the Password box.
- On the Body tab, select x-www-form-urlencoded.
- Type grant_type in the key box, and type client_credentials in the value box.
- Click Send.
`partial:partials/docs/rest/token-expiry.en-XC`
Steps to Integrate Paypal in NodeJS:
Step 1: Create a PayPal Business Account
- Visit the PayPal Developer website and sign up or log in with your existing account.
- Once logged in, navigate to the Dashboard and click on “Create App” under the “REST API apps” section.
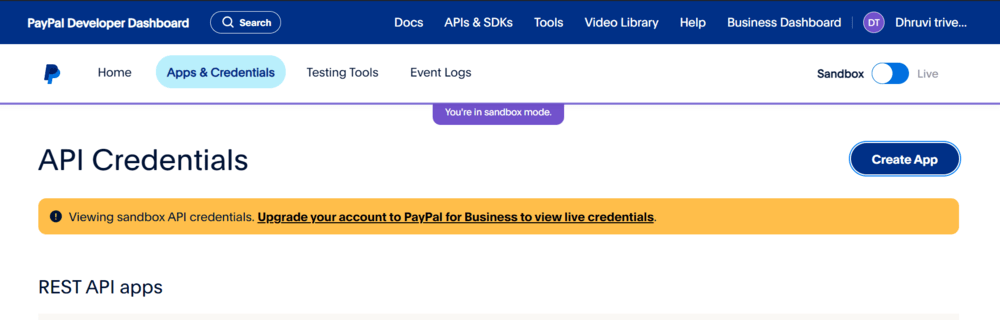
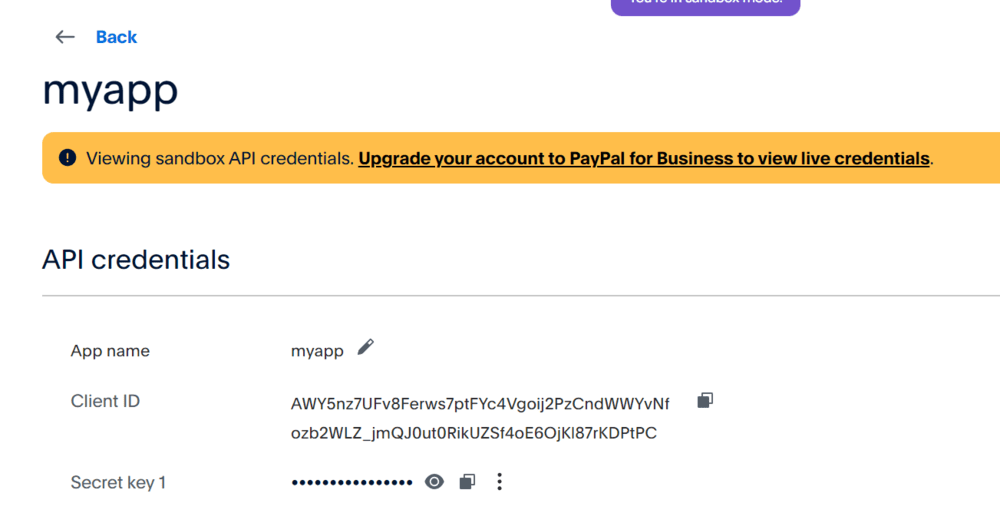
- Enter a name for your app, select the sandbox developer account, and click on “Create App” to generate client ID and secret.
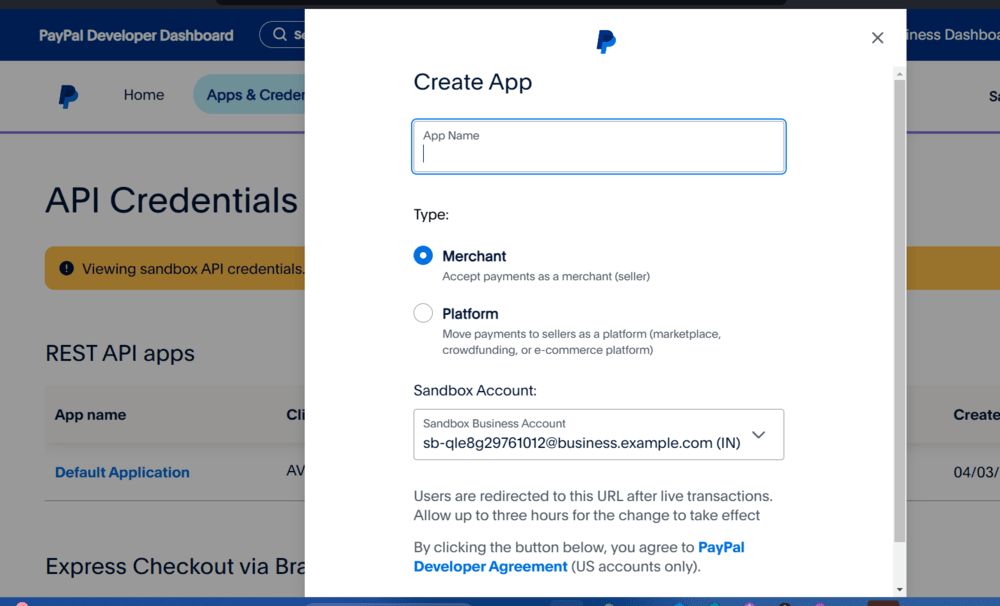
- Note down the client ID and secret as you’ll need them later in your React application.
Step 2: Install PayPal SDK
- In your React project directory, install the PayPal SDK using npm:
npm install paypal-rest-sdk
Step 3: Replace ‘YOUR_CLIENT_ID‘ and secret key with your actual PayPal client ID obtained from the PayPal Developer Dashboard.
Step 4: Configure Your NodeJS Project:
Create a new file (e.g., server.js) to handle PayPal integration in your Node.js application:
JavaScript
const express = require('express');
const paypal = require('paypal-rest-sdk');

paypal.configure({
    'mode': 'sandbox',  // live
    'client_id': 'yourclientid',
    'client_secret': 'yoursecretkey'
});

const PORT = 3000;
const app = express();

app.get('/', (req, res) =>
    res.sendFile(__dirname + "/index.html"));

app.post('/pay', (req, res) => {
    const create_payment_json = {
        "intent": "sale",
        "payer": {
            "payment_method": "paypal"
        },
        "redirect_urls": {
            "return_url": "http://localhost:3000/success",
            "cancel_url": "http://localhost:3000/cancel"
        },
        "transactions": [{
            "item_list": {
                "items": [{
                    "name": "Red Sox Hat",
                    "sku": "001",
                    "price": "25.00",
                    "currency": "USD",
                    "quantity": 1
                }]
            },
            "amount": {
                "currency": "USD",
                "total": "25.00"
            },
            "description": "Hat for the best team ever"
        }]
    };

    paypal.payment.create(
        create_payment_json,
        function (error, payment) {
            if (error) {
                throw error;
            } else {
                for (let i = 0; i < payment.links.length; i++) {
                    if (payment.links[i].rel === 'approval_url') {
                        res.redirect(payment.links[i].href);
                    }
                }
            }
        });
});

app.get('/success', (req, res) => {
    const payerId = req.query.PayerID;
    const paymentId = req.query.paymentId;

    const execute_payment_json = {
        "payer_id": payerId,
        "transactions": [{
            "amount": {
                "currency": "USD",
                "total": "25.00"
            }
        }]
    };

    paypal.payment.execute(paymentId,
        execute_payment_json,
        function (error, payment) {
            if (error) {
                console.log(error.response);
                throw error;
            } else {
                console.log(JSON.stringify(payment));
                res.send('Success');
            }
        });
});

app.get('/cancel', (req, res) => res.send('Cancelled'));

app.listen(PORT, () => console.log(`Server Started on ${PORT}`));
Step 4: Run Your Node Application
- Ensure your development server is running:
node server.js
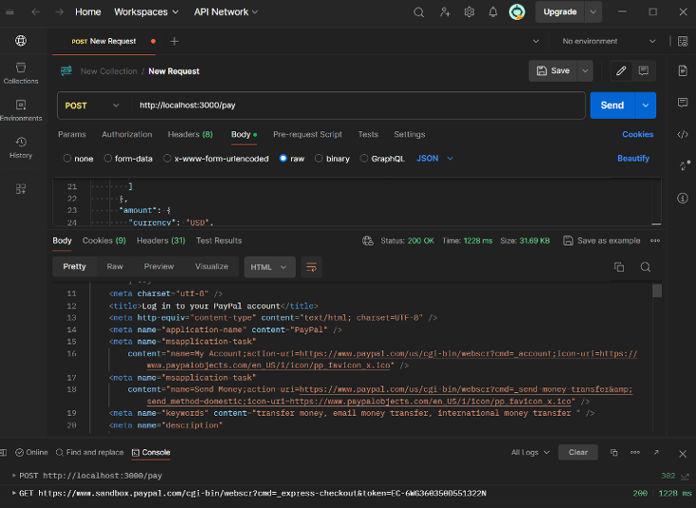
Testing PayPal Integration:
- Open the Postman application on your computer.
- Set the request type to POST.
- In the request Body choose raw and add the following :-
{
  "intent": "sale",
  "payer": {
    "payment_method": "paypal"
  },
  "redirect_urls": {
    "return_url": "http://localhost:3000/success",
    "cancel_url": "http://localhost:3000/cancel"
  },
  "transactions": [
    {
      "item_list": {
        "items": [
          {
            "name": "Red Sox Hat",
            "sku": "001",
            "price": "25.00",
            "currency": "USD",
            "quantity": 1
          }
        ]
      },
      "amount": {
        "currency": "USD",
        "total": "25.00"
      },
      "description": "Hat for the best team ever"
    }
  ]
}
Output:
Conclusion:
In conclusion, integrating PayPal into a NodeJS application can be achieved through various approaches, each offering its own advantages in terms of flexibility, simplicity, and control. By following the steps outlined in this guide and choosing the approach that best fits your project requirements, you can seamlessly incorporate PayPal payments into your web application.
Share your thoughts in the comments
Please Login to comment...