How to Handle CPU Intensive Loads In Node JS ?
Last Updated :
09 Feb, 2024
Node is a Single-Threaded Non-blocking event-driven architecture. But when it comes to handling heavy CPU-intensive workloads it can face some challenges while handling it. In this article, we will explore strategies to tackle CPU-intensive loads in Node.js effectively, to handle demanding tasks like a hero.
What are CPU extensive workloads?
Regarding I/O intensive operations like calling external APIs, and fetching data from a database NodeJs seamlessly offloads the tasks to libuv to unblock the main thread and continue accepting further responses. However, when it comes to handling CPU-intensive tasks, the single-threaded nature of Node.js might block the main thread from taking any more requests to process. This is where the concept of multithreading comes to the rescue, enabling you to efficiently manage compute-heavy workloads.
When there is a non-blocking I/O operation like calling a third-party API or fetching something from the database, Node JS is smart enough to offload these tasks to worker threads in Libuv but there might be cases when you want to do some CPU-intensive tasks in such a case NodeJs won’t automatically offload the task to libuv, it will continue using the main thread for the complete processing
Example: Here is a small nodejs server using expresjs which has exposed two different APIs. Here the blocking API which runs a simple for loop for 2000000000000 and sends a successful response.
Node
const express = require("express");
const app = express();
app.get("/blocking", (req, res) => {
const workerPromises = [];
for (let i = 0; i < 2000000000000; i++) { }
res.status(200).send(‘Processing completed’);
});
app.get("/non-blocking", (req, res) => {
res.status(200).send(‘Non-blocking process completed’);
});
app.listen(3000, () => { //listening to port 3000
console.log("Server listening on port 3000");
});
Try starting this server and hit the /blocking api from your browser and you will see the tab in continuously loading. Now, try hitting the /non-blocking api, you will see that this is also loading and not returning any response. This is because the main thread is blocked by the /blocking api.
To solve this we need to explicitly offload the task from the main thread to the Libuv worker threads so that our main thread can continue accepting other requests.
Example: Here non-blocking code sends a successful response.
Node
//index.js
const express = require("express");
const app = express();
const { Worker } = require(‘worker_threads’);
app.get("/blocking", (req, res) => {
const worker = new Worker("./worker.js");
//receiving data from worker threads
worker.on("message", (message) => {
res.status(200).send(message);
});
//fired if an error occurs in the child thread
worker.on("error", (error) => {
res.status(500).send(‘Blocking process failed to complete’);
});
});
app.get("/non-blocking", (req, res) => {
res.status(200).send(‘Non-blocking process completed’);
});
app.listen(3000, () => {
console.log("Server listening on port 3000");
});
Node
//worker.js
const { parentPort, workerData } = require("worker_threads");
for (let i = 0; i < 2000000000000; i++)
parentPort.postMessage(‘Blocking operation successfully completed’);
In the above code as you can see we have created a new worker.js file which contains the long CPU intensive task to be performed and when complete processing is done, the worker is communicating back to the main thread by posting a message. In the main index.js file we have created an instance of the worker task of worker.js file and it’s listening to any message that the worker thread is posting.
Now, let’s further optimise the code by sending some data from parent to worker thread this time. As you can see in the above code we are only spawning the task to one worker thread but in most of the modern computers we have more than 2 cores. Lets make use of that and try spawning 4 worker thread and see the difference.
Index.js
Node
//index.js
const express = require("express");
const app = express();
const { Worker } = require(‘worker_threads’);
const THREADCOUNT = 4; //specifying the no of threads to spawn
function createWorker() {
return new Promise((resolve, reject) => {
const worker = new Worker("./worker.js", {
workerData: { threadCount: THREADCOUNT }, //sending data to worker threads
});
worker.on("message", (message) => {
resolve(message); //listening to messages from worker threads
});
worker.on("error", (error) => {
reject(error);
});
});
}
app.get("/blocking", (req, res) => {
const workerPromises = [];
for (let i = 0; i < THREADCOUNT; i++) {
workerPromises.push(createWorker());
}
const threadResults = await Promise.all(workerPromises);
const total = threadResults.reduce((a, b) => a + b, 0);
res.status(200).send(`Total: ${total}`);
});
app.get("/non-blocking", (req, res) => {
res.status(200).send(‘Non-blocking process completed’);
});
app.listen(3000, () => {
console.log("Server listening on port 3000");
});
Node
//worker.js
const { parentPort, workerData } = require("worker_threads");
for (let i = 0; i < 2000000000000 / workerData.threadCount; i++) {} //using received data from main thread
parentPort.postMessage(1); //sending data to main thread
Output:In the above example we have spawned 4 worker threads and divided the task among them equally to optimise the performance. Here is the time taken by the /blocing API.
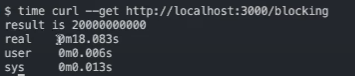
One Worker Thread
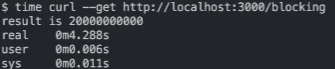
Four Worker Threads
Explanation: You can clearly see the different between the above examples. Time taken by the first program which has only one worker thread is ~ 18 sec and the time taken by the server having 4 worker threads is ~ 4 sec.
Share your thoughts in the comments
Please Login to comment...