How to Enable Access Control & Authentication in MongoDB
Last Updated :
04 Apr, 2024
MongoDB is a popular NoSQL, Database management system used in modern applications. MongoDB is used for its flexibility and scalability. In the case of databases, security is always an important aspect. In database systems, proper security methods have to be implemented to save data from unauthorized access.
Access Control and User Authentication is the first step to safe data in the database from external access without authority. In MongoDB also, we can set up authentical and use access control. In this article, we will be learning about how we can set up access control and authentication for MongoDB servers.
What is Authentication in MongoDB?
- Authentication in MongoDB is about verifying and identifying the users or applications trying to access the Database.
- Authentication involves providing the correct username and password, which we say as credentials to get access to users of the database.
- This practice is very important when we have a multi-user setup where multiple users and applications are trying to get data and send data to the database.
- This helps save data from wrong access or illegal overriding data in the database.
Why Authentication is Important?
- Authentication is essential to build industry-grade database systems. Authentication helps in maintaining the security and integrity of the Database.
- Unauthorized access, data breaches, and illegal activities such as theft or data tampering can be prevented.
- For example: We can think of data as money and databases as Banks. So now if anyone can access the bank locker without any validation then there is always a concern about the money in the bank. One can steal it, take some money from another account holder without knowledge, etc. So, we must define access control and authentication.
Steps to Enable Access Control and Authentication in MongoDB
Step 1: Start the MongoDB
To make changes in MongoDB, we need to start the MongoDB server. To start MongoDB, open the command prompt on our computer and execute the following command to start MongoDB.
mongosh
Output:

Connect to MongoDB
As we can see that the database has been started and we can access it.
Step 2: Create Document
Now to create database, we can manually write all details in command prompt or we can use MongoDB Compass to use the GUI. Let’s quickly create a database in MongoDB and add some documents in it. First use a database name to use the database. It will not instantly create the Database, as we create a Collection, the database will be created.
use mydb //Creates database
db.createCollection("nameColletion")
Output:

Create Collection
Once we have successfully created a database, it’s time to insert few documents into the database.
db.nameCollection.insertOne({ name: "Philips Kumar", age: 21})
Output:

Insert Documents
Now using the same format, we can insert more data in the database as per our requirements. Use the article on How to Create Database & Collection in MongoDB for better understanding.
Step 3: Create User
To use authentication, we need to define a user and assign certain role to it. Lets create a user named Geek and assign the role of useradmin for the database mydb. The useradmin role provides the user with power to create new users and assign roles to others including self. This user can access, update or delete any data in the database. If short, we are giving the superuser role to the user named Geek. However, The privileges of the user stays only inside the database defined.
 db.createUser({
...     "user": "Geek",
...     "pwd": "abc123",
...     "roles": [ { "role": "userAdmin", "db": "mydb" } ]
... })
Output:

Create User
Step 4: Change MongoDB Configuration
By default, in MongoDB the authentication feature is not enable. So, to use authentication we first have to edit the configurations and enable access control. To do that, navigate to the mongod.conf file. The path to the file should be similar to the following,
C:\Program Files\MongoDB\Server\7.0\bin
Open the mongod.conf file in any editor and write the following under security,
security:
        authentication: enabled

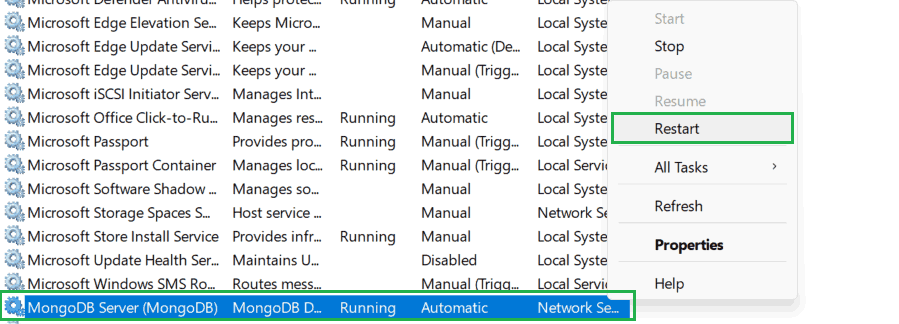
Save the changes and close the file. Once we have made the changes, Go to Services in Windows and find MongoDB and restart it.
Step 5: Try Authentication
Once restarted, now try accessing the data we have inserted without authenticating with valid credentials. Let’s ask the database to show all documents available in the collection nameCollection.
db.nameCollection.find()
Output:

require authentication
As we can see it is saying that we need to autheticate first to get the data. That means we have successfully enable authentication and access control.
Now to see the data, let’s first give the username and password.
db.auth("Geek","abc123")
Output:

Give user and Password
Now check for the available documents in the database.
db.nameCollection.find()
Output:

As we can see after successful authentication, we get access to the documents available in the MongoDB database.
Conclusion
Authentication is needed everywhere if there exists sensitive data. Follow the above given steps in the order to successfully implement Access Control and Authentication in MongoDB server. The order of steps should be maintained, otherwise we may face some errors. If you change the configuration file before creating user then you will not be able to access the database. Also make sure to create the database Admin before you start following the steps. As if any issues encountered, you can use it’s privileges to add new users and modify roles and databases.
Share your thoughts in the comments
Please Login to comment...