How to create SQL table using DBI library in R
Last Updated :
01 Aug, 2023
DBI library in R programming is used for interacting with different types of database systems such as MySQL for different types of professional work like data analysis using R language. We can easily connect to the database, run queries and retrieve results from the database in the R environment with the DBI library. In this article, we looked at how to write SQL tables in R using the DBI library.
Before we start, make sure you have R and R Studio installed on your computer, which contains the following R packages: DBI and RMySQL. In this article, we are using MySQL Database. If you don’t have these packages installed, you can install them by running the following code in the console of R Studio:
install.packages("DBI")
install.packages("RMySQL")
Creating SQL table using DBI library in R
Here is a step-by-step guide to create an SQL table using DBI Library in R:
Step 1: Importing Required Library
R
library(DBI)
library(RMySQL)
|
Step 2: Connecting to the Database
After successfully importing the library, we now need to connect to the database. DBI library has a function dbConnect() which we can use to establish a connection with the database using the appropriate driver.
Syntax:
dbConnect(RMySQL::MySQL(), dbname = "database_name", host = "localhost", port = 3306,
                user = "username", password = "password")
R
connection <- dbConnect(RMySQL::MySQL(),
dbname = "Rlanguage",
host = "localhost",
port = 3306,
user = "username",
password = "password")
|
We used a database named RLanguage on the localhost machine. As you see, we specify the port number, username, and password, which is required to access the database.
Step 3: Creating a Table
After successfully Connecting with Database, now we can start writing our query for performing specific operations on our database. We can use the dbSendQuery() function to send a SQL query to the database.
Here’s how we can create a table using R language:
R
dbSendQuery(connection, "CREATE TABLE geeksforgeeks(
S_NO INT(11) UNSIGNED AUTO_INCREMENT PRIMARY KEY,
Name VARCHAR(50),
Feedback VARCHAR(1000)
)")
|
Output:
After executing the dbSendQuery(), we can see a table named “geeksforgeeks” is created in the MySQL server with the following column names – S_NO, Name, and Feedback.
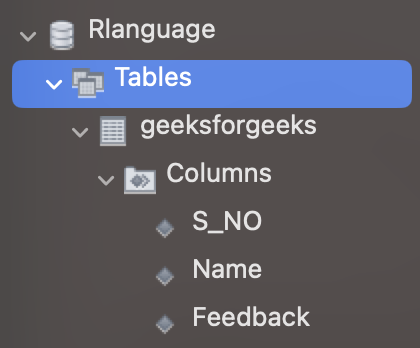
Table created in MySQL server
Step 4: Inserting Data into Table
In this step, we will insert data into the table with dbSendQuery() function by using SQL INSERT INTO statement followed by the table name and values which we want to insert in the database like this:
Syntax:
dbSendQuery(connection,"INSERT INTO table_name (column1, column2, column3)
VALUES (value1, value2, value3);")
R
dbSendQuery(connection, "INSERT INTO geeksforgeeks (Name, Feedback)
VALUES ('Raj', 'I love GeeksForGeeks 3000'),
('Yash', 'I love Reading Article on GeeksForGeeks');")
|
Output:
Now we will execute the following query in our MySQL shell to see if our data is inserted into the table.
select * from geeksforgeeks;
We can see that the rows are inserted into the table geeksforgeeks.
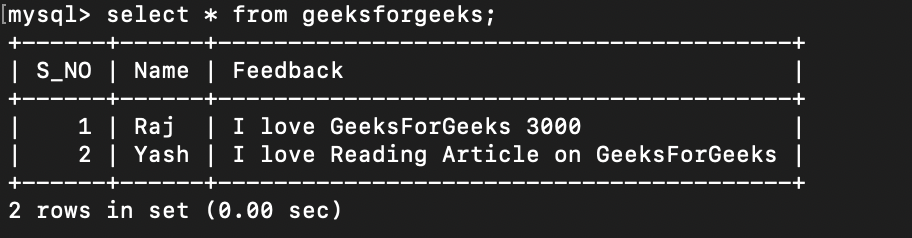
Data inserted in the table
Share your thoughts in the comments
Please Login to comment...