Mobile application development industries play a major role in today’s generation as many businesses are looking forward to building a mobile application for their enterprise. A developed application needs to be published on Google Play Store for the intended audience to download and use it.
In order to create and upload your app on Google Play Store, make sure you are ready with the following things beforehand.
- High-quality screenshots of the app, short and full app descriptions, and compiled APK.
- In order to submit an Android App Bundle, you need to register yourself in the Play App Signing. It helps you in storing your app signing key on Google’s infrastructure.
- Google Play supports apps of a maximum size of 150 MB. So, make sure to remove unused code and resources in case your app size exceeds the limit.
How to Upload Your App to Google Play Store?
Now that you are ready with the above-mentioned things, follow the steps given below to upload an app to Google Play Store. Make sure that you follow the steps in the given order only so as to avoid any mistakes while publishing your application.
Steps to Create and Upload Your App to the Google Play Store
1. Create Your Developer Account
In order to publish your app on Google Play Store, you need to create your Google Play developer account on Google Play Console.
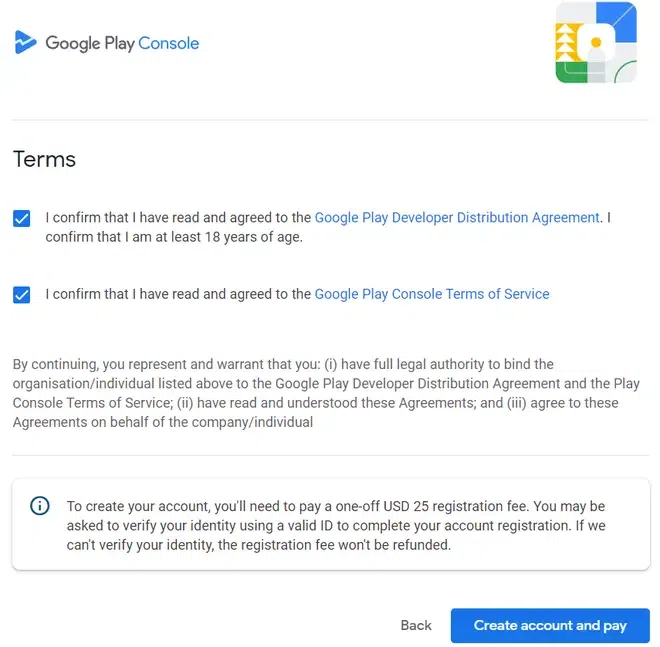
Google Play Developer Console is a platform created by Google for the developers of Android to publish their applications on the Google Play Store and track their performance. Android developers wishing to publish their apps on Google Play Store need to pay a one-time fee of $25. The payment could be done either using a credit card, debit card, or online payment methods. It usually takes around 48 hours for your developer’s account to be reviewed and activated.
For Google Play Console Sign-in, you can use your Email ID. After that, you will be asked whether you are an individual developer or an organization, and based on your choice, you will be asked to fill in some details about yourself or your organization. Click on Create account and pay and complete the payment process.
2. Create a Google Merchant Account
The next important step is to connect your developer account with your Google merchant account if your application involves in-app purchases. Click on Set up a merchant account in order to create a merchant account.

Once your merchant account has been created, your Google Play Console will get automatically linked to it and after that, you can easily manage, monitor, and analyze the app sales.
In case you already have an existing account, you can simply go to the Download reports and then to the Financial section.
3. Create Your App
After setting up your account, the next you need to do is, create an app.
To create an application,
- Go to the dashboard and click on All apps
- Click on Create App button
After that, you will be asked to fill out some details regarding your app.

- App name: You need to enter the name of your application which has a maximum of 30 characters in length. This name will be displayed on the Google Play Console. You can change this name at any point in time.
- Default language: You can choose the default language of your app by choosing any language from the drop-down list.
- App or game: You need to specify the type of your application whether it is a game or an app. You can change it later.
- Free or paid: You need to specify whether your app is available for free or users have to pay a certain amount to install your app. This can be changed later as well till the time your app has not been published. Once your app is published on Google Play Store, you cannot change it.
After filling in these details, make sure that your app falls under the Google policies of the Developer program and abides by US Export Laws. Once you have read and agreed to the terms and conditions, click on Create App.
4. Set up Your App
After that, you will be directed to the dashboard of your application where you will see Set up your app option after scrolling a bit. Click on View Tasks. One by one, enter the details about your app.

- Set privacy policy: Google requires you to include a privacy policy when publishing your app in order to prevent app violations of privacy.
- App access: In order for Google to review your app, you need to mention whether your app has access to all its parts or if some of the parts are restricted.
- Ads: You can let Google know if your app contains any ads or not.
- Content rating:

You need to fill out a content rating questionnaire. This is an important step as without it, Google will mark your app as an underrated app and will take off from Google Play Store. Click on the Start questionnaire button and get started. The questionnaire is divided into three sections: Category, Questionnaire, and Summary. Starting with the Category section, you are required to enter some basic details like the Email address which will be used to contact you regarding your content ratings, and Category asking about the type of your application whether it is a game, social, or any other type of app.
Click on the Next button.
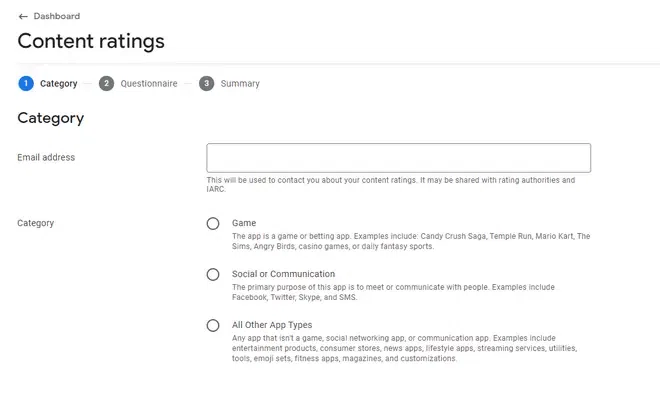
Next comes the Questionnaire section where you are asked more about your application.

Make sure all the details are filled with the right information and cross-check it in the Summary section. Click on Submit to save.
- Select an app category and provide contact details: You are required to mention the type of your app and choose a category. You are also asked to enter details like email address, phone number, and website which will be visible to the users on the Google Play Store and through which they can contact you.

- Set up your store listing: Once you click on it, you will be asked to fill in some important details about your app listing.
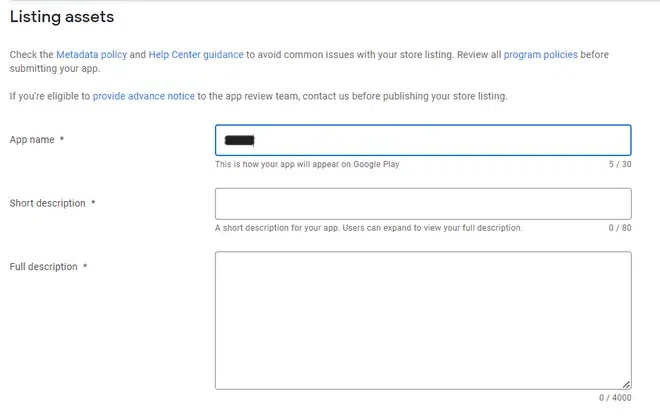
- App name: It will automatically display the name of the application you entered in the previous step. In case, you wish to change the name of the application, you can change it here.
- Short description: You need to enter a short description of your app with a maximum length of 80 characters.
- Full description: You need to enter a full description explanation of your application of a maximum length of 4000 characters. Make sure to use targeted keywords so that your app is shared and recommended to the desired audience.
After this, you are required to upload the graphics of your application like app icons, screenshots, and videos which will increase the user engagement of your application.
- App icon: You can upload your app’s icon in either a PNG or a JPEG format with a maximum file size of 1 MB having 512 pixels by 512 pixels dimensions.
- Feature graphic: You can upload a feature graphic image in either a PNG or a JPEG format with a maximum file size of 15 MB having 1024 pixels by 500 pixels dimensions.
- Video: It is optional to add a YouTube video link but in case you have it, make sure it is public with ads turned off, has no age restriction, and should be in a landscape mode.
- Phone screenshots: You are required to upload a minimum of 2 and a maximum of 8 screenshots of your application in either a PNG or a JPEG format with each file having a maximum size of 8 MB, an aspect ratio of either 16:9 or 9:16 and each side between 320 pixels and 3840 pixels dimensions.
- 7-inch tablet screenshots: You can also upload a maximum of 8 screenshots of your application taken from a 7-inch tablet in either a PNG or a JPEG format with each file having a maximum size of 8 MB, aspect ratio of either 16:9 or 9:16, and each side between 320 pixels and 3840 pixels dimensions.
- 10-inch tablet screenshots: You can also upload a maximum of 8 screenshots of your application taken from a 7-inch tablet in either a PNG or a JPEG format with each file having a maximum size of 8 MB, aspect ratio of either 16:9 or 9:16, and each side between 1080 pixels and 7680 pixels dimensions.
- Chromebook screenshots: You can also upload a minimum of 4 and a maximum of 8 screenshots of your application in either a PNG or a JPEG format with each file having a maximum size of 8 MB, an aspect ratio of either 16:9 or 9:16 and each side between 1080 pixels and 7680 pixels dimensions.
5. Create and Upload the app to Google Play Store
In the dashboard, go to the Release your App option. Here, you are required to finally upload APK to Google Play Console upload your app to the Google Play Console, and submit it for review before it goes live.
Go to Select countries and regions and choose all the countries you wish your app to be available.
Go to the Select Testers section and choose the type of testing:
- Internal Test – It is available for up to 100 testers of your choice
- Close Test – It is available for a few testers
- Production Release – It is available to all the Google Play Store users in the countries you have chosen
- Open Test – It is available to Google Playtesters and also users who wish to test from your store listing
Now, click on Create a new release option and upload the app bundles and fill in the release details. After confirming all the details, add the app to the platform.
Then, Go to the App Releases tab -> select Manage Production -> Select Edit Release -> Click on Review -> Click on Start rollout to Production -> Select Confirm.
Your app is now successfully uploaded and submitted for review. It usually takes around 7 days for your app to be approved by Google and go live on Google Play Store.
Conclusion
Once the app is live, you must have a promotion and marketing strategy ready so that you can start advertising your app to the intended audience. Make sure to analyze the data insights and analytics and upgrade your application by releasing new versions with bugs fixed and new features to keep the audience engaged. The above steps were the final steps to publish your apps on the play store. Uploading your app on the play store is a one-time process but to get better reviews and top results you should continuously bring updates and fix the bugs from time to time.
FAQs
Q1. Can we upload Android apps for free to Google Play Store?
Answer:
No, there is a one-time fee of $25 which you have to pay when you publish your first application. After that, you don’t need to pay any fee.
Q2. How do Play Store apps make money?
Answer:
Purchases of in-app resources, subscriptions, and freemium upsell are among the highest-earning monetization methods. Transaction fees, online sales, or sponsorships may complement these.
Q3. Does Play Store pay per download?
Answer:
Google takes 30% of the revenue made on the Android app and gives the rest 70% to the developers.
Q4. Can you make a free app paid?
Answer:
Once your app has been offered for Free, the app can’t be changed to Paid. If you want to charge for the app, you need to create a new app with a new package name and set a price.
Q5. Can anyone publish an app?
Answer:
To upload and publish private apps, you only need an Android App Bundle or an Android application package (APK) and a title. To publish any private or public app, you must register as a developer.
Share your thoughts in the comments
Please Login to comment...