How to create an IAM user in AWS
Last Updated :
02 Jan, 2024
In this, the title IAM stands for Identity Access Management. When we working on cloud services in a company. Different employee has different categories of access. The employees in the company are restricted to particular resource utilization and Administration has the complete access to review all employee’s work. Similarly in AWS, the root user has access to all the services managed by administrators. From the root user, we create the IAM users providing some specific permissions as per job role/position.
Through IAM users it will provide both Authentication and Authorization. They are as follows:
- Authentication: Authentication from the AWS account is provided through username and password. Whenever the user tries to log in, the verification of username and password will be done. It can be thought of as a gateway for accessing the resources.
- Authorization: Once authentication is provided secondly comes to authorizing the resources/services. Administration will assign this by providing access to resources/services of the users.
In this Article I will show you how to create an IAM user with the username “myuser1” [Authentication] and provide permission to view only the EC2 instances [ Authorization ]. So this IAM user can only view the EC2 instances and can’t modify the EC2 instances and can’t access the other services.
Step-by-Step Guide to Creating an IAM User in AWS
Step 1: Go to the Amazon web services Sign-In console. Create an AWS Free Tier Account.
Step 2: Try signing in with your root username and password
Step 3: Search in the search box entering “IAM user” as shown in the image.

Step 4: After you enter the IAM user page, you can see the IAM dashboard then go to the “users” option by clicking on it.

In the user sections try creating a user by clicking on the “create user” button, now you will follow through with 3 phases for creating an IAM user.
i. Specifying the user details
- Provide the username that you would like to create as an IAM user

ii. Setup the permissions
- Select the attach policies directly option, It’s meant to assign the policies individually for the IAM user.
- In the Permissions policies section go to the search box and enter EC2ReadOnly, you can we see the policy name with AmazonEC2ReadOnly select it to provide this policy access to creating IAM user.
- Similarly you can add on whatever permissions that you would like from the pre-created policies as per the requirement.
- They will be a case in which we can’t find the require based policies in that moment , you have to create policies as your own.

iii. Review and create
- In this step you have to review the information that you provided, once verified then go for the create option.
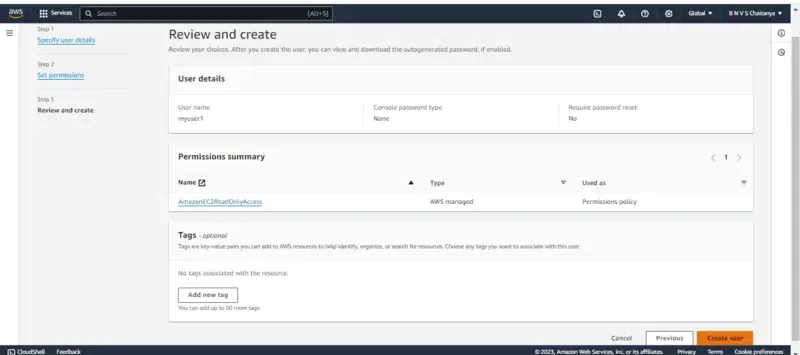
- Finally, the IAM user is been created and you can see it on the dashboard as shown in the below figure.
Note: Till now the user creation is done, the root user can anytime may delete the user or customize the permission policies as needed.

Creating the Password (Security)
Step 6: Now based on the mode of login we have to create a password or access Key as per the use case. If you need a web console login then try on setting the password or else create the access key.
Note: In this article, I will guide you through web console access.
Step 7: Firstly Go to security credentials, In the console -sign-in section click on the enable console access button.

By clicking on the Enable console button you will be redirected to manage console login as shown in figure:
- Choose the Enable option
- Coming to the below password section we can set either the customized password that is directly set now or auto-generating and try on creating at the time of login.
- Try Setting up the password as per instructions on including Alphabets, Special Characters, and Numbers.

Step 9: Follow the instructions while setting the password once it is created click on ‘Done’ option.
Login with the IAM User
Step 10: For logging in with the IAM user we need 3 things:
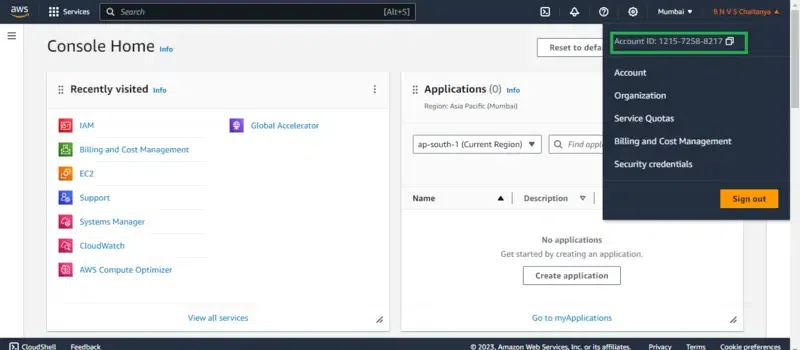
1. AWS account ID, you can get the AWS account Id by clicking the root user account in the right corner similar to the figure highlighted below.
2. IAM username, The IAM user name that you created
3. Password, The password that you set for this IAM user
Fill in the asking details such as AWS account ID, IAM user, and Password from the sign-in portal going to the IAM user option :

Once you log in successfully you can view the page link like this as shown below figure, on top of the right corner you can we see the IAM username with account ID:

If you reached to this final interface then you performed the creation and login with the IAM user successfully.
FAQs On IAM IAM user in AWS
1. What is the Maximum Number of IAM Users that can be Created from a Root Account?
In AWS account we can create a maximum of 5000 IAM users
2. What is the Purpose of Creating the IAM User?
To Control who can be authenticated through [ Sign in ] and authorized [ has permissions] to access and use resources.
3. Can We create an IAM user from Another IAM User?
Yes , We can create another IAM user from an IAM user by providing IAM permission policies to it.
4. What is the Life Period of Passwords in IAM Users?
In general the life period of IAM user passwords is 90 days or less . Its recommended to rotate the passwords for better security maintenance rather using the same passwords for longer.
5. How to change the IAM user Password?
Go to the security credentials section in the IAM users profile and update the new password with entering the old one.
Share your thoughts in the comments
Please Login to comment...