How to Create a Chips Component using HTML CSS & JavaScript ?
Last Updated :
30 Oct, 2023
In this article, we will see how we can create a chip component with the help of HTML, CSS, and JavaScript. In a chip component, there are basically two sections: one is the content section, and the other is the cross-button section. Both should be under one container with a proper border-radius.
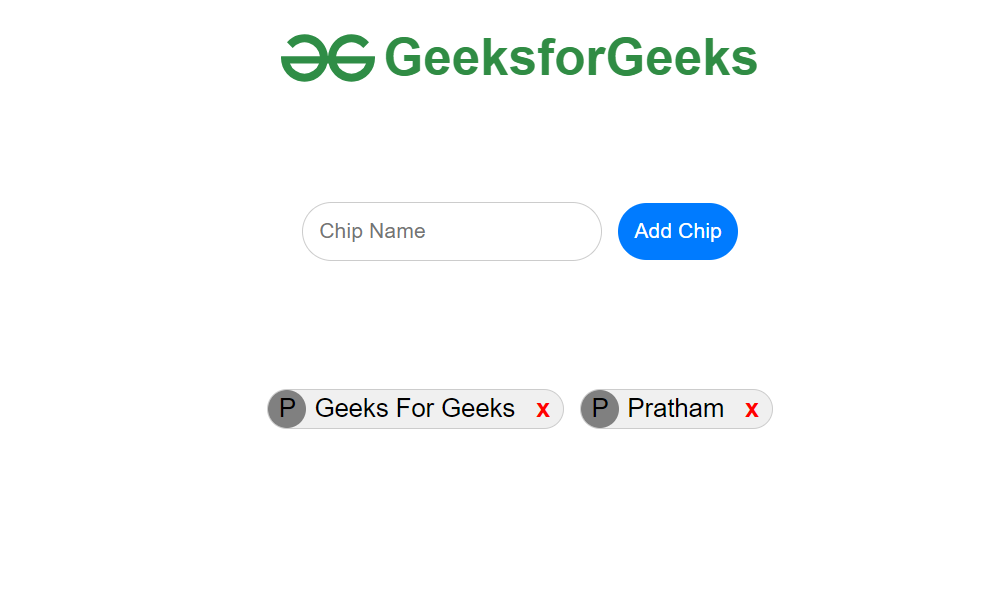
Preview Image:
Prerequisites
Approach
- Create an HTML structure for the chips component with proper ids and classes for the styles.
- Add a CSS file that contains all the styles related to the chip component.
- Add a JavaScript file with all the logic to create the chip and delete it.
- Then, link the JavaScript and CSS files to the HTML file.
Example: This example describes the basic implementation of the Chips Component using HTML, CSS, and JavaScript.
HTML
<!DOCTYPE html>
<html lang="en">
<head>
<meta charset="UTF-8" />
<meta name="viewport"
content="width=device-width,
initial-scale=1.0" />
<link rel="stylesheet" href="style.css" />
<title>Chips Component</title>
</head>
<body>
<header>
<img src=
alt="Error in Loading">
<h1>GeeksforGeeks</h1>
</header>
<form id="addChipForm" class="add-chip">
<input type="text" id="nameInput"
placeholder="Chip Name" />
<button type="submit">
Add Chip
</button>
</form>
<div class="chips-container">
</div>
<script src="script.js"></script>
</body>
</html>
|
CSS
body {
font-family: Arial, sans-serif;
margin: 0;
padding: 0;
}
header {
display: flex;
color: #308c44;
justify-content: center;
}
header img {
margin-right: 5px;
}
.chips-container {
display: flex;
flex-wrap: wrap;
gap: 10px;
width: max-content;
margin: auto;
margin-top: 80px;
}
.chip {
display: flex;
align-items: center;
background-color: #f0f0f0;
border: 1px solid #ccc;
border-radius: 20px;
gap: 5px;
}
.chip-avatar {
width: 24px;
height: 24px;
border-radius: 50%;
background-color: grey;
text-align: center;
line-height: 23px;
}
.close-icon {
cursor: pointer;
margin: 0px 8px;
font-weight: bold;
color: red;
}
.add-chip {
display: flex;
align-items: center;
margin: 10px;
width: max-content;
margin: auto;
margin-top: 50px;
}
#nameInput,
#profileIconInput {
padding: 10px;
border-radius: 20px;
border: 1px solid #ccc;
margin-right: 10px;
}
#addChipForm button {
background-color: #007bff;
color: #fff;
border: none;
border-radius: 20px;
padding: 10px 10px;
cursor: pointer;
}
|
Javascript
function createChip(name) {
const chipContainer =
document.querySelector(
".chips-container");
const chip =
document.createElement("div");
chip.classList.add("chip");
const chipAvatar =
document.createElement("div");
chipAvatar.classList.add(
"chip-avatar");
chipAvatar.textContent = "P";
const chipName =
document.createElement("div");
chipName.textContent = name;
const closeIcon =
document.createElement("div");
closeIcon.classList.add(
"close-icon");
closeIcon.textContent = "x";
closeIcon.addEventListener(
"click",
function () {
chip.remove();
});
chip.appendChild(chipAvatar);
chip.appendChild(chipName);
chip.appendChild(closeIcon);
chipContainer.appendChild(chip);
}
const addChipForm =
document.getElementById(
"addChipForm");
addChipForm.addEventListener(
"submit",
function (event) {
event.preventDefault();
const nameInput =
document.getElementById(
"nameInput");
const name =
nameInput.value.trim();
if (name !== "") {
createChip(name);
nameInput.value = "";
}});
|
Output:
Share your thoughts in the comments
Please Login to comment...