How to Add User Registration with Email Verification in Android?
Last Updated :
04 Aug, 2022
We have seen most of the apps verify their user via the user’s email addresses or phone numbers by sending them either a verification link or sending an OTP to the user’s mobile numbers. In this article, we will take a look at the implementation of user Registration in Android with its email verification. For this, we will be using the Back4App service which provides us a feature so that we can send the automated email verification links to our users for verification.
What we are going to build in this article?
We will be building a simple application in which we will be displaying a simple user registration and login form. After user registration, we will be sending a verification link to our user’s email address to verify the user’s email address. Below is the video in which we will get to see what we are going to build in this article.
Step by Step Implementation
Step 1: Create a New Project
To create a new project in Android Studio please refer to How to Create/Start a New Project in Android Studio. Note that select Java as the programming language.
Step 2: Connect your app to Back4App
Please refer to How to Connect Android App with Back4App for this task.
Step 3: Working with the activity_main.xml file
Navigate to the app > res > layout > activity_main.xml and add the below code to that file. Below is the code for the activity_main.xml file.
XML
<?xml version="1.0" encoding="utf-8"?>
<RelativeLayout
android:layout_width="match_parent"
android:layout_height="match_parent"
android:orientation="vertical"
tools:context=".MainActivity">
<TextView
android:id="@+id/idTVHeader"
android:layout_width="match_parent"
android:layout_height="wrap_content"
android:layout_marginTop="30dp"
android:gravity="center_horizontal"
android:padding="5dp"
android:text="Welcome to Geeks for Geeks \n Register Form"
android:textAlignment="center"
android:textColor="@color/purple_700"
android:textSize="18sp" />
<EditText
android:id="@+id/idEdtUserName"
android:layout_width="match_parent"
android:layout_height="wrap_content"
android:layout_below="@id/idTVHeader"
android:layout_marginStart="10dp"
android:layout_marginTop="50dp"
android:layout_marginEnd="10dp"
android:hint="Enter UserName"
android:inputType="text" />
<EditText
android:id="@+id/idEdtEmail"
android:layout_width="match_parent"
android:layout_height="wrap_content"
android:layout_below="@id/idEdtUserName"
android:layout_marginStart="10dp"
android:layout_marginTop="20dp"
android:layout_marginEnd="10dp"
android:hint="Enter Email Address"
android:inputType="textEmailAddress" />
<EditText
android:id="@+id/idEdtPassword"
android:layout_width="match_parent"
android:layout_height="wrap_content"
android:layout_below="@id/idEdtEmail"
android:layout_marginStart="10dp"
android:layout_marginTop="20dp"
android:layout_marginEnd="10dp"
android:hint="Enter Password"
android:inputType="textPassword" />
<Button
android:id="@+id/idBtnRegister"
android:layout_width="match_parent"
android:layout_height="wrap_content"
android:layout_below="@id/idEdtPassword"
android:layout_marginStart="10dp"
android:layout_marginTop="20dp"
android:layout_marginEnd="10dp"
android:text="Register User"
android:textAllCaps="false" />
</RelativeLayout>
|
Step 4: Working with the MainActivity.java file
Go to the MainActivity.java file and refer to the following code. Below is the code for the MainActivity.java file. Comments are added inside the code to understand the code in more detail.
Java
import android.content.Intent;
import android.os.Bundle;
import android.text.TextUtils;
import android.view.View;
import android.widget.Button;
import android.widget.EditText;
import android.widget.Toast;
import androidx.appcompat.app.AppCompatActivity;
import com.parse.ParseException;
import com.parse.ParseUser;
import com.parse.SignUpCallback;
public class MainActivity extends AppCompatActivity {
private EditText userNameEdt, passwordEdt, userEmailEdt;
private Button registerBtn;
@Override
protected void onCreate(Bundle savedInstanceState) {
super.onCreate(savedInstanceState);
setContentView(R.layout.activity_main);
userNameEdt = findViewById(R.id.idEdtUserName);
passwordEdt = findViewById(R.id.idEdtPassword);
userEmailEdt = findViewById(R.id.idEdtEmail);
registerBtn = findViewById(R.id.idBtnRegister);
registerBtn.setOnClickListener(new View.OnClickListener() {
@Override
public void onClick(View v) {
String userName = userNameEdt.getText().toString();
String password = passwordEdt.getText().toString();
String email = userEmailEdt.getText().toString();
if (TextUtils.isEmpty(userName) && TextUtils.isEmpty(password) && TextUtils.isEmpty(email)) {
Toast.makeText(MainActivity.this, "Please enter user name and password", Toast.LENGTH_SHORT).show();
}
registerUser(userName, password, email);
}
});
}
private void registerUser(String userName, String password, String email) {
ParseUser user = new ParseUser();
user.setUsername(userName);
user.setEmail(email);
user.setPassword(password);
user.signUpInBackground(new SignUpCallback() {
@Override
public void done(ParseException e) {
if (e == null) {
Toast.makeText(MainActivity.this, "User Registered successfully \n Please verify your email", Toast.LENGTH_SHORT).show();
Intent i = new Intent(MainActivity.this, LoginActivity.class);
i.putExtra("userName", userName);
i.putExtra("password", password);
startActivity(i);
} else {
ParseUser.logOut();
Toast.makeText(MainActivity.this, "Fail to Register User..", Toast.LENGTH_SHORT).show();
}
}
});
}
}
|
Step 5: Creating a new Activity for Login into our App
Navigate to the app > java > your app’s package name > Right-click on it > New > Activity > Empty activity and then name your activity as LoginActivity.
Step 6: Working with the activity_login.xml file
Navigate to the app > res > layout > activity_login.xml and add the below code to that file. Below is the code for the activity_login.xml file.
XML
<?xml version="1.0" encoding="utf-8"?>
<RelativeLayout
android:layout_width="match_parent"
android:layout_height="match_parent"
tools:context=".LoginActivity">
<TextView
android:id="@+id/idTVHeader"
android:layout_width="match_parent"
android:layout_height="wrap_content"
android:layout_marginTop="30dp"
android:gravity="center_horizontal"
android:padding="5dp"
android:text="Welcome to Geeks for Geeks \n Login Form"
android:textAlignment="center"
android:textColor="@color/purple_700"
android:textSize="18sp" />
<EditText
android:id="@+id/idEdtUserName"
android:layout_width="match_parent"
android:layout_height="wrap_content"
android:layout_below="@id/idTVHeader"
android:layout_marginStart="10dp"
android:layout_marginTop="50dp"
android:layout_marginEnd="10dp"
android:hint="Enter UserName"
android:inputType="textEmailAddress" />
<EditText
android:id="@+id/idEdtPassword"
android:layout_width="match_parent"
android:layout_height="wrap_content"
android:layout_below="@id/idEdtUserName"
android:layout_marginStart="10dp"
android:layout_marginTop="20dp"
android:layout_marginEnd="10dp"
android:hint="Enter Password"
android:inputType="textPassword" />
<Button
android:id="@+id/idBtnLogin"
android:layout_width="match_parent"
android:layout_height="wrap_content"
android:layout_below="@id/idEdtPassword"
android:layout_marginStart="10dp"
android:layout_marginTop="20dp"
android:layout_marginEnd="10dp"
android:text="Login"
android:textAllCaps="false" />
</RelativeLayout>
|
Step 7: Working with the LoginActivity.java file
Go to the LoginActivity.java file and refer to the following code. Below is the code for the LoginActivity.java file. Comments are added inside the code to understand the code in more detail.
Java
import android.content.Intent;
import android.os.Bundle;
import android.text.TextUtils;
import android.view.View;
import android.widget.Button;
import android.widget.EditText;
import android.widget.Toast;
import androidx.appcompat.app.AppCompatActivity;
import com.parse.ParseUser;
public class LoginActivity extends AppCompatActivity {
private EditText userNameEdt, passwordEdt;
private Button loginBtn;
@Override
protected void onCreate(Bundle savedInstanceState) {
super.onCreate(savedInstanceState);
setContentView(R.layout.activity_login);
userNameEdt = findViewById(R.id.idEdtUserName);
passwordEdt = findViewById(R.id.idEdtPassword);
loginBtn = findViewById(R.id.idBtnLogin);
userNameEdt.setText(getIntent().getStringExtra("userName"));
passwordEdt.setText(getIntent().getStringExtra("password"));
loginBtn.setOnClickListener(new View.OnClickListener() {
@Override
public void onClick(View v) {
String userName = userNameEdt.getText().toString();
String password = passwordEdt.getText().toString();
if (TextUtils.isEmpty(userName) && TextUtils.isEmpty(password)) {
Toast.makeText(LoginActivity.this, "Please enter user name and password", Toast.LENGTH_SHORT).show();
}
loginUser(userName, password);
}
});
}
private void loginUser(String userName, String password) {
ParseUser.logInInBackground(userName, password, (parseUser, e) -> {
if (parseUser != null) {
Toast.makeText(this, "Login Successful ", Toast.LENGTH_SHORT).show();
Intent i = new Intent(LoginActivity.this, HomeActivity.class);
i.putExtra("username", userName);
startActivity(i);
} else {
ParseUser.logOut();
Toast.makeText(LoginActivity.this, e.getMessage(), Toast.LENGTH_LONG).show();
}
});
}
}
|
Step 8: Creating a new Activity for displaying Home Screen
After the user login, we will redirect our user to the app’s home page. So for that, we will be creating a new activity. Navigate to the app > java > your app’s package name > Right-click on it > New > Activity > Empty Activity and then name your activity as HomeActivity.
Step 9: Working with the activity_home.xml file
Navigate to the app > res > layout > activity_home.xml and add the below code to that file. Below is the code for the activity_home.xml file.
XML
<?xml version="1.0" encoding="utf-8"?>
<RelativeLayout
android:layout_width="match_parent"
android:layout_height="match_parent"
tools:context=".HomeActivity">
<TextView
android:id="@+id/idTVHeader"
android:layout_width="match_parent"
android:layout_height="wrap_content"
android:layout_centerInParent="true"
android:gravity="center_horizontal"
android:text="Welcome back again to Geeks for Geeks"
android:textAlignment="center"
android:textColor="@color/purple_700"
android:textSize="18sp" />
<TextView
android:id="@+id/idTVUserName"
android:layout_width="match_parent"
android:layout_height="wrap_content"
android:layout_below="@id/idTVHeader"
android:layout_centerInParent="true"
android:layout_marginTop="20dp"
android:gravity="center_horizontal"
android:text="UserName"
android:textAlignment="center"
android:textColor="@color/purple_700"
android:textSize="25sp" />
</RelativeLayout>
|
Step 10: Working with the HomeActivity.java file
Go to the HomeActivity.java file and refer to the following code. Below is the code for the HomeActivity.java file. Comments are added inside the code to understand the code in more detail.
Java
import android.os.Bundle;
import android.widget.TextView;
import androidx.appcompat.app.AppCompatActivity;
public class HomeActivity extends AppCompatActivity {
private TextView userNameTV;
@Override
protected void onCreate(Bundle savedInstanceState) {
super.onCreate(savedInstanceState);
setContentView(R.layout.activity_home);
userNameTV = findViewById(R.id.idTVUserName);
String name = getIntent().getStringExtra("username");
userNameTV.setText(name);
}
}
|
Now we have completed the work on our app and now we will move towards the email verification in the Back4App console.
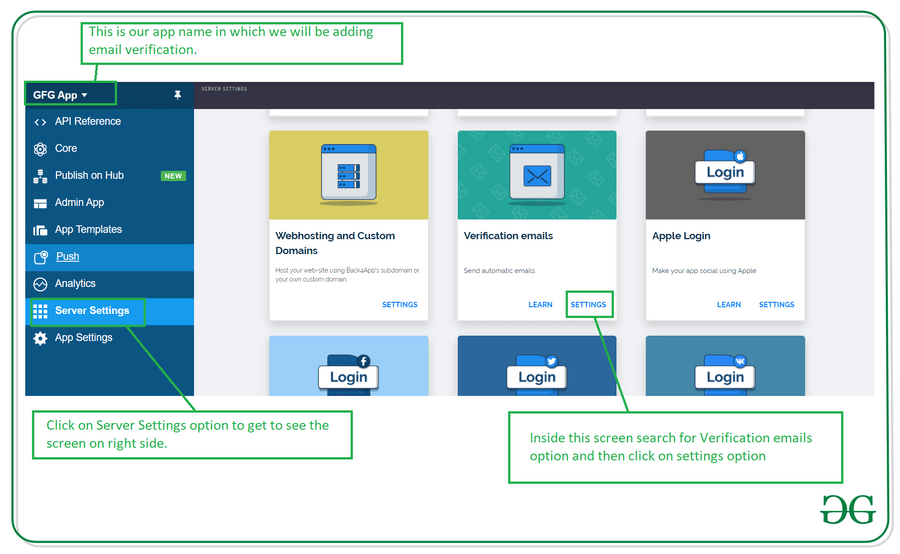
Step 11: Adding email template which you will be sent to your user for email verification
Navigate to the app’s dashboard in the Back4App console. Inside this console. Navigate to the Server Settings option in the left nav drawer and inside your screen. Click on the Settings option in the Verification emails part. You can get to see the below screenshot.
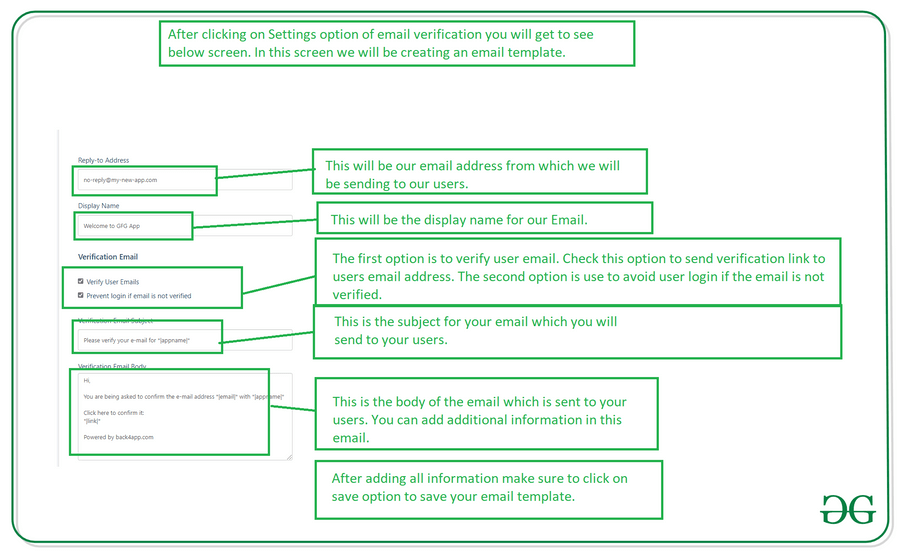
After going to this option you can see the email template. You can add or edit this email template according to your requirement. After updating the email template. Make sure to save your email template.
After updating the email template save your email template and then run your app. You can get to see the output on the below screen.
Output:
Check out the project on the below link: https://github.com/ChaitanyaMunje/GFG-Back4App/tree/EmailVerification
Like Article
Suggest improvement
Share your thoughts in the comments
Please Login to comment...