Redux is an open-source JavaScript library for state management in applications, commonly integrated with React or Angular. As the official React binding for Redux, React Redux enables components to interact with a centralized Redux Store, facilitating scalable state management through a unidirectional data flow model.
There are 3 major components of Redux:
- Store: It contains the state of components that can be passed to other components in the application.
- Actions: It basically contains the actions that can be performed on the states present in the store.
- Reducers: These are the pure functions that contain operations that need to be performed on the state.
Syntax:
import { createStore } from 'redux';
import rootReducer from './reducers';
const store = createStore(rootReducer);
export default store;
Steps for installing & configuring the Redux
Step 1: Create a React App using the following command:
npx create-react-app redux-example
Step 2: Now get into the project directory:
cd redux-example
Step 3: Install the Redux libraries using the following command:
npm install redux react-redux
Step 4: Importing the required components:
import { useSelector, useDispatch } from 'react-redux';
Step 5: Create a new folder redux inside the src folder.
mkdir src/redux
Step 6: Create a new file actions.js in the redux folder.
touch src/redux/actions.js
Step 7: Create a new file reducers.js in the redux folder.
touch src/redux/reducers.js
Step 8: Create a new file store.js in the redux folder.
touch src/redux/store.js
Project Structure:
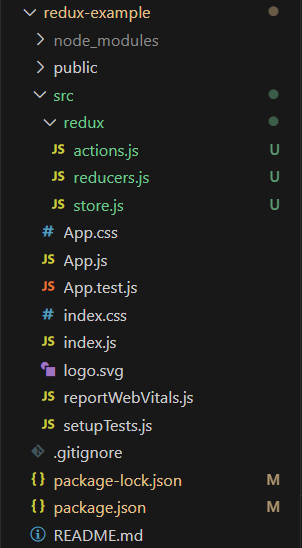
Project Structure
Example: Below is the code example of the using redux.
Javascript
export const increment = () => {
return {
type: 'INCREMENT'
};
};
export const decrement = () => {
return {
type: 'DECREMENT'
};
};
|
Javascript
const initialState = {
count: 0
};
const reducer = (state = initialState, action) => {
switch (action.type) {
case 'INCREMENT':
return {
...state,
count: state.count + 1
};
case 'DECREMENT':
return {
...state,
count: state.count - 1
};
default:
return state;
}
};
export default reducer;
|
Javascript
import { createStore } from 'redux';
import reducer from './reducers';
const store = createStore(reducer);
export default store;
|
Javascript
import React from 'react';
import { useSelector, useDispatch } from 'react-redux';
import { increment, decrement } from './redux/actions';
import './App.css'
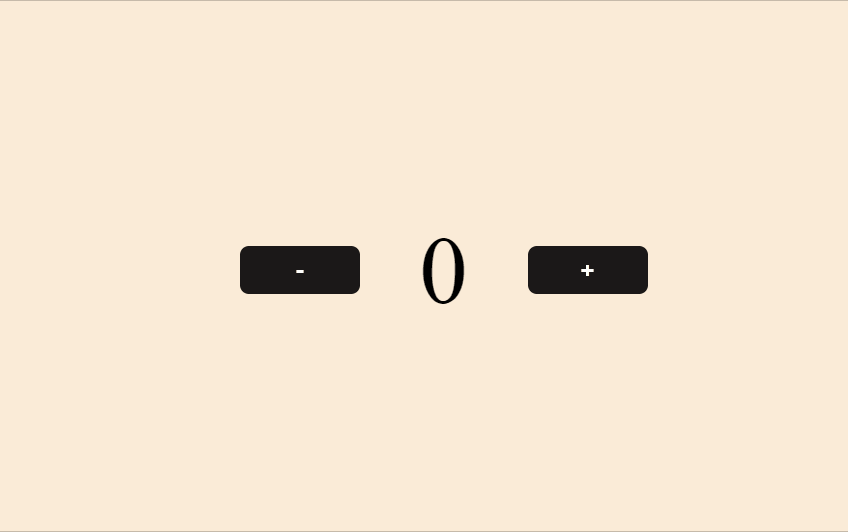
function App() {
const count = useSelector((state) => state.count);
const dispatch = useDispatch();
return (
<div className="App">
<button onClick={() => dispatch(decrement())}>
-
</button>
<h1>{count}</h1>
<button onClick={() => dispatch(increment())}>
+
</button>
</div>
);
}
export default App;
|
Javascript
import React from 'react';
import ReactDOM from 'react-dom';
import { Provider } from 'react-redux';
import store from './redux/store';
import App from './App';
import './index.css';
ReactDOM.render(
<Provider store={store}>
<App />
</Provider>,
document.getElementById('root')
);
|
CSS
.App {
display: flex;
flex-direction: column;
justify-content: center;
align-items: center;
}
body {
background-color: antiquewhite;
}
.App>h2 {
text-align: center;
font-size: 2rem;
}
.App>button {
width: 20rem;
font-size: larger;
padding: 2vmax auto;
height: 2.6rem;
color: white;
background-color: rgb(34, 34, 33);
border-radius: 10px;
}
button:hover {
background-color: rgb(80, 80, 78);
}
|
Step to Run Application: Run the application using the following command from the root directory of the project:
npm start
Output: Now open your browser and go to http://localhost:3000
Relay:
Relay is a data management library for React that lets you fetch and update data with GraphQL. It works closely with GraphQL APIs and optimizes data fetching by using a declarative approach and a concept called GraphQL fragments. React Relay is basically a framework used to build GraphQL-driven React applications. It keeps the management of data-fetching easy, no matter how many components your React app has.
Syntax:
import { RelayEnvironmentProvider } from 'react-relay/hooks';
Steps for installing & Configuring the Relay
Step 1: Installing a React App
npx create-react-app relay-example
Step 2: Now, we need to fetch the data from the GraphQL servers. For this, we will use the fetch API to request some data from the GitHub GraphQL API, and we will use it as a server.
To start, we will need an authentication key token for the GitHub API. Follow these steps:
Step 3: Navigate to the main directory of your project
cd relay-example
Step 4: Now, we will fetch GraphQL from React. We can use the fetchGraphQL function to fetch some data in our React App.
async function fetchGraphQL(text, variables) {
    const REACT_APP_GITHUB_AUTH_TOKEN =
        process.env.REACT_APP_GITHUB_AUTH_TOKEN;
    // Fetch data from GitHub's GraphQL API:
    const response =
        await fetch('https://api.github.com/graphql', {
        method: 'POST',
        headers: {
            Authorization: `bearer ${REACT_APP_GITHUB_AUTH_TOKEN}`,
            'Content-Type': 'application/json',
        },
        body: JSON.stringify({
            query: text,
            variables,
        }),
    });
    // Get the response as JSON
    return await response.json();
}
export default fetchGraphQL;
Step 5: Install the react-relay dependencies with the following commands:
npm install --save relay-runtime react-relay
npm install --save-dev relay-compiler babel-plugin-relay
OR
yarn add relay-runtime react-relay
yarn add --dev relay-compiler babel-plugin-relay
Step 6: Create a GraphQL Schema
Create a file named schema.graphql in the root of your project. Copy the schema from GitHub’s GraphQL API documentation or use a sample schema from a public GraphQL API.
The updated dependencies in package.json file will look like:
"dependencies": {
        "@testing-library/jest-dom": "^5.16.5",
        "@testing-library/react": "^13.4.0",
        "@testing-library/user-event": "^13.5.0",
        "react": "^18.2.0",
        "react-dom": "^18.2.0",
        "react-relay": "^15.0.0",
        "react-scripts": "5.0.1",
        "relay-runtime": "^15.0.0",
        "web-vitals": "^2.1.4"
}
Example: Below is the code example using Relay
Javascript
import React from 'react';
import './App.css';
import graphql
from 'babel-plugin-relay/macro';
import {
RelayEnvironmentProvider,
loadQuery,
usePreloadedQuery,
} from 'react-relay/hooks';
import RelayEnvironment from './RelayEnvironment';
const { Suspense } = React;
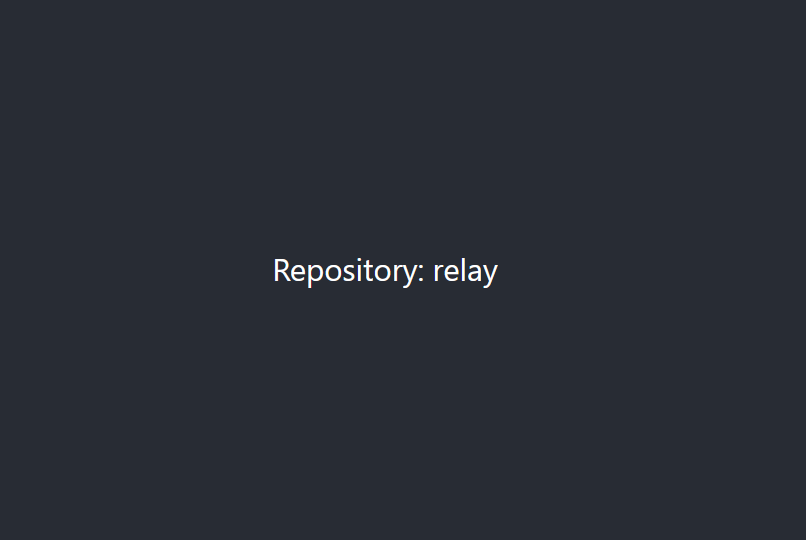
const RepositoryNameQuery = graphql`
query AppRepositoryNameQuery {
repository(owner: "facebook", name: "relay") {
name
}
}
`;
const preloadedQuery =
loadQuery(RelayEnvironment, RepositoryNameQuery, {
});
function App(props) {
const data =
usePreloadedQuery(RepositoryNameQuery, props.preloadedQuery);
return (
<div className="App">
<header className="App-header">
<p>{data.repository.name}</p>
</header>
</div>
);
}
function AppRoot(props) {
return (
<RelayEnvironmentProvider environment={RelayEnvironment}>
<Suspense fallback={'Loading...'}>
<App preloadedQuery={preloadedQuery} />
</Suspense>
</RelayEnvironmentProvider>
);
}
export default AppRoot;
|
Javascript
import { Environment, Network, RecordSource, Store }
from 'relay-runtime';
import fetchGraphQL from './fetchGraphQL';
async function fetchRelay(params, variables) {
console.log(`fetching query ${params.name}
with ${JSON.stringify(variables)}`);
return fetchGraphQL(params.text, variables);
}
export default new Environment({
network: Network.create(fetchRelay),
store: new Store(new RecordSource()),
});
|
Step to Run Application: Compile Relay Queries
Run the Relay compiler to generate artifacts for your queries:
npm run relay or npm start
Output: Now open your browser and go to http://localhost:3000
Difference between Relay and Redux:
| Purpose |
A GraphQL client framework for data fetching and caching. |
A React state management library for storing and managing application state. |
| Data Fetching |
Declarative data fetching using GraphQL queries and fragments. |
Manual data fetching using actions and reducers. |
| Store Structure |
Hierarchical store structure based on the GraphQL Schema. |
Flat store structure with reducers managing different parts of the state. |
| Performance |
Optimized data fetching and caching with GraphQL. |
The performance depends on application design and usage patterns. |
| Component Binding |
Uses container components and HOCs for data binding. |
Uses hooks like useDispatch() and useSelector() for handling state. |
| Complexity |
Can be complex and requires an understanding of GraphQL. |
Relatively simpler, can be used easily in smaller applications. |
Share your thoughts in the comments
Please Login to comment...