House Price Prediction using Linear Regression | Django
Last Updated :
21 Mar, 2024
In this article, we’ll explore how to use a Python machine-learning algorithm called linear regression to estimate house prices. We’ll do this by taking input data from users who want to predict the price of their home. To make things more accessible and interactive, we’ll transform this house price prediction code into a web-based system using the Django framework. Django is a Python web framework that helps us turn a regular Python project into a web application.
House Price Prediction Project using Linear Regression in Django
For our data source, we’ll be using the House Price Prediction dataset. With this system, users can easily predict a house’s value by providing specific details. We’ve converted the original code into a user-friendly web form, allowing individuals to input the necessary information for predicting house prices. Once they’ve entered all the required details, users can click on the ‘predict’ button, and the result will be displayed on the same page in the form of a quick message.
Starting the Project Folder
Installation: To install Django follow these steps. To install the necessary modules follow this commands:
pip install pandas
pip install matplotlib
import os
pip install seaborn
pip install scikit-learn
To start the project use this command
django-admin startproject HOUSEPREDICTION
cd HOUSEPREDICTION
To start the app use this command
python manage.py startapp HousePrediction
Now add this app to the ‘settings.py’
Now you can see the file structure like this which display on your vs studio.
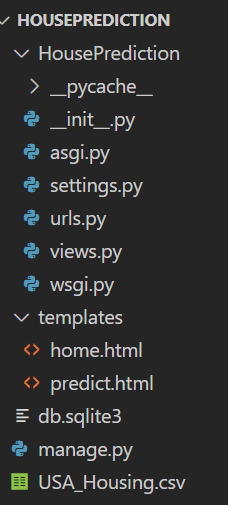
File Structure
setting.py: In this file, we import ‘os‘ and connect templates to the folder by using the following ‘os.path.join’ code. To connect the ‘templates’ folder with the ‘settings.py’ file, add the following code line to the ‘TEMPLATES’ section of the ‘settings.py’ file, as shown in the image.
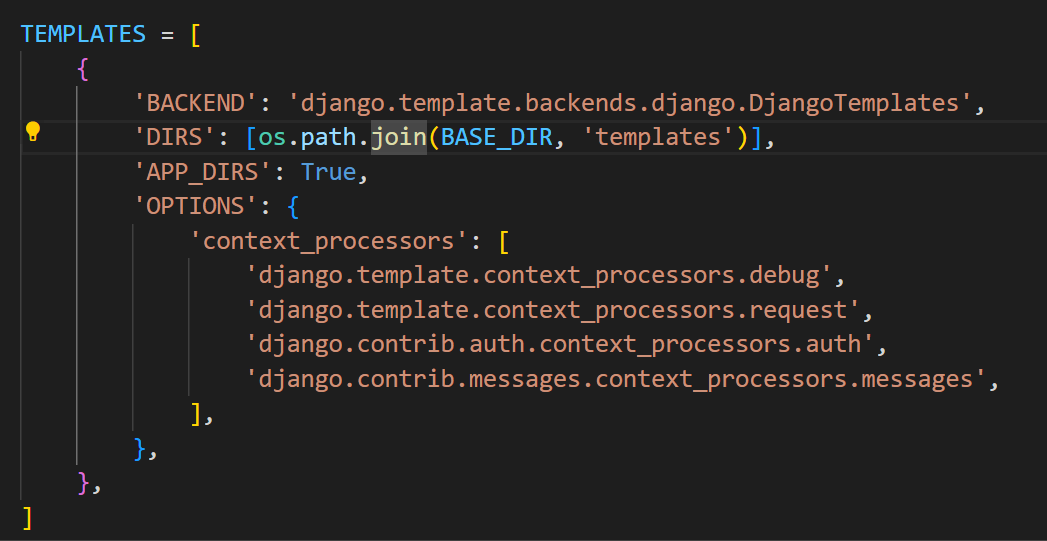
Setting.py
view.py: The dataset is read from the ‘USA_Housing.csv’ file, and the ‘Address’ column is dropped.The independent variables (X) and the dependent variable (Y) are separated.The data is split into training and testing sets using train_test_split.A Linear Regression model is created and fitted to the training data.User input values are obtained from the GET request.A prediction is made using the model.The prediction is rounded to an integer.A message containing the predicted rent is created.Finally, the ‘predict.html’ file is rendered with the prediction result.
Python3
import os
from django.shortcuts import render
import pandas as pd
import matplotlib.pyplot as plt
import seaborn as sns
import numpy as np
from sklearn.model_selection import train_test_split
from sklearn.linear_model import LinearRegression
from sklearn import metrics
def home(request):
return render(request, 'home.html')
def predict(request):
return render(request, 'predict.html')
def result(request):
data = pd.read_csv(r"USA_Housing.csv")
data = data.drop(['Address'], axis=1)
X = data.drop('Price', axis=1)
Y = data['Price']
X_train, X_test, Y_train, Y_test = train_test_split(X, Y, test_size= .30)
model = LinearRegression()
model.fit(X_train, Y_train)
var1 = float(request.GET['n1'])
var2 = float(request.GET['n2'])
var3 = float(request.GET['n3'])
var4 = float(request.GET['n4'])
var5 = float(request.GET['n5'])
pred = model.predict(np.array([var1, var2, var3, var4, var5]).reshape(1, -1))
pred = round(pred[0])
price = "The Predicted Rent Is Rs "+str(pred)
return render(request, 'predict.html', {"result2":price})
|
Creating GUI
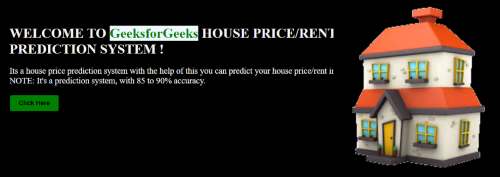
home.html: This HTML file is used to view the home page.
HTML
{% load static %}
<!DOCTYPE html>
<html lang="en">
<head>
<meta charset="UTF-8">
<meta http-equiv="X-UA-Compatible" content="IE=edge">
<meta name="viewport" content="width=device-width, initial-scale=1.0">
<title>Home_Page</title>
<style>
* {
background-color: black;
}
img {
margin-left: 60%;
margin-top: -15%;
width: 400px;
}
.head {
color: whitesmoke;
margin-top: 12%;
margin-left: 15%;
}
.para {
color: white;
margin-left: 15%;
font-size: 20px;
}
.btn {
color: black;
background-color: green;
margin-left: 15%;
padding: 10px 20px;
font-weight: bold;
font-size: 15px;
border-radius: 5px;
}
strong {
color: green;
background-color: aliceblue;
font-weight: bold;
}
</style>
</head>
<body>
<div class="wrapper">
<div class="top-bar">
<div class="hero">
<div class="hero-text">
<h1 class="head
">WELCOME TO <strong> GeeksforGeeks</strong> HOUSE PRICE/RENT <br> PREDICTION SYSTEM !</h1>
<p class="para">Its a house price prediction system with the help of this you can predict your house
price/rent in just a few seconds... <br>
NOTE: It's a prediction system, with 85 to 90% accuracy. </p>
</div>
</div>
<div class="hero-banner">
<form action="predict">
<button class="btn" type="submit">Click Here</button>
</form>
</div>
<div class="pla">
alt="">
</div>
</div>
</div>
</div>
</body>
</html>
|
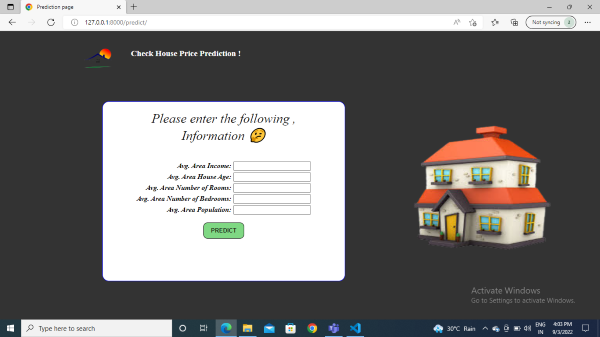
predict.html: This HTML file is used to print the results .
HTML
{% load static %}
<!DOCTYPE html>
<html lang="en">
<head>
<meta charset="UTF-8">
<meta http-equiv="X-UA-Compatible" content="IE=edge">
<meta name="viewport" content="width=device-width, initial-scale=1.0">
<title>Home_Page</title>
<style>
/* CSS Styles - Define the appearance of the page elements */
* {
background-color: black;
}
img {
margin-left: 60%;
margin-top: -15%;
width: 400px;
}
.head {
color: whitesmoke;
margin-top: 12%;
margin-left: 15%;
}
.para {
color: white;
margin-left: 15%;
font-size: 20px;
}
.btn {
color: black;
background-color: green;
margin-left: 15%;
padding: 10px 20px;
font-weight: bold;
font-size: 15px;
border-radius: 5px;
}
strong {
color: green;
background-color: aliceblue;
font-weight: bold;
}
</style>
</head>
<body>
<div class="wrapper">
<div class="top-bar">
<div class="hero">
<div class="hero-text">
<h1 class="head">WELCOME TO <strong> GeeksforGeeks</strong> HOUSE PRICE/RENT <br> PREDICTION
SYSTEM !</h1>
<p class="para">It's a house price prediction system with the help of which you can predict your
house price/rent in just a few seconds... <br>
NOTE: It's a prediction system with 85 to 90% accuracy. </p>
</div>
</div>
<div class="hero-banner">
<form action="predict">
<button class="btn" type="submit">Click Here</button>
</form>
</div>
<div class="pla">
<img class="img"
</div>
</div>
</div>
</body>
</html>
|
urls.py: This is the URL file which is used to define all the urls.
Python3
from django.contrib import admin
from django.urls import path
from . import views
urlpatterns = [
path('admin/', admin.site.urls),
path('', views.home),
path('predict/', views.predict),
path('predict/result', views.result),
]
|
Deployement of the Project
Run these commands to apply the migrations:
python3 manage.py makemigrations
python3 manage.py migrate
Run the server with the help of following command:
python3 manage.py runserver
Output
The accuracy of the prediction system is 80% according to the linear regression algorithm.
Share your thoughts in the comments
Please Login to comment...