Google Calendar is a powerful tool that often remains untapped, hiding amazing features you may not be aware of. Don’t worry; we’ve got you covered! With Google Calendar you can increase your productivity and take full advantage of its fully managed features, which will help in optimizing your day and managing your time with less effort. Today, we’ll reveal 15 mind-blowing hacks to supercharge your productivity using Google Calendar. Get ready to revolutionize the way you manage your time!

1. Use Tasks
Why limit yourself to events and appointments? Google Calendar’s Tasks feature lets you transform your calendar into a comprehensive task manager. Adding tasks is a breeze—simply follow the same process as adding an event, but choose “Task” instead. To display your tasks on the calendar, toggle the “Tasks” option in the My Calendars section or in the app’s hamburger menu. Once you’ve completed a task, mark it as done with a single click.
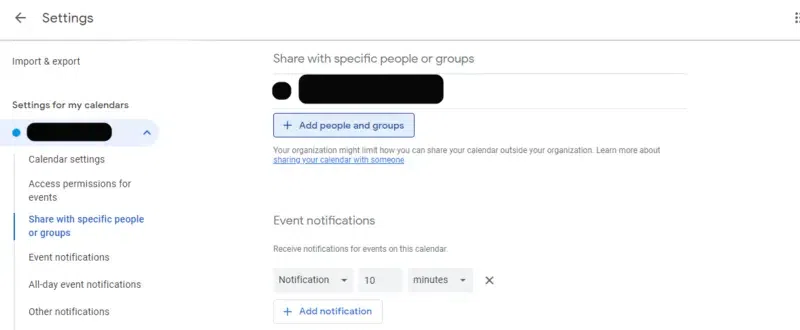
2. Set Up Default Reminders
Are you tired of manually setting reminders for every new event? Say goodbye to the extra effort with default reminders. By creating default reminders, you can ensure that they are automatically added to each event you create.
Here’s how you can do it:
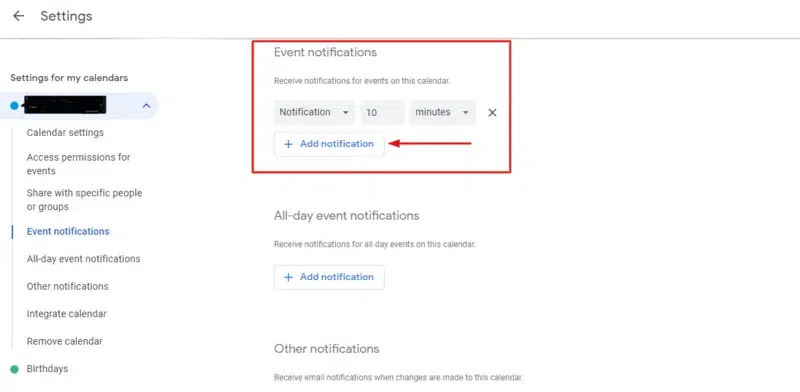
- Visit your Calendar Homepage.
- Spot the gear icon in the top right-hand corner and give it a click.
- From the menu that appears, select “Settings.”
- On the left-hand side, navigate to “Settings for My Calendars” and choose your calendar.
- Scroll down until you find “Event Notifications” and click on “Add Notification.”
- Decide the desired number of minutes, hours, or days in advance for your reminders.
- Don’t be shy to the!
- Now, these default reminders will automatically be included whenever you create an event.
- With this time-saving feature, you can focus on enjoying your college life and let your calendar take care of the rest.
3. Use the Secondary Time Zone Feature
Are you constantly dealing with different time zones? Say goodbye to scheduling mishaps by leveraging the power of Google Calendar’s Secondary Time Zone feature.
Here’s how to set it up:
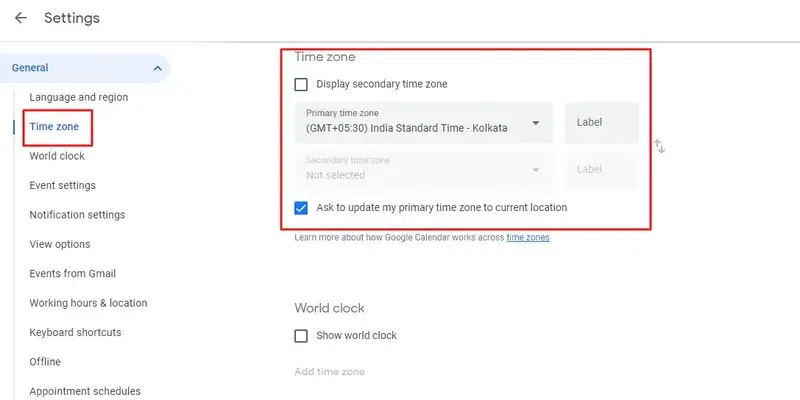
- Head over to the General tab in your Settings.
- Locate the Time Zone option and check the Display Secondary Time Zone box.
- Choose your preferred secondary time zone from the dropdown menu.
- (Optional) Add labels to each time zone for better organization.
Now, effortlessly keep track of time differences and never miss an important appointment, whether it’s with colleagues from overseas or friends in a different time zone.
4. Create Multiple Calendars and Color-Code Them
If you’re a college-goer or millennial trying to navigate the chaos of life, maintaining a single calendar can quickly become overwhelming. The solution? Embrace the power of multiple calendars and color-coding.
Follow these steps to regain control of your schedule:
- Create separate calendars for different aspects of your life, such as work, personal commitments, and family activities.
- Assign a unique color to each calendar, making it easy to identify events at a glance.
- Toggle individual calendars on and off effortlessly in the left-hand menu on the desktop or by accessing the hamburger menu in the top left of the mobile app.
By color-coding your calendars, you’ll gain a clear overview of your commitments, ensuring that you never mix up important events again. It’s time to simplify your life and master multitasking like a pro!
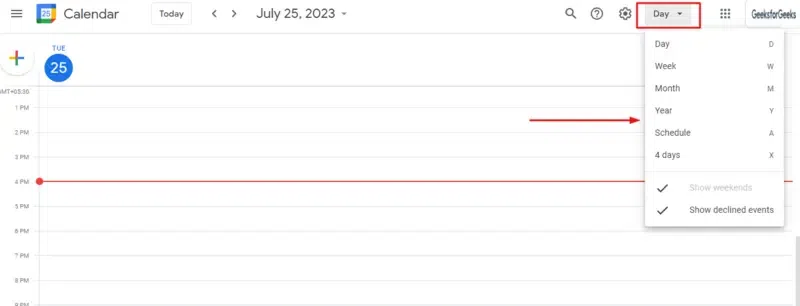
5. Customize Your Calendar View
Google has got your back when it comes to calendar flexibility. On the desktop, just head to the top right-hand corner, and in the mobile app, look for the hamburger menu at the top left. There, you’ll find a bunch of awesome options to tweak your calendar view.
Take your pick from Day, Week, Month, Year, and Schedule/Agenda. For example, if you’re all about the ‘Day’ view, you’ll only see what’s on your plate for that specific day. No more overwhelming glimpses of your entire week or month!
Don’t stop there, though. You can also choose to hide or display weekends and even create a custom calendar view tailored just for you.
6. Fewer Notifications = More Productivity
Your trusty Google Calendar is designed to keep you in the loop, ensuring you never miss an important event. It’s got your back with notifications that pop up ten minutes before your next engagement. Pretty handy, right?
However, let’s face it, sometimes too many notifications can be a distraction. We’ve all been there, succumbing to the urge to divert our attention and peek at our calendar.
Well, worry not! You can easily conquer those distracting notifications by switching to ‘browser notifications.’ Instead of dragging you away from your tasks, Google will discreetly show a friendly notice in the right-hand corner of your screen. So long, unnecessary interruptions!
7. Keyboard Shortcuts for Google Calendar
Save time and supercharge your productivity with these handy keyboard shortcuts in Google Calendar:
- Create an event: Press ‘c’
- Quick add: Simply hit ‘q’
- Event details: Select the event and press ‘e’
- Delete an event: Click on the event and press ‘Backspace’ or ‘Delete’
- Navigate to the previous time period: Press ‘p’
- Jump to the next time period: Press ‘n’
- View today’s schedule: Hit ‘t’
- Day view: Press ‘d’
- Week view: Press ‘w’
- Month view: Press ‘m’
- Customize your view: Press ‘x’
- Check out the agenda view: Press ‘a’
- Quick search: Simply press ‘/’
- Print your calendar: Use ‘Ctrl + p’ or ‘Command + p’
- Access settings: Press ‘s’
8. Recurring Events and Meetings
Keep up with your recurring meetings and stay organized effortlessly using Google Calendar’s recurring events feature. Here’s how to set it up:
- When creating the event, mark it as a recurring meeting.
- Choose the frequency of repetition, such as weekly, monthly, quarterly, etc.
- By doing this, you’ll save valuable time and eliminate the risk of forgetting to add future meetings to your calendar (and everyone else’s, too!).
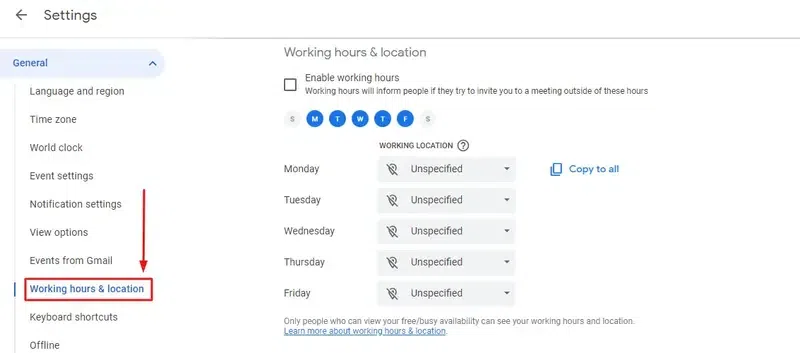
9. Set Your Working Hours
Ensure smooth communication and coordination within your team by establishing clear working hours. Whether you have a flexible schedule, work across time zones, or simply want to communicate your availability, this feature can be a game-changer. Please note that it is available exclusively for Google Workspace subscribers.
To get started, follow these simple steps:
- Go to “Settings” and navigate to “General.”
- Look for “Working Hours” and specify your preferred start and end times.
By setting your working hours, you save valuable time for both yourself and anyone scheduling meetings with you.
10. Restore Deleted Events
Ever accidentally deleted an important event? Worry not! You can swiftly recover deleted events by following these steps:
- Click the gear icon and select “Trash/Bin.”
- Browse through your recently deleted events.
- Select the event you want to restore by checking the checkbox.
- Click the arrow icon above the list, and voila! The event is back on your calendar.
11. Change the Meeting Organizer
There will be occasions when you need to pass on the reins of a scheduled meeting. Whether due to personal emergencies, illness, or urgent tasks, you can easily transfer the responsibility to someone else. Here’s how:
- Click “More actions” beside the meeting’s name.
- Add the email of the new owner.
- Click “Change owner.”
- The new owner will receive a notification and access all the meeting information you originally entered into the calendar.
12. Combine Multiple Calendar Views
Efficiently manage your personal and work schedules by merging them into a single view. This allows you to seamlessly add, delete, or modify events. Follow these steps:
- Press “S” to access settings in your personal calendar.
- Select your calendar and click “Share with specific people.”
- Add your work account email.
- Under “Permissions,” choose “Make changes and manage sharing” (since you’re sharing with yourself).
- Hit “Send!”
13. Export and Import Calendars
Seamlessly export all your calendars, including Birthdays, from Google Contacts into a convenient .zip file. Useful for sharing team vacation calendars at work or coordinating extracurricular meetings at school.
Quick and easy steps: Press “S” for settings, select “Import & export” on the sidebar, and click “Export.” Share specific calendars with lazy friends or family by following these steps:
- Unzip the file.
- Within your calendar, go to the “Import” section.
- Select the specific file you want from the unzipped folder to upload.
- Click “Import.”
14. Add Attachments to Events
Enhance your Google Calendar experience by adding attachments to your events. Imagine going to a meeting with all the necessary documents at your fingertips. You can attach the meeting agenda right to the calendar entry. Attending a conference? Easily add the timetable and list of seminars/speakers to the corresponding event.
But that’s not all! You can attach documents to calendar entries on your computer and access them seamlessly from the Google Calendar App on your phone. No more wasting time on printing piles of documents before an event. Keep everything in one place and effortlessly find what you need!
To add an attachment, simply click on the paper clip icon within the event’s description and upload the appropriate file. It’s that easy!
15. Schedule Group Meetings with “Find a Time”
Organizing group meetings can be a real challenge, especially when everyone has different schedules. But by using the “Find a Time” tab, you can conveniently check the schedules of all group members in one place. Say goodbye to endless back-and-forth emails or frustrating clashes in availability. With this feature, you can easily find a time that works for everyone and schedule your meeting.
Keep in mind that to access the “Find a Time” feature, you’ll need to connect to your team through Google Workspace or subscribe to your guests’ Google Calendars. So go ahead, streamline your group meetings, and make planning a breeze!
Bottom line
Embrace the ultimate productivity hacks by incorporating Google Calendar into your daily routine. Make it a habit to utilize this powerful tool for every event, meeting, and appointment. As you consistently rely on it, Google Calendar will exponentially enhance your productivity and organizational skills.
Share your thoughts in the comments
Please Login to comment...