This article introduces Jinja and then describes the basics of working with it which includes how to render templates using Jinja and Python3, passing data to the template through arguments, and basic Jinja syntax (delimiters, expressions, control structures – decisions and loops). A few examples including creating a simple static HTML page are presented.
What is Jinja?
Jinja is a text rendering engine for Python programming language. It has first-class support among popular Python frameworks like Django and Flask and is used extensively. It is popular for its easy and straightforward syntax and variety of features including (but not limited to) –
- Variable access.
- Control structures (Conditionals, loops).
- Macros (similar to functions in programming languages).
- Filters
- Inheritance, etc.
Its syntax is heavily influenced by Django and Python which is good for anyone already familiar with Python.
Basic technical overview of Jinja
One can render any text or text file using Jinja like HTML, XML, LaTeX, plain text, etc. as long as it is pure text. We need a template and data. We provide these to the Jinja rendering engine as input which combines them and outputs the text or text file as shown in the figure below

Overview of Jinja rendering process.
A template is simply a text file defining the structure of a document (that will be rendered/output) with Jinja syntax at places where we want to work with data. The rendering engine takes the data and inserts it into the template as defined in it to produce the output text. The templates need not have any specific extension or any extension at all. But it is recommended to use “.jinja” extension as this would be helpful to recognize the files and if you are using IDEs (Integrated development Environments) this may help them recognize that it is a Jinja file. In special cases, like working with web Frameworks like Flask or Django, we can use “.html” extension which provides additional benefits in that environment like html escaping.
Installating Jinja
We will work with Python3 to render Jinja templates. So, one needs to have Python3 and Jinja2 installed in order to work out the examples in this article. Once Python3 is installed, any python package manager can be used to install Jinja2. Here is the command to install using pip package manager –
On Windows -
py -m pip install jinja2
On Linux -
python3 -m pip install jinja2
Setting up the Project
In order to work with jinja any further, we need a small folder setup like this –
jinjaTests/
|_ templates/
|_ renders/
All our python files to render the templates will be put directly under the jinjaTests folder and the jinja templates would be put under templates folder. We will run the python programs from the jinjaTests folder as the current working directory/folder and any files rendered will be saved in renders folder.
Though we can use any extension name or no extension at all for the jinja templates, it is recommended to use the “.jinja” extension and we will follow this convention throughout this article.
Rendering text from Jinja Template using Python
Rendering a jinja template always results in some text (obviously, since this is what jinja is all about as stated earlier). Rendering a template using a python file involves the following steps –
- Step 1: Import the necessary libraries and components (objects, functions, etc.) from libraries.
- Step 2: Create a jinja rendering environment and store it in a variable. This environment will be used in further steps.
- Step 3: Load the template in a variable.
- Step 4: Render the template using <template-object>.render() function to obtain text.
- Step 5: Print the rendered text to the screen or a file as suitable.
Following is an example to demonstrate the above process.
Printing “Hello World” with Jinja
Create a jinja template named “helloWorld.jinja” and save it in templates folder. Here are the contents of this file –
Hello World!
Create a python file named “helloWorld.py” and save it directly under the jinjaTests folder. This file will render the “helloWorld.jinja” template. Here are the contents of this file.
After importing the necessary components from “jinja2” module we load the environment using the “Environment()” function citing the templates folder as the folder for keeping templates. While loading jinja templates, the environment will search for the templates relative to this folder. Next, we load the template using “<environment-object>.get_template(<path to the template>)” function where the path to the template is relative to the templates folder as stated and store it in variable named “template”. Next we render the template using “<template-object>.render()” function which outputs the rendered text (string). We store the output string in the variable output. Finally, we print the string stored in output on the screen.
Python3
from jinja2 import Environment, FileSystemLoader
env = Environment(loader = FileSystemLoader('templates'))
template = env.get_template('helloWorld.jinja')
output = template.render()
print(output)
|
Output
Hello World!
Saving the output of rendering a Jinja template to a file
To save the output to a file, we just need to write the output string to a file instead of the screen in last example. One way to do this is by replacing the print line (last line) with the following code in helloWorld.py –
with open("renders/outputFileName.txt", 'w') as f:
    print(output, file = f)
Running the “helloWorld.py” with this code will create a file named “outputFileName.txt” in the renders folder (or any other location you specify).
Passing data to the Jinja template
We can pass data to the jinja template from the rendering python program by passing keyword argument(s) to the “<template-object>.render()” function. The keys of these arguments can be used to access the respective values in the expression delimiters (i.e., {{ }}) inside the template. Here is an example to print hello to a name passed to the template by the rendering python program –
Example
Save a template named “helloName.jinja” in the templates folder with the following content –
Hello {{name}}!
Next save the rendering python program named “helloName.py” in the jinjaTests folder with the following content –
Python3
from jinja2 import Environment, FileSystemLoader
env = Environment(loader = FileSystemLoader('templates'))
template = env.get_template('helloName.jinja')
output = template.render(name = 'Geeks')
print(output)
|
Running this file produces the following text output on the screen –
Hello Geeks!
Note that we passed the “name” argument to the render function which is accessed in the template inside the expression delimiters. More on delimiters in syntax section.
Basics of Jinja Syntax
Now that we are familiar with the basics of rendering a jinja template and passing data to it with a python program, we proceed to the basic syntax of the jinja templates and how to use the data passed in the template.
Delimiters
All the jinja syntax goes inside the delimiters inside the template. All the text outside the delimiters is rendered as it is. There are following three types of delimiters by default –
- {{ }} for expressions.
- {# #} for comments (even multiline) inside the template.
- {% %} for jinja statements (like loops, etc.)
Expressions
We can write expressions inside the Jinja templates in “{{ }}” delimiters. We can even access the variables passed to the template by the rendering python program via render method as stated earlier. The delimiter is replaced with the result obtained after evaluating the expression while rendering.
Decisions
We can write the if…else statements inside the jinja template using the following syntax –
{% if <condition> %} <if block>
{% elif <condition2> %} <elif block>
<%else%> <else block
<% endif %>
Where elif and else blocks are optional. Depending on the condition, the text inside the respective block is rendered.
Loops
Jinja provides a for loop very similar to the python for loop. It works on an sequence/collection of values. It even has the range() function. Here is the syntax for the for loop in Jinja –
{% for <variable name> in <sequence> %}
<block inside the loops>
{% endfor %}
Creating static HTML pages with Jinja
Now we use some of the above-mentioned concepts to render a static html page that renders the table of a number. To render an HTML page, we just need to have the HTML markup inside the Jinja Template where required. We finally save the rendered text to an external file with a .html extension. Here is an example that creates an HTML page with the table of a given number.
Create a template with the following content and save it as “webTable.jinja” in the jinjaTests folder.
<!DOCTYPE html>
<html>
    <head><title>Table of {{tableOf}}</title></head>
    <body>
        <h2>Table of {{tableOf}} rendered with Jinja -</h2>
        {% for i in range(1,11) -%}
        <p>{{tableOf}} x {{i}} = {{tableOf * i}}</p>
        {%- endfor %}
    </body>
</html>
Create a python file to render the above template and save it as “webTable.py” in the jinjaTests folder. Here are the contents of the file –
Python3
from jinja2 import Environment, FileSystemLoader
env = Environment(loader = FileSystemLoader('templates'))
template = env.get_template('webTable.jinja')
with open("renders/output.html", 'w') as f:
print(template.render(tableOf = 5), file = f)
|
Running the above file produces a file named “output.html” in renders folder. You can check it out by opening it with a web browser. The output –
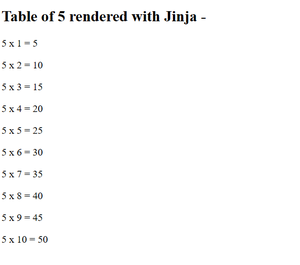
Table of a number created with Jinja
Try to understand the above program based on past concepts for practice.
Conclusion
Jinja2 is a powerful text rendering engine for python3. It is flexible and powerful and integrates well with a wide range of libraries and frameworks. It can be used to render just any sort of file as long as it contains text. The jinja rendering engine takes data and the template and then combines them to produce some output text. We saw the basic working of Jinja and basic jinja syntax in this article.
Share your thoughts in the comments
Please Login to comment...