Flutter – TabView Widget
Last Updated :
16 Aug, 2021
There are lots of apps where you often have come across tabs. Tabs are a common pattern in the apps. They are situated at top of the app below the App bar. So today we are going to create our own app with tabs.
Table of Contents:
- Project Setup
- Code
- Conclusion
Project Setup:
You can either create a new project or a new file in your existing project.
We don’t need any other dependencies.
Code:
We need a TabController to control the tabs of our app. Here in this tutorial, we are going to use DefaultTabController because it is the simplest and accessible to all the descendants.
DefaultTabController is used as the home of MaterialApp.
So in the main.dart file:
Dart
import 'package:flutter/material.dart';
void main() {
runApp(MyApp());
}
class MyApp extends StatelessWidget {
@override
Widget build(BuildContext context) {
return MaterialApp(
title: 'TabView Tutorial GFG',
theme: ThemeData(
primarySwatch: Colors.green,
),
home: HomePage(),
);
}
}
class HomePage extends StatelessWidget {
const HomePage({ Key? key }) : super(key: key);
@override
Widget build(BuildContext context) {
return DefaultTabController(
length: length,
child: child,
);
}
}
|
So as you can see we need to provide two fields, one is the length and the other is a child. These are required fields.
- length: Number of tabs
- child: The widget you want to display
Now I want 3 tabs so I am providing length with 3. Also, the child will be obviously Scaffold because it is necessary.
Dart
DefaultTabController(
length: 3,
child: Scaffold(
appBar: AppBar(
title: Text("GeeksForGeeks"),
bottom: TabBar(
tabs: [],
),
),
body: TabBarView(
children: [],
),
),
);
|
Here you can see two new widgets, TabBar and TabBarView.
- TabBar: It is used to display the top view of tabs or more specifically it displays the content of the tab.
- TabBarView: It is used to display the contents when a tab is pressed.
So we will display Icons in the TabBar.
Note: Here you should display 3 tabs or else you will get an error.
Dart
TabBar(
tabs: [
Tab(
icon: Icon(Icons.home_filled),
text: "Home",
),
Tab(
icon: Icon(Icons.account_box_outlined),
text: "Account",
),
Tab(
icon: Icon(Icons.alarm),
text: "Alarm",
),
],
),
|
Inside the TabBarView widget, we need three children widgets, and they can be anything.
So I will display just Icons for the simplicity of the tutorial.
Dart
TabBarView(
children: [
Center(
child: Icon(Icons.home),
),
Center(
child: Icon(Icons.account_circle),
),
Center(
child: Icon(Icons.alarm),
)
],
),
|
Now run the App.

TabBarView app
Now if you have lots of tabs, like 5 or 6 we can use the isScrollable field in the TabView. If it is false, it shrinks all the tabs within the screen and if it is true it makes scrollable Tabs.
You can change the length to 6 and duplicate all the tabs under TabBar and TabBarView.
Dart
DefaultTabController(
length: 6,
child: Scaffold(
appBar: AppBar(
title: Text("GeeksForGeeks"),
bottom: TabBar(
isScrollable: true,
tabs: [
Tab(
icon: Icon(Icons.home_filled),
text: "Home",
),
Tab(
icon: Icon(Icons.account_box_outlined),
text: "Account",
),
Tab(
icon: Icon(Icons.alarm),
text: "Alarm",
),
Tab(
icon: Icon(Icons.home_filled),
text: "Home",
),
Tab(
icon: Icon(Icons.account_box_outlined),
text: "Account",
),
Tab(
icon: Icon(Icons.alarm),
text: "Alarm",
),
],
),
),
body: TabBarView(
children: [
Center(
child: Icon(Icons.home),
),
Center(
child: Icon(Icons.account_circle),
),
Center(
child: Icon(Icons.alarm),
),
Center(
child: Icon(Icons.home),
),
Center(
child: Icon(Icons.account_circle),
),
Center(
child: Icon(Icons.alarm),
)
],
),
),
);
|
Now run the app again.
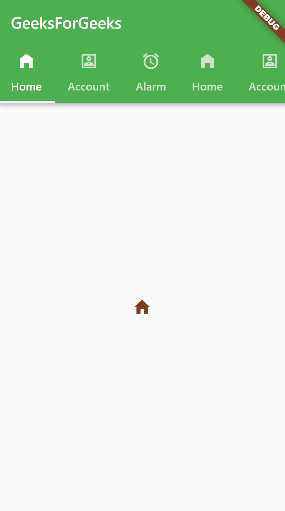
More tabs TabView App
Now clear the duplicate code. Here is the full code.
Dart
import 'package:flutter/material.dart';
void main() {
runApp(MyApp());
}
class MyApp extends StatelessWidget {
@override
Widget build(BuildContext context) {
return MaterialApp(
title: 'TabView Tutorial GFG',
theme: ThemeData(
primarySwatch: Colors.green,
),
home: HomePage(),
);
}
}
class HomePage extends StatelessWidget {
const HomePage({Key? key}) : super(key: key);
@override
Widget build(BuildContext context) {
return DefaultTabController(
length: 3,
child: Scaffold(
appBar: AppBar(
title: Text("GeeksForGeeks"),
bottom: TabBar(
tabs: [
Tab(
icon: Icon(Icons.home_filled),
text: "Home",
),
Tab(
icon: Icon(Icons.account_box_outlined),
text: "Account",
),
Tab(
icon: Icon(Icons.alarm),
text: "Alarm",
),
],
),
),
body: TabBarView(
children: [
Center(
child: Icon(Icons.home),
),
Center(
child: Icon(Icons.account_circle),
),
Center(
child: Icon(Icons.alarm),
)
],
),
),
);
}
}
|
Conclusion
So we learned a new widget TabView and we created a very basic app. But we can make beautiful apps with this very simple and easy widget. It comes with all the necessary animations and snapping which makes settings up very easily an app with tabs. If you have any doubts comment below.
Share your thoughts in the comments
Please Login to comment...