Design patterns in C Sharp (C#) help developers create maintainable, flexible, and understandable code. They encapsulate the expertise and experience of seasoned software architects and developers, making it easier for newer programmers to follow established best practices.
Important Topics for the Design Patterns in C sharp (C#)
1. What are Design Patterns in C sharp (C#)?
Design patterns are defined as reusable solutions to the common problems that arise during software design and development. They are general templates or best practices that guide developers in creating well-structured, maintainable, and efficient code.
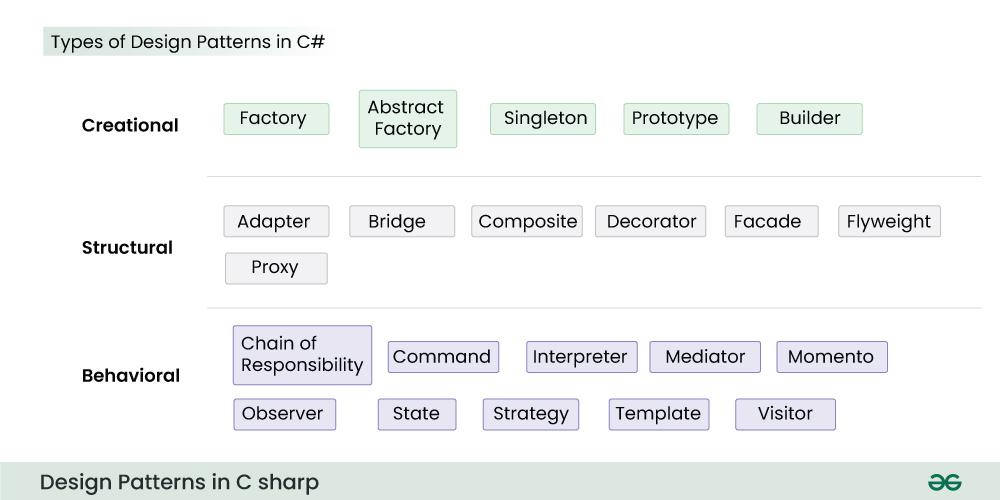
2. Types of Design Patterns in C sharp (C#)
Several types of design patterns are commonly used in software development. These patterns can be categorized into three main groups:
- Creational Design Patterns
- Structural Design Patterns
- Behavioral Design Patterns
3.Creational Design Patterns in C sharp (C#)
Creational design patterns abstract the instantiation process. They help make a system independent of how its objects are created, composed, and represented. A class creational pattern uses inheritance to vary the class that’s instantiated, whereas an object creational pattern will delegate instantiation to another object. Creational patterns give a lot of flexibility in what gets created, who creates it, how it gets created, and, when.
There are two recurring themes in these patterns:
- They all encapsulate knowledge about which concrete class the system uses.
- They hide how instances of these classes are created and put together.
3.1 Factory Method Design Pattern in C sharp (C#)
Factory Method or Factory Design Patterns also known as virtual constructor, it define an interface for creating an object, but let subclasses decide which class to instantiate. Factory Method lets a class defer instantiation to subclasses.
When to use Factory Method
- A class can’t anticipate the class of objects it must create.
- A class wants its subclass to specify the objects it creates.
- Classes delegate responsibility to one of several helper subclasses, and you want to localize the knowledge of which helper subclass is the delegate.
Let’s understand Factory Method by using an example:
When making a system where clients can request different types of vehicles (TwoWheeler, ThreeWheeler, or FourWheeler) , this might involves creating instances of concrete classes directly in the client code.
- If multiple clients need to create instances of vehicles, the code for creating those instances might be duplicated across different parts of the application.
- Creating instances of concrete classes directly ties the client code to those specific classes.
- The Client code could become cluttered with the details of object creation, making it harder to read and understand.
Then how Factory Pattern provides a centralized and abstract way to create objects for the above problem?
In the below code the VehicleFactory class is responsible for creating instances of the requested vehicles based on the provided VehicleType. The client class (Client) uses the factory to build vehicles and then interacts with the created vehicles without knowing their specific implementations.
Below is the Code for the above problem statement:
C#
using System;
public enum VehicleType
{
TwoWheeler,
ThreeWheeler,
FourWheeler
}
public abstract class Vehicle
{
public abstract void PrintVehicleInfo();
}
public class TwoWheeler : Vehicle
{
public override void PrintVehicleInfo()
{
Console.WriteLine("I am two wheeler");
}
}
public class ThreeWheeler : Vehicle
{
public override void PrintVehicleInfo()
{
Console.WriteLine("I am three wheeler");
}
}
public class FourWheeler : Vehicle
{
public override void PrintVehicleInfo()
{
Console.WriteLine("I am four wheeler");
}
}
public interface IVehicleFactory
{
Vehicle Build(VehicleType vehicleType);
}
public class VehicleFactory : IVehicleFactory
{
public Vehicle Build(VehicleType vehicleType)
{
switch (vehicleType)
{
case VehicleType.TwoWheeler:
return new TwoWheeler();
case VehicleType.ThreeWheeler:
return new ThreeWheeler();
case VehicleType.FourWheeler:
return new FourWheeler();
default:
return null;
}
}
}
public class Client
{
private Vehicle _pVehicle;
public Client()
{
_pVehicle = null;
}
public void BuildVehicle(VehicleType vehicleType)
{
IVehicleFactory vf = new VehicleFactory();
_pVehicle = vf.Build(vehicleType);
}
public Vehicle GetVehicle()
{
return _pVehicle;
}
}
class Program
{
static void Main(string[] args)
{
Client client = new Client();
client.BuildVehicle(VehicleType.TwoWheeler);
client.GetVehicle().PrintVehicleInfo();
client.BuildVehicle(VehicleType.ThreeWheeler);
client.GetVehicle().PrintVehicleInfo();
client.BuildVehicle(VehicleType.FourWheeler);
client.GetVehicle().PrintVehicleInfo();
}
}
|
Output
I am two wheeler
I am three wheeler
I am four wheeler
3.2 Abstract Factory Method Design Pattern in C sharp (C#)
Abstract Factory design pattern is one of the Creational pattern. Abstract Factory pattern is almost similar to Factory Pattern and is considered as another layer of abstraction over factory pattern. Abstract Factory patterns work around a super-factory which creates other factories.
Let’s understand Abstract Factory Method by using an example:
When designing a system that allows the creation of different types of cars (Micro, Mini, Luxury) in various locations (USA, India, Default). Each type of car and location combination has its own factory.
- Direct instantiation of car objects without an abstract factory would tightly couple the client code to concrete car classes and their instantiation logic.
- Adding a new type of car or a new location would require modifying the existing client code, violating the Open/Closed Principle of software design.
- The lack of a centralized and abstract way to create objects can reduce code readability and maintainability.
How we Abstract Factory Pattern gonna solve the above problem?
The Below code provides an abstract base class Car and concrete implementations for each type of car. There are also separate factory classes for different locations (INDIACarFactory, USACarFactory, and DefaultCarFactory). The CarFactory class acts as an abstract factory that decides which concrete factory to use based on the specified location.
Below is the Code for the above problem statement:
C#
using System;
public enum CarType
{
MICRO, MINI, LUXURY
}
public enum Location
{
DEFAULT, USA, INDIA
}
public abstract class Car
{
protected Car(CarType model, Location location)
{
Model = model;
Location = location;
}
public CarType Model { get; }
public Location Location { get; }
public abstract void Construct();
public override string ToString()
{
return $"CarModel - {Model} located in {Location}";
}
}
public class LuxuryCar : Car
{
public LuxuryCar(Location location) : base(CarType.LUXURY, location)
{
Construct();
}
public override void Construct()
{
Console.WriteLine("Connecting to luxury car");
}
}
public class MicroCar : Car
{
public MicroCar(Location location) : base(CarType.MICRO, location)
{
Construct();
}
public override void Construct()
{
Console.WriteLine("Connecting to Micro Car ");
}
}
public class MiniCar : Car
{
public MiniCar(Location location) : base(CarType.MINI, location)
{
Construct();
}
public override void Construct()
{
Console.WriteLine("Connecting to Mini car");
}
}
public class INDIACarFactory
{
public static Car BuildCar(CarType model)
{
switch (model)
{
case CarType.MICRO:
return new MicroCar(Location.INDIA);
case CarType.MINI:
return new MiniCar(Location.INDIA);
case CarType.LUXURY:
return new LuxuryCar(Location.INDIA);
default:
return null;
}
}
}
public class DefaultCarFactory
{
public static Car BuildCar(CarType model)
{
switch (model)
{
case CarType.MICRO:
return new MicroCar(Location.DEFAULT);
case CarType.MINI:
return new MiniCar(Location.DEFAULT);
case CarType.LUXURY:
return new LuxuryCar(Location.DEFAULT);
default:
return null;
}
}
}
public class USACarFactory
{
public static Car BuildCar(CarType model)
{
switch (model)
{
case CarType.MICRO:
return new MicroCar(Location.USA);
case CarType.MINI:
return new MiniCar(Location.USA);
case CarType.LUXURY:
return new LuxuryCar(Location.USA);
default:
return null;
}
}
}
public class CarFactory
{
private CarFactory()
{
}
public static Car BuildCar(CarType type)
{
Location location = Location.INDIA;
switch (location)
{
case Location.USA:
return USACarFactory.BuildCar(type);
case Location.INDIA:
return INDIACarFactory.BuildCar(type);
default:
return DefaultCarFactory.BuildCar(type);
}
}
}
public class AbstractDesign
{
public static void Main(string[] args)
{
Console.WriteLine(CarFactory.BuildCar(CarType.MICRO));
Console.WriteLine(CarFactory.BuildCar(CarType.MINI));
Console.WriteLine(CarFactory.BuildCar(CarType.LUXURY));
}
}
|
Output
Connecting to Micro Car
CarModel - MICRO located in INDIA
Connecting to Mini car
CarModel - MINI located in INDIA
Connecting to luxury car
CarModel - LUXURY located in INDIA
3.3 Singleton Method Design Pattern in C sharp (C#)
Singleton pattern is a design pattern which restricts a class to instantiate its multiple objects. It is nothing but a way of defining a class.
- Class is defined in such a way that only one instance of the class is created in the complete execution of a program or project.
- When the sole instance should be extensible by subclassing and clients should be able to use an extended instance without modifying
- Singleton classes are used for logging, driver objects, caching, and thread pool, database connections.
Let’s understand Singleton Method by using an example:
- In some scenarios where we need a single point of control for a global state or shared resource, where we have to manage and coordinate changes across multiple instances.
- In some scenarios where we unintentionally create multiple instances of a class, leading to redundant memory usage and potential inconsistencies in data or behavior. Lack of a global access point can make it difficult for different parts of the application to interact with a common instance, leading to redundancy and a lack of centralized control.
How we are gonna solve this problem using Singleton Pattern?
The Singleton class has a private constructor, a private static instance, and a public static method GetInstance() that returns the instance. The method demonstrates the usage of the Singleton pattern by calling the GetInstance() method and then invoking the DoSomething() method on the obtained instance.
Below is the Code for the above problem statement:
C#
using System;
public class Singleton
{
private static Singleton instance;
private Singleton()
{
Console.WriteLine("Singleton is Instantiated.");
}
public static Singleton GetInstance()
{
if (instance == null)
instance = new Singleton();
return instance;
}
public void DoSomething()
{
Console.WriteLine("Something is Done.");
}
}
class Program
{
static void Main(string[] args)
{
Singleton.GetInstance().DoSomething();
}
}
|
Output
Singleton is Instantiated.
Something is Done.
3.4 Prototype Method Design Pattern in C sharp (C#)
Prototype allows us to hide the complexity of making new instances from the client. The concept is to copy an existing object rather than creating a new instance from scratch, something that may include costly operations. The existing object acts as a prototype and contains the state of the object. The newly copied object may change same properties only if required. This approach saves costly resources and time, especially when object creation is a heavy process.
Let’s understand Prototype Method by using an example:
Lets consider a scenario where you are developing a system for an online graphic design application. Users can create various graphic elements, such as logos, icons, or templates. Each graphic element can be customized in terms of colors, sizes, and styles. The challenge is to efficiently create new graphic elements while allowing users to customize and iterate upon existing designs.
How Prototype design pattern help to solve this problem?
The Prototype design pattern allows us to create new objects by copying an existing object, known as the prototype. In this scenario, we can define a prototype interface, say GraphicElement, which declares a method to clone the object. Concrete classes like Logo, Icon, and Template implement this interface.
Below is the Code for the above problem statement:
C#
using System;
public interface IGraphicElement
{
IGraphicElement Clone();
void Display();
}
public class Logo : IGraphicElement
{
private string name;
private string color;
public Logo(string name, string color)
{
this.name = name;
this.color = color;
}
public IGraphicElement Clone()
{
return (IGraphicElement)MemberwiseClone();
}
public void Display()
{
Console.WriteLine($"Logo: {name}, Color: {color}");
}
}
class Program
{
static void Main()
{
IGraphicElement originalLogo = new Logo("OriginalLogo", "Blue");
IGraphicElement customizedLogo = originalLogo.Clone();
Console.WriteLine("Original Logo:");
originalLogo.Display();
Console.WriteLine("\nCustomized Logo:");
customizedLogo.Display();
}
}
|
Output
Original Logo:
Logo: OriginalLogo, Color: Blue

Customized Logo:
Logo: OriginalLogo, Color: Blue
3.5 Builder Method Design Pattern in C sharp (C#)
Builder pattern aims to “Separate the construction of a complex object from its representation so that the same construction process can create different representations.” It is used to construct a complex object step by step and the final step will return the object. The process of constructing an object should be generic so that it can be used to create different representations of the same object.
Let’s understand Builder Method by using an example:
Lets consider a system for constructing houses with different features, The house class represents a house with various components like basement, structure, roof, and interior , The House class might have a complex constructor with numerous parameters representing different components and their configurations. This can lead to confusion and errors, especially when there are many optional parameters.
How Builder Pattern gonna help to solve this problem:
The builder design pattern, we can address these problems, providing a clear and concise way to construct objects with many optional components while improving code readability, maintainability, and flexibility.
In the below code:
- There are two types of builders:
IglooHouseBuilder and TipiHouseBuilder. Each builder knows how to build a specific type of house with its unique features.
- The
CivilEngineer class is responsible for orchestrating the construction process, using a specific builder to build a house with the desired components.
- The main program (
Builder) showcases the construction of an igloo house by creating an instance of IglooHouseBuilder, passing it to a CivilEngineer, and then instructing the engineer to construct the house.
- The resulting house is then printed out.
Below is the Code for the above problem statement:
C#
using System;
public interface IHousePlan
{
void SetBasement(string basement);
void SetStructure(string structure);
void SetRoof(string roof);
void SetInterior(string interior);
}
public class House : IHousePlan
{
private string basement;
private string structure;
private string roof;
private string interior;
public void SetBasement(string basement)
{
this.basement = basement;
}
public void SetStructure(string structure)
{
this.structure = structure;
}
public void SetRoof(string roof)
{
this.roof = roof;
}
public void SetInterior(string interior)
{
this.interior = interior;
}
public override string ToString()
{
return $"Basement: {basement}, Structure: {structure}, Roof: {roof}, Interior: {interior}";
}
}
public interface IHouseBuilder
{
void BuildBasement();
void BuildStructure();
void BuildRoof();
void BuildInterior();
House GetHouse();
}
public class IglooHouseBuilder : IHouseBuilder
{
private House house;
public IglooHouseBuilder()
{
this.house = new House();
}
public void BuildBasement()
{
house.SetBasement("Ice Bars");
}
public void BuildStructure()
{
house.SetStructure("Ice Blocks");
}
public void BuildRoof()
{
house.SetRoof("Ice Dome");
}
public void BuildInterior()
{
house.SetInterior("Ice Carvings");
}
public House GetHouse()
{
return house;
}
}
public class TipiHouseBuilder : IHouseBuilder
{
private House house;
public TipiHouseBuilder()
{
this.house = new House();
}
public void BuildBasement()
{
house.SetBasement("Wooden Poles");
}
public void BuildStructure()
{
house.SetStructure("Wood and Ice");
}
public void BuildRoof()
{
house.SetRoof("Wood, caribou and seal skins");
}
public void BuildInterior()
{
house.SetInterior("Fire Wood");
}
public House GetHouse()
{
return house;
}
}
public class CivilEngineer
{
private IHouseBuilder houseBuilder;
public CivilEngineer(IHouseBuilder houseBuilder)
{
this.houseBuilder = houseBuilder;
}
public House GetHouse()
{
return houseBuilder.GetHouse();
}
public void ConstructHouse()
{
houseBuilder.BuildBasement();
houseBuilder.BuildStructure();
houseBuilder.BuildRoof();
houseBuilder.BuildInterior();
}
}
class Builder
{
public static void Main(string[] args)
{
IHouseBuilder iglooBuilder = new IglooHouseBuilder();
CivilEngineer engineer = new CivilEngineer(iglooBuilder);
engineer.ConstructHouse();
House house = engineer.GetHouse();
Console.WriteLine("Builder constructed: " + house);
}
}
|
Output
Builder constructed: Basement: Ice Bars, Structure: Ice Blocks, Roof: Ice Dome, Interior: Ice Carvings
4. Structural Design Patterns in C sharp (C#)
Structural Design Patterns are concerned with how classes and objects are composed to form larger structures. Structural class patterns use inheritance to compose interfaces or implementations. Consider how multiple inheritances mix two or more classes into one. The result is a class that combines the properties of its parent classes.
There are two recurring themes in these patterns:
- This pattern is particularly useful for making independently developed class libraries work together.
- Structural Design Patterns describe ways to compose objects to realize new functionality.
- The added flexibility of object composition comes from the ability to change the composition at run-time, which is impossible with static class composition.
4.1 Adapter Method Design Patterns in C sharp (C#)
This pattern is easy to understand as the real world is full of adapters.
For example:
consider a USB to Ethernet adapter. We need this when we have an Ethernet interface on one end and USB on the other. Since they are incompatible with each other. we use an adapter that converts one to other. This example is pretty analogous to Object Oriented Adapters.
In design, adapters are used when we have a class (Client) expecting some type of object and we have an object (Adaptee) offering the same features but exposing a different interface.
Let’s understand Adapter Method by using an example:
Lets consider you have an existing system that works with a service called LegacyService, which has a method LegacyRequest(). However, you need to integrate a new service called NewService, which has a method NewRequest().
- The method names and signatures in
LegacyService and NewService do not match, causing a direct incompatibility.
- Modifying the existing system to work with
NewService directly would require changes to its code, leading to disruptions and potentially breaking the existing functionality.
How Adapter Pattern gonna help to solve this problem:
The Adapter Pattern makes the NewService compatible with the ILegacyService interface expected by the existing system.
In the below code:
- Target Interface: Define an interface called
ILegacyService that represents the operations expected by the existing system.
- Adaptee: Create a class called
NewService with the method NewRequest().
- Adapter Class:Create an adapter class
Adapter that implements ILegacyService and wraps an instance of NewService. The Adapter class delegates calls to LegacyRequest() to the corresponding method in NewService.
Below is the Code for the above problem statement:
C#
using System;
public interface ILegacyService
{
void LegacyRequest();
}
public class NewService
{
public void NewRequest()
{
Console.WriteLine("Executing NewService.NewRequest()");
}
}
public class Adapter : ILegacyService
{
private readonly NewService newService;
public Adapter(NewService newService)
{
this.newService = newService;
}
public void LegacyRequest()
{
newService.NewRequest();
}
}
class Program
{
static void Main()
{
NewService newService = new NewService();
ILegacyService legacyServiceAdapter = new Adapter(newService);
legacyServiceAdapter.LegacyRequest();
}
}
|
Output
Executing NewService.NewRequest()
4.2 Bridge Method Design Patterns in C sharp (C#)
The bridge pattern allows the Abstraction and the Implementation to be developed independently and the client code can access only the Abstraction part without being concerned about the Implementation part.
Let’s understand Bridge Method by using an example:
Lets consider a system where different types of vehicles (cars and bikes) can be manufactured with different workshops (e.g., produce and assemble) but adding new types of vehicles or workshops becomes challenging, It might need to modify existing code, and introducing new variations could lead to code duplication and increased complexity.
It might have a high degree of coupling between the abstraction (e.g., vehicles) and its implementation (e.g., workshops). Any changes to one part of the system could affect the other, making it less flexible.
How Bridge Pattern gonna help to solve this problem:
By using the Bridge design pattern, you can address these challenges by separating abstraction from implementation. This allows for greater flexibility, extensibility, and maintainability in your system, making it easier to add new types of vehicles or workshops independently.
In the below code:
- The Bridge pattern allows the abstraction (vehicle) and its implementation (workshop) to vary independently
- There is a common abstraction, represented by the
Vehicle class, which has references to two workshops.
- Two abstractions,
Car and Bike, extend the Vehicle class and implement the Manufacture method, combining the workshops to showcase the manufacturing process.
- The
IWorkshop interface defines the methods that workshops must implement, and two concrete implementations (Produce and Assemble) represent different steps in the manufacturing process.
- The
BridgePattern class demonstrates the usage of the Bridge pattern by creating instances of cars and bikes, associating them with specific workshops, and then manufacturing each vehicle, showing the steps of production.
Below is the Code for the above problem statement:
C#
using System;
abstract class Vehicle
{
protected IWorkshop workShop1;
protected IWorkshop workShop2;
protected Vehicle(IWorkshop workShop1, IWorkshop workShop2)
{
this.workShop1 = workShop1;
this.workShop2 = workShop2;
}
public abstract void Manufacture();
}
class Car : Vehicle
{
public Car(IWorkshop workShop1, IWorkshop workShop2) : base(workShop1, workShop2)
{
}
public override void Manufacture()
{
Console.Write("Car ");
workShop1.Work();
workShop2.Work();
}
}
class Bike : Vehicle
{
public Bike(IWorkshop workShop1, IWorkshop workShop2) : base(workShop1, workShop2)
{
}
public override void Manufacture()
{
Console.Write("Bike ");
workShop1.Work();
workShop2.Work();
}
}
interface IWorkshop
{
void Work();
}
class Produce : IWorkshop
{
public void Work()
{
Console.Write("Produced");
}
}
class Assemble : IWorkshop
{
public void Work()
{
Console.Write(" And");
Console.WriteLine(" Assembled.");
}
}
class BridgePattern
{
static void Main(string[] args)
{
Vehicle vehicle1 = new Car(new Produce(), new Assemble());
vehicle1.Manufacture();
Vehicle vehicle2 = new Bike(new Produce(), new Assemble());
vehicle2.Manufacture();
}
}
|
Output
Car Produced And Assembled.
Bike Produced And Assembled.
4.3 Composite Method Design Patterns in C sharp (C#)
Composite pattern is a partitioning design pattern and describes a group of objects that is treated the same way as a single instance of the same type of object. The intent of a composite is to “compose” objects into tree structures to represent part-whole hierarchies. It allows you to have a tree structure and ask each node in the tree structure to perform a task.
Let’s understand Composite Method by using an example:
Lets consider a system where different types of employees (Developers and Managers) can be organized in a hierarchical structure but managing hierarchical structures becomes more complex, as you have to handle the distinctions between employees and groups separately. Operations that should be uniform for both individuals and groups may need to be duplicated with slight modifications, leading to maintenance challenges.
How Composite Pattern gonna help to solve this problem:
By applying the Composite design pattern, you can address these challenges, allowing you to treat both individual employees and groups uniformly, simplifying your code, and providing a more consistent and scalable solution.
In the below code:
- A common interface,
IEmployee, which all employee classes implement. This interface includes a method ShowEmployeeDetails to display the details of an employee.
- The
Developer and Manager classes are concrete implementations of employees with specific attributes such as employee ID, name, and position.
- The
CompanyDirectory class serves as a composite, representing a group of employees. It implements the IEmployee interface, allowing both individual employees and groups of employees to be treated uniformly. It can contain a list of IEmployee objects, which can be either individual employees or subgroups (other instances of CompanyDirectory).
- The
Company class acts as the client code, creating instances of individual employees (Developers and Managers) and organizing them into composite structures using CompanyDirectory. It then demonstrates the use of the Composite pattern by displaying the details of the entire employee structure
Below is the Code for the above problem statement:
C#
using System;
using System.Collections.Generic;
interface IEmployee
{
void ShowEmployeeDetails();
}
class Developer : IEmployee
{
private long empId;
private string name;
private string position;
public Developer(long empId, string name, string position)
{
this.empId = empId;
this.name = name;
this.position = position;
}
public void ShowEmployeeDetails()
{
Console.WriteLine($"{empId} {name} {position}");
}
}
class Manager : IEmployee
{
private long empId;
private string name;
private string position;
public Manager(long empId, string name, string position)
{
this.empId = empId;
this.name = name;
this.position = position;
}
public void ShowEmployeeDetails()
{
Console.WriteLine($"{empId} {name} {position}");
}
}
class CompanyDirectory : IEmployee
{
private List<IEmployee> employeeList = new List<IEmployee>();
public void ShowEmployeeDetails()
{
foreach (IEmployee emp in employeeList)
{
emp.ShowEmployeeDetails();
}
}
public void AddEmployee(IEmployee emp)
{
employeeList.Add(emp);
}
public void RemoveEmployee(IEmployee emp)
{
employeeList.Remove(emp);
}
}
class Company
{
public static void Main(string[] args)
{
Developer dev1 = new Developer(100, "Lokesh Sharma", "Pro Developer");
Developer dev2 = new Developer(101, "Vinay Sharma", "Developer");
CompanyDirectory engDirectory = new CompanyDirectory();
engDirectory.AddEmployee(dev1);
engDirectory.AddEmployee(dev2);
Manager man1 = new Manager(200, "Kushagra Garg", "SEO Manager");
Manager man2 = new Manager(201, "Vikram Sharma", "Kushagra's Manager");
CompanyDirectory accDirectory = new CompanyDirectory();
accDirectory.AddEmployee(man1);
accDirectory.AddEmployee(man2);
CompanyDirectory directory = new CompanyDirectory();
directory.AddEmployee(engDirectory);
directory.AddEmployee(accDirectory);
directory.ShowEmployeeDetails();
}
}
|
Output
100 Lokesh Sharma Pro Developer
101 Vinay Sharma Developer
200 Kushagra Garg SEO Manager
201 Vikram Sharma Kushagra's Manager
4.4 Decorator Method Design Patterns in C sharp (C#)
The Decorator pattern is a structural design pattern that allows behavior to be added to individual objects, either statically or dynamically, without affecting the behavior of other objects from the same class. It involves creating a set of decorator classes that are used to wrap concrete components. These decorators add new functionalities to the objects they decorate by providing alternative processing pathways.
Let’s understand Decorator Method by using an example:
Imagine a pizza ordering system, adding new toppings or combinations might involve modifying the existing pizza classes. It’s like having to change the core pizza recipe every time a new topping is introduced.
How Decorator Pattern gonna help to solve this problem:
Decorator Pattern allow customers to customize their pizza orders by adding various toppings dynamically without modifying the existing pizza classes. It’s like having a versatile system that adapts to various customer preferences, making the pizza customization process smooth and scalable.
In the below code:
- An abstract class
Pizza representing the base pizza, with concrete pizza classes such as PeppyPaneer, FarmHouse, etc.
- There is an abstract decorator class
ToppingsDecorator, extending Pizza, which represents additional toppings that can be added to the pizza.
- Concrete topping classes like
FreshTomato, Barbeque, and Paneer extend the ToppingsDecorator class.
- The
PizzaStore class serves as the driver program, creating instances of pizzas and decorating them with various toppings.
Below is the Code for the above problem statement:
C#
using System;
abstract class Pizza
{
protected string description = "Unknown Pizza";
public virtual string GetDescription()
{
return description;
}
public abstract int GetCost();
}
abstract class ToppingsDecorator : Pizza
{
public abstract new string GetDescription();
}
class PeppyPaneer : Pizza
{
public PeppyPaneer() { description = "PeppyPaneer"; }
public override int GetCost() { return 100; }
}
class FarmHouse : Pizza
{
public FarmHouse() { description = "FarmHouse"; }
public override int GetCost() { return 200; }
}
class Margherita : Pizza
{
public Margherita() { description = "Margherita"; }
public override int GetCost() { return 100; }
}
class ChickenFiesta : Pizza
{
public ChickenFiesta() { description = "ChickenFiesta"; }
public override int GetCost() { return 200; }
}
class SimplePizza : Pizza
{
public SimplePizza() { description = "SimplePizza"; }
public override int GetCost() { return 50; }
}
class FreshTomato : ToppingsDecorator
{
Pizza pizza;
public FreshTomato(Pizza pizza) { this.pizza = pizza; }
public override string GetDescription()
{
return pizza.GetDescription() + ", Fresh Tomato ";
}
public override int GetCost() { return 40 + pizza.GetCost(); }
}
class Barbeque : ToppingsDecorator
{
Pizza pizza;
public Barbeque(Pizza pizza) { this.pizza = pizza; }
public override string GetDescription()
{
return pizza.GetDescription() + ", Barbeque ";
}
public override int GetCost()
{
return pizza != null ? 90 + pizza.GetCost() : 90;
}
}
class Paneer : ToppingsDecorator
{
Pizza pizza;
public Paneer(Pizza pizza) { this.pizza = pizza; }
public override string GetDescription()
{
return pizza.GetDescription() + ", Paneer ";
}
public override int GetCost() { return 70 + pizza.GetCost(); }
}
class PizzaStore
{
static void Main(string[] args)
{
Pizza pizza = new Margherita();
Console.WriteLine(pizza.GetDescription() +
" Cost :" + pizza.GetCost());
Pizza pizza2 = new FarmHouse();
pizza2 = new FreshTomato(pizza2);
pizza2 = new Paneer(pizza2);
Console.WriteLine(pizza2.GetDescription() +
" Cost :" + pizza2.GetCost());
Pizza pizza3 = new Barbeque(null);
Console.WriteLine(pizza3.GetDescription() + " Cost :" + pizza3.GetCost());
}
}
|
Output
Margherita Cost :100
Unknown Pizza Cost :310
Unknown Pizza Cost :90
4.5 Facade Method Design Patterns in C sharp (C#)
The Facade Pattern is a design pattern in software engineering that falls under the structural pattern category. It provides a simplified and unified interface to a set of interfaces or subsystems within a larger system, making it easier to use and reducing the complexity of the system for clients. Essentially, it acts as a facade or entry point to a more complex system, shielding clients from its intricacies.
Let’s understand Facade Method by using an example:
Lets consider a Car system, which includes an engine and lights, interacting with the car might involve dealing with the complexities of the engine and lights subsystems separately. It’s like having to understand the internal workings of these parts every time you want to start or stop the car.
How Facade Pattern gonna help to solve this problem:
The Facade Pattern hides the complexities of the engine and lights subsystems, offering a straightforward way to interact with the car. It’s like having a user-friendly control panel, making the car operation more accessible and user-friendly.
In the below code:
- Created a subsystem for the engine with functionalities to start and stop the engine.
- Developed another subsystem for lights with features to turn them on and off.
- A Facade class named
Car that encapsulates the interactions with the engine and lights subsystems.
- The
Car class have methods StartCar() to start the engine, turn on the lights, and indicate the car is ready to drive. Additionally, it should have StopCar() to turn off the lights, stop the engine, and indicate the car has stopped.
- Demonstrated the usage of the
Car class in the Main method, showcasing how the Facade pattern simplifies the process of starting and stopping the car without dealing with the complexities of individual subsystems.
Below is the Code for the above problem statement:
C#
using System;
class Engine
{
public void Start()
{
Console.WriteLine("Engine started");
}
public void Stop()
{
Console.WriteLine("Engine stopped");
}
}
class Lights
{
public void TurnOn()
{
Console.WriteLine("Lights on");
}
public void TurnOff()
{
Console.WriteLine("Lights off");
}
}
class Car
{
private Engine engine = new Engine();
private Lights lights = new Lights();
public void StartCar()
{
engine.Start();
lights.TurnOn();
Console.WriteLine("Car is ready to drive");
}
public void StopCar()
{
lights.TurnOff();
engine.Stop();
Console.WriteLine("Car has stopped");
}
}
class Program
{
static void Main()
{
Car car = new Car();
car.StartCar();
car.StopCar();
}
}
|
Output
Engine started
Lights on
Car is ready to drive
Lights off
Engine stopped
Car has stopped
4.6 Flyweight Method Design Patterns in C sharp (C#)
Flyweight pattern is one of the structural design patterns as this pattern provides ways to decrease object count thus improving application required objects structure. Flyweight pattern is used when we need to create a large number of similar objects (say 105). One important feature of flyweight objects is that they are immutable. This means that they cannot be modified once they have been constructed.
Let’s understand Flyweight Method by using an example:
In the Counter-Strike game, There are be two types of players: Terrorists and Counter-Terrorists. Each player has a specific mission and can be equipped with different weapons but the problem is that there can be lot of instances for each player, duplicating mission details or weapon information. It’s like having the same information repeated multiple times, taking up a lot of memory.
How Flyweight Pattern gonna help to solve this problem:
The Flyweight pattern is used to optimize memory usage by sharing common intrinsic attributes among similar objects. For example the intrinsic attributes like the mission type (“PLANT A BOMB” for Terrorists and “DIFFUSE BOMB” for Counter-Terrorists). Extrinsic attributes, such as the weapon a player carries, are assigned dynamically.
In the below code:
- Player Interface (
IPlayer): Defines methods for assigning a weapon and performing a mission.
- Concrete Player Classes (
Terrorist and CounterTerrorist): Implement the IPlayer interface, having intrinsic attributes (mission type) and extrinsic attributes (assigned weapons).
- Player Factory (
PlayerFactory): Responsible for creating and managing player objects. Uses a Dictionary to store and retrieve players based on their type.
- Driver Class (
CounterStrike): Main class demonstrating the Flyweight pattern. Creates and assigns weapons to players in a Counter-Strike game simulation.
Below is the Code for the above problem statement:
C#
using System;
using System.Collections.Generic;
interface IPlayer
{
void AssignWeapon(string weapon);
void Mission();
}
class Terrorist : IPlayer
{
private const string TASK = "PLANT A BOMB";
private string weapon;
public void AssignWeapon(string weapon)
{
this.weapon = weapon;
}
public void Mission()
{
Console.WriteLine($"Terrorist with weapon {weapon} | Task is {TASK}");
}
}
class CounterTerrorist : IPlayer
{
private const string TASK = "DIFFUSE BOMB";
private string weapon;
public void AssignWeapon(string weapon)
{
this.weapon = weapon;
}
public void Mission()
{
Console.WriteLine($"Counter Terrorist with weapon {weapon} | Task is {TASK}");
}
}
class PlayerFactory
{
private static Dictionary<string, IPlayer> playerDictionary =
new Dictionary<string, IPlayer>();
public static IPlayer GetPlayer(string type)
{
IPlayer player = null;
if (playerDictionary.ContainsKey(type))
player = playerDictionary[type];
else
{
switch (type)
{
case "Terrorist":
Console.WriteLine("Terrorist Created");
player = new Terrorist();
break;
case "CounterTerrorist":
Console.WriteLine("Counter Terrorist Created");
player = new CounterTerrorist();
break;
default:
Console.WriteLine("Unreachable code!");
break;
}
playerDictionary.Add(type, player);
}
return player;
}
}
class CounterStrike
{
private static string[] playerType =
{"Terrorist", "CounterTerrorist"};
private static string[] weapons =
{"AK-47", "Maverick", "Gut Knife", "Desert Eagle"};
static void Main(string[] args)
{
for (int i = 0; i < 10; i++)
{
IPlayer player = PlayerFactory.GetPlayer(GetRandPlayerType());
player.AssignWeapon(GetRandWeapon());
player.Mission();
}
}
static string GetRandPlayerType()
{
Random random = new Random();
int randInt = random.Next(playerType.Length);
return playerType[randInt];
}
static string GetRandWeapon()
{
Random random = new Random();
int randInt = random.Next(weapons.Length);
return weapons[randInt];
}
}
|
Output
Counter Terrorist Created
Counter Terrorist with weapon Desert Eagle | Task is DIFFUSE BOMB
Counter Terrorist with weapon AK-47 | Task is DIFFUSE BOMB
Counter Terrorist with weapon Gut Knife | Task is...
4.7. Proxy Method Design Patterns in C sharp (C#)
A Proxy is a design pattern that allows one object to stand in for another. It acts as a substitute or placeholder, controlling access to the real object. With a Proxy, you can execute actions before or after a request reaches the actual object, giving you the ability to manage and modify the behavior of the real object transparently.
Let’s understand Proxy Method by using an example:
Imagine a system of typical banking operations such as depositing money, withdrawing money, and checking the account balance. Now, these operations involve sensitive data, and we want to make sure they are secure. If we directly access these operations, there’s a risk of unauthorized access or tampering., So these operations should be accessible only after successful authentication.
How Proxy Pattern gonna help to solve this problem:
Proxy Pattern acts as a protective barrier between you and the sensitive operations. Before you can deposit, withdraw, or check balance, the proxy ensures there’s proper authentication.
In the below code:
- The code we will design should defines two classes,
RealBankAccount representing an actual bank account, and SecureBankAccountProxy acting as a proxy that controls access to the real bank account.
- The proxy requires a password for authentication, and if the password is correct, it allows operations like depositing money, withdrawing money, and checking the account balance.
- The client code demonstrates using the proxy to perform these operations on the bank account.
Below is the Code for the above problem statement:
C#
using System;
interface IBankAccount
{
void Deposit(double amount);
void Withdraw(double amount);
double GetBalance();
}
class RealBankAccount : IBankAccount
{
private double balance;
public void Deposit(double amount)
{
balance += amount;
Console.WriteLine($"Deposited: {amount}");
}
public void Withdraw(double amount)
{
if (balance >= amount)
{
balance -= amount;
Console.WriteLine($"Withdrawn: {amount}");
}
else
{
Console.WriteLine("Insufficient funds!");
}
}
public double GetBalance()
{
return balance;
}
}
class SecureBankAccountProxy : IBankAccount
{
private RealBankAccount realBankAccount;
private string password;
public SecureBankAccountProxy(string password)
{
this.password = password;
Authenticate();
}
private void Authenticate()
{
if (password == "secret")
{
realBankAccount = new RealBankAccount();
Console.WriteLine("Authentication successful.");
}
else
{
Console.WriteLine("Authentication failed. Access denied.");
}
}
public void Deposit(double amount)
{
if (realBankAccount != null)
{
realBankAccount.Deposit(amount);
}
}
public void Withdraw(double amount)
{
if (realBankAccount != null)
{
realBankAccount.Withdraw(amount);
}
}
public double GetBalance()
{
return (realBankAccount != null) ? realBankAccount.GetBalance() : 0.0;
}
}
class ProxyBankExample
{
static void Main(string[] args)
{
IBankAccount account = new SecureBankAccountProxy("secret");
account.Deposit(1000);
account.Withdraw(500);
double balance = account.GetBalance();
Console.WriteLine($"Current Balance: {balance}");
}
}
|
Output
Authentication successful.
Deposited: 1000
Withdrawn: 500
Current Balance: 500
5. Behavioral Design Patterns in C sharp (C#)
Behavioral Patterns are concerned with algorithms and the assignment of responsibilities between objects. Behavioral patterns describe not just patterns of objects or classes but also the patterns of communication between them. These patterns characterize complex control flow that’s difficult to follow at run-time.
There are three recurring themes in these patterns:
- Behavioral class patterns use inheritance to distribute behavior between classes.
- Behavioral object patterns use object composition rather than inheritance.
- Behavioral object patterns are concerned with encapsulating behavior in an object and delegating requests to it.
5.1. Chain of Responsibility Method Design Pattern in C sharp (C#)
Chain of responsibility pattern is used to achieve loose coupling in software design where a request from the client is passed to a chain of objects to process them. Later, the object in the chain will decide themselves who will be processing the request and whether the request is required to be sent to the next object in the chain or not.
Let’s understand Chain of Responsibilty Method by using an example:
When designing a chain of processor (which handles the request) , we have to manage the flow of requests, Each processor might need explicit dependencies on subsequent processors, making it challenging to modify or extend the processing logic and could result in a rigid and less maintainable code structure, How we can make a system in which there is efficiently handled related tasks with a clear structure, enabling each processor to decide if it can address a request or delegate it to the next processor in the chain.
How Chain of Responsibilty Pattern gonna help to solve this problem:
Using the Chain of Responsibility design pattern, a flexible and extensible system is designed to handle numeric operations. Multiple processors form a chain, each capable of independently deciding whether to handle a numeric request or pass it to the next processor in the chain.
In the below code:
- Processors: Processors (
NegativeProcessor, ZeroProcessor, PositiveProcessor) handle requests based on being negative, zero, or positive.
- Number Class:
Number class represents the request with an integer value.
- Chain Creation: The
Chain class initializes a chain of processors during creation.
- Processing Requests: Each processor decides to handle or pass the request to the next processor.
- Client (TestChain): Demonstrates creating a chain and passing numbers through for processing.
- Outputs which processor handles each type of number in the chain.
Below is the Code for the above problem statement:
C#
using System;
public class Chain
{
private Processor chain;
public Chain()
{
BuildChain();
}
private void BuildChain()
{
chain = new NegativeProcessor(new ZeroProcessor(new PositiveProcessor(null)));
}
public void Process(Number request)
{
chain.Process(request);
}
}
public abstract class Processor
{
private readonly Processor nextProcessor;
public Processor(Processor nextProcessor)
{
this.nextProcessor = nextProcessor;
}
public virtual void Process(Number request)
{
if (nextProcessor != null)
nextProcessor.Process(request);
}
}
public class Number
{
private readonly int number;
public Number(int number)
{
this.number = number;
}
public int GetNumber()
{
return number;
}
}
public class NegativeProcessor : Processor
{
public NegativeProcessor(Processor nextProcessor) : base(nextProcessor)
{
}
public override void Process(Number request)
{
if (request.GetNumber() < 0)
{
Console.WriteLine("NegativeProcessor : " + request.GetNumber());
}
else
{
base.Process(request);
}
}
}
public class ZeroProcessor : Processor
{
public ZeroProcessor(Processor nextProcessor) : base(nextProcessor)
{
}
public override void Process(Number request)
{
if (request.GetNumber() == 0)
{
Console.WriteLine("ZeroProcessor : " + request.GetNumber());
}
else
{
base.Process(request);
}
}
}
public class PositiveProcessor : Processor
{
public PositiveProcessor(Processor nextProcessor) : base(nextProcessor)
{
}
public override void Process(Number request)
{
if (request.GetNumber() > 0)
{
Console.WriteLine("PositiveProcessor : " + request.GetNumber());
}
else
{
base.Process(request);
}
}
}
class TestChain
{
public static void Main(string[] args)
{
Chain chain = new Chain();
chain.Process(new Number(90));
chain.Process(new Number(-50));
chain.Process(new Number(0));
chain.Process(new Number(91));
}
}
|
Output
PositiveProcessor : 90
NegativeProcessor : -50
ZeroProcessor : 0
PositiveProcessor : 91
5.2.Command Method Design Pattern in C sharp (C#)
The command pattern encapsulates a request as an object, thereby letting us parameterize other objects with different requests, queue or log requests, and support undoable operations.
Let’s understand Command Method by using an example:
When communication between the sender and the receiver, sender (remote control) would need to directly interact with the receiver (light, stereo) to execute commands. This tight coupling makes it challenging to introduce new commands or modify existing ones without affecting the sender.
How Command Pattern gonna help to solve this problem:
The Command Pattern encapsulates each command as an object. This decouples the sender from the specific operations of the receiver. The remote control only needs to know how to execute a generic command interface, and new commands can be easily added without modifying the sender.
In the below code:
- Remote Control Setup: There’s a simple remote control (
SimpleRemoteControl) with a single button. The remote control is designed to work with any command that implements the ICommand interface.
- Commands: Commands are represented by classes that implement the
ICommand interface. Example commands include turning on a light (LightOnCommand), turning off a light (LightOffCommand), operating a stereo with a CD (StereoOnWithCDCommand), and turning off a stereo (StereoOffCommand).
- Command Execution: The remote control can be dynamically configured with different commands. When you press the button on the remote control, it executes the associated command.
Below is the Code for the above problem statement:
C#
using System;
interface ICommand
{
void Execute();
}
class Light
{
public void On()
{
Console.WriteLine("Light is on");
}
public void Off()
{
Console.WriteLine("Light is off");
}
}
class LightOnCommand : ICommand
{
private readonly Light _light;
public LightOnCommand(Light light)
{
_light = light;
}
public void Execute()
{
_light.On();
}
}
class LightOffCommand : ICommand
{
private readonly Light _light;
public LightOffCommand(Light light)
{
_light = light;
}
public void Execute()
{
_light.Off();
}
}
class Stereo
{
public void On()
{
Console.WriteLine("Stereo is on");
}
public void Off()
{
Console.WriteLine("Stereo is off");
}
public void SetCD()
{
Console.WriteLine("Stereo is set for CD input");
}
public void SetVolume(int volume)
{
Console.WriteLine($"Stereo volume set to {volume}");
}
}
class StereoOffCommand : ICommand
{
private readonly Stereo _stereo;
public StereoOffCommand(Stereo stereo)
{
_stereo = stereo;
}
public void Execute()
{
_stereo.Off();
}
}
class StereoOnWithCDCommand : ICommand
{
private readonly Stereo _stereo;
public StereoOnWithCDCommand(Stereo stereo)
{
_stereo = stereo;
}
public void Execute()
{
_stereo.On();
_stereo.SetCD();
_stereo.SetVolume(11);
}
}
class SimpleRemoteControl
{
private ICommand _slot;
public SimpleRemoteControl()
{
}
public void SetCommand(ICommand command)
{
_slot = command;
}
public void ButtonWasPressed()
{
_slot.Execute();
}
}
class RemoteControlTest
{
static void Main(string[] args)
{
SimpleRemoteControl remote = new SimpleRemoteControl();
Light light = new Light();
Stereo stereo = new Stereo();
remote.SetCommand(new LightOnCommand(light));
remote.ButtonWasPressed();
remote.SetCommand(new StereoOnWithCDCommand(stereo));
remote.ButtonWasPressed();
remote.SetCommand(new StereoOffCommand(stereo));
remote.ButtonWasPressed();
}
}
|
Output
Light is on
Stereo is on
Stereo is set for CD input
Stereo volume set to 11
Stereo is off
5.3. Observer Method Design Pattern in C sharp (C#)
The Observer Pattern defines a one to many dependency between objects so that one object changes state, all of its dependents are notified and updated automatically.
- One to many dependency is between Subject(One) and Observer(Many).
- There is dependency as Observers themselves don’t have access to data. They are dependent on Subject to provide them data.
Let’s understand Observer Method by using an example:
Lets consider a weather monitoring system where multiple displays need to show real-time updates whenever there is a change in weather conditions but the challenge is to maintain consistency across observer and also ensuring that observers don’t negatively impact each other or the subject or potential performance concerns if there are many observers or frequent updates.
How Observer Pattern gonna help to solve this problem:
Using Observer pattern helps to make a flexible and loosely coupled system where new displays can be added without modifying the WeatherStation code.
In the below code:
The WeatherStation acts as the subject, and DisplayDevice instances act as observers.
- Displays can be dynamically added or removed from observation.
- When the weather changes (
SetWeather is called), all registered displays are automatically updated (NotifyObservers).
Below is the Code for the above problem statement:
C#
using System;
using System.Collections.Generic;
public class WeatherStation
{
private List<IObserver> observers = new List<IObserver>();
private string currentWeather;
public void AddObserver(IObserver observer)
{
observers.Add(observer);
}
public void RemoveObserver(IObserver observer)
{
observers.Remove(observer);
}
public void NotifyObservers()
{
foreach (var observer in observers)
{
observer.Update(currentWeather);
}
}
public void SetWeather(string newWeather)
{
currentWeather = newWeather;
NotifyObservers();
}
}
public interface IObserver
{
void Update(string weather);
}
public class DisplayDevice : IObserver
{
private string displayLocation;
public DisplayDevice(string location)
{
displayLocation = location;
}
public void Update(string weather)
{
Console.WriteLine($"Display at {displayLocation} updated. Current weather: {weather}");
}
}
class Program
{
static void Main()
{
WeatherStation weatherStation = new WeatherStation();
DisplayDevice mobileApp = new DisplayDevice("Mobile App");
DisplayDevice website = new DisplayDevice("Website");
DisplayDevice dedicatedDevice = new DisplayDevice("Dedicated Device");
weatherStation.AddObserver(mobileApp);
weatherStation.AddObserver(website);
weatherStation.AddObserver(dedicatedDevice);
weatherStation.SetWeather("Sunny");
weatherStation.SetWeather("Rainy");
}
}
|
Output
Display at Mobile App updated. Current weather: Sunny
Display at Website updated. Current weather: Sunny
Display at Dedicated Device updated. Current weather: Sunny
Display at Mobile App updated. Curr...
5.4 State Method Design Pattern in C sharp (C#)
The state pattern is one of the behavioral design patterns. A state design pattern is used when an Object changes its behavior based on its internal state. If we have to change the behavior of an object based on its state, we can have a state variable in the Object and use the if-else condition block to perform different actions based on the state. The state pattern is used to provide a systematic and lose-coupled way to achieve this through Context and State implementations.
Let’s understand State Method by using an example:
Lets consider a document editing application, it can have different states such as Draft, Review, and Published. The challenges here could be managing transitions between states and ensuring that actions are appropriately handled based on the current state.
How State Pattern gonna help to solve this problem:
The State design pattern is that it allows an object to alter its behavior when its internal state changes. This pattern encapsulates states into separate classes, and the object delegates the state-specific behavior to these classes.
In the below code:
Document class represents the context that can be in different states (DraftState, ReviewState, PublishedState).
- The
Handle method of each state is called based on the current state, and it performs actions accordingly.
- The
ChangeState method is used to transition between states.
- This pattern allows the context to behave differently based on its internal state, making it more flexible and maintainable.
Below is the Code for the above problem statement:
C#
using System;
public interface IState
{
void Handle();
}
public class DraftState : IState
{
public void Handle()
{
Console.WriteLine("Document is in Draft state. Editing is allowed.");
}
}
public class ReviewState : IState
{
public void Handle()
{
Console.WriteLine("Document is in Review state. Editing is restricted. Reviewers can provide feedback.");
}
}
public class PublishedState : IState
{
public void Handle()
{
Console.WriteLine("Document is in Published state. Editing is not allowed. It is publicly available.");
}
}
public class Document
{
private IState currentState;
public Document()
{
currentState = new DraftState();
}
public void ChangeState(IState newState)
{
currentState = newState;
}
public void Request()
{
currentState.Handle();
}
}
class Program
{
static void Main()
{
Document document = new Document();
document.Request();
document.ChangeState(new ReviewState());
document.Request();
document.ChangeState(new PublishedState());
document.Request();
}
}
|
Output
Document is in Draft state. Editing is allowed.
Document is in Review state. Editing is restricted. Reviewers can provide feedback.
Document is in Published state. Editing is not allowed. It is public...
5.5. Strategy Method Design Pattern in C sharp (C#)
Strategy pattern is a behavioral design pattern that allows the behavior of an object to be selected at runtime. It is one of the Gang of Four (GoF) design patterns, which are widely used in object-oriented programming. The Strategy pattern is based on the idea of encapsulating a family of algorithms into separate classes that implement a common interface.
Let’s understand Strategy Method by using an example:
Lets consider an e-commerce platform, and we need to handle payments. Different payment gateways (algorithms) such as PayPal, Credit Card, and Bitcoin may be used interchangeably based on user preferences but the challenge is when we handle payment processing directly within the client code, we might end up with hardcoded dependencies on specific payment methods and can leads to code redundancy and maintenance challenges.
How Strategy Pattern gonna help to solve this problem:
By applying the Strategy Pattern, you can address these challenges by encapsulating each payment method in a separate strategy class. This promotes code reuse, modularity, and easier extensibility without modifying existing code. It also allows for dynamic switching between payment strategies, making the system more flexible and scalable.
In the below code:
- PaymentProcessor Class: This is the context class that holds a reference to the current payment strategy. It has a method
ProcessPayment that delegates the payment processing to the strategy.
- PaymentStrategy Interface: The interface declares a method
ProcessPayment that concrete strategies must implement.
- Concrete Payment Strategies: Classes like
CreditCardPayment and PayPalPayment implement the PaymentStrategy interface, providing their specific implementation of payment processing.
- Client Code (Program class): The client creates an instance of the
PaymentProcessor and sets its payment strategy dynamically by calling SetPaymentStrategy. This allows the client to switch between different payment methods seamlessly.
Below is the Code for the above problem statement:
C#
using System;
public interface IPaymentStrategy
{
void ProcessPayment(float amount);
}
public class PayPalPayment : IPaymentStrategy
{
public void ProcessPayment(float amount)
{
Console.WriteLine($"Processing PayPal payment of {amount} dollars.");
}
}
public class CreditCardPayment : IPaymentStrategy
{
public void ProcessPayment(float amount)
{
Console.WriteLine($"Processing Credit Card payment of {amount} dollars.");
}
}
public class BitcoinPayment : IPaymentStrategy
{
public void ProcessPayment(float amount)
{
Console.WriteLine($"Processing Bitcoin payment of {amount} dollars.");
}
}
public class PaymentContext
{
private IPaymentStrategy paymentStrategy;
public PaymentContext(IPaymentStrategy strategy)
{
this.paymentStrategy = strategy;
}
public void SetPaymentStrategy(IPaymentStrategy strategy)
{
this.paymentStrategy = strategy;
}
public void ProcessPayment(float amount)
{
paymentStrategy.ProcessPayment(amount);
}
}
class Program
{
static void Main()
{
PaymentContext paymentContext = new PaymentContext(new PayPalPayment());
paymentContext.ProcessPayment(100.0f);
paymentContext.SetPaymentStrategy(new BitcoinPayment());
paymentContext.ProcessPayment(50.0f);
}
}
|
Output
Processing PayPal payment of 100 dollars.
Processing Bitcoin payment of 50 dollars.
5.6. Template Method Design Pattern in C sharp (C#)
Template method design pattern is to define an algorithm as a skeleton of operations and leave the details to be implemented by the child classes. The overall structure and sequence of the algorithm are preserved by the parent class.
Let’s understand Template Method by using an example:
Lets consider an application where various types of reports need to be generated (e.g., PDF report, Excel report). While the overall structure of report generation is similar, the details (like data fetching, formatting) vary for each type of report but there can be challenges like duplicating the common steps across different report classes, leading to code redundancy. If a change is needed in the common structure, you’d have to modify each report class separately, violating the DRY (Don’t Repeat Yourself) principle.
How Template Pattern gonna help to solve this problem:
This Template Method pattern ensures that the overall algorithm’s structure remains consistent across different implementations, allowing for code reuse, maintenance, and extensibility.
In the below code:
- The
ReportTemplate abstract class provides a template method, GenerateReport, defining the overall structure of a report.
- Concrete subclasses like
PdfReport and ExcelReport implement specific steps (FetchData and FormatData) according to their report types.
- The common method
DisplayReport ensures consistent behavior. In the Main method, instances of PdfReport and ExcelReport are created, and the GenerateReport method is invoked
Below is the Code for the above problem statement:
C#
using System;
abstract class ReportTemplate
{
public void GenerateReport()
{
Console.WriteLine("Generating Report Header");
FetchData();
FormatData();
DisplayReport();
}
protected abstract void FetchData();
protected abstract void FormatData();
private void DisplayReport()
{
Console.WriteLine("Displaying Report");
}
}
class PdfReport : ReportTemplate
{
protected override void FetchData()
{
Console.WriteLine("Fetching Data for PDF Report");
}
protected override void FormatData()
{
Console.WriteLine("Formatting Data for PDF Report");
}
}
class ExcelReport : ReportTemplate
{
protected override void FetchData()
{
Console.WriteLine("Fetching Data for Excel Report");
}
protected override void FormatData()
{
Console.WriteLine("Formatting Data for Excel Report");
}
}
class Program
{
static void Main()
{
ReportTemplate pdfReport = new PdfReport();
pdfReport.GenerateReport();
ReportTemplate excelReport = new ExcelReport();
excelReport.GenerateReport();
}
}
|
Output
Generating Report Header
Fetching Data for PDF Report
Formatting Data for PDF Report
Displaying Report
Generating Report Header
Fetching Data for Excel Report
Formatting Data for Excel Report
Displayi...
The Visitor pattern allows you to define new operations on an object structure without changing the classes of the elements on which it operates. The separation of concerns between the visitor and the elements being visited promotes extensibility and maintenance of the codebase.
Let’s understand Visitor Method by using an example:
Imagine we have a document structure with different elements like Paragraph and Table, and we want to perform operations like rendering and counting words on these elements , when we try modify each document element class whenever a new operation is introduced, this can lead to code modification and potential code duplication, violating the Open/Closed Principle.
How Visitor Pattern gonna help to solve this problem:
The Visitor pattern addresses these challenges by separating the operations into visitor classes. New operations can be added by introducing new visitor classes without modifying the existing element classes, promoting a more modular and extensible design.
In the below code:
Paragraph and Table classes implementing the IDocumentElement interface, and two visitors (RenderVisitor and WordCountVisitor) implementing the IVisitor interface. - The client code can apply different visitors to elements without modifying the element classes.
Below is the Code for the above problem statement:
C#
using System;
using System.Collections.Generic;
interface IDocumentElement
{
void Accept(IVisitor visitor);
}
class Paragraph : IDocumentElement
{
public void Accept(IVisitor visitor)
{
visitor.VisitParagraph(this);
}
}
class Table : IDocumentElement
{
public void Accept(IVisitor visitor)
{
visitor.VisitTable(this);
}
}
interface IVisitor
{
void VisitParagraph(Paragraph paragraph);
void VisitTable(Table table);
}
class RenderVisitor : IVisitor
{
public void VisitParagraph(Paragraph paragraph)
{
Console.WriteLine("Rendering Paragraph");
}
public void VisitTable(Table table)
{
Console.WriteLine("Rendering Table");
}
}
class WordCountVisitor : IVisitor
{
public void VisitParagraph(Paragraph paragraph)
{
Console.WriteLine("Counting words in Paragraph");
}
public void VisitTable(Table table)
{
Console.WriteLine("Counting words in Table");
}
}
class Client
{
static void Main()
{
List<IDocumentElement> elements = new List<IDocumentElement>
{
new Paragraph(),
new Table()
};
IVisitor renderVisitor = new RenderVisitor();
IVisitor wordCountVisitor = new WordCountVisitor();
foreach (var element in elements)
{
element.Accept(renderVisitor);
element.Accept(wordCountVisitor);
}
}
}
|
Output
Rendering Paragraph
Counting words in Paragraph
Rendering Table
Counting words in Table
5.8. Mediator design pattern in C sharp (C#)
Mediator pattern enables decoupling of objects by introducing a layer in between so that the interaction between objects happen via the layer. If the objects interact with each other directly, the system components are tightly-coupled with each other that makes higher maintainability cost and not hard to extend. Mediator pattern focuses on providing a mediator between objects for communication and help in implementing loose-coupling between objects
Let’s understand Mediator Method by using an example:
Lets consider Chat application where users can send messages to each other. Direct communication between users would lead to a highly coupled system. Adding or removing users, or changing the way communication works, could become complex and error-prone.
How Mediator Pattern gonna help to solve this problem:
The mediator acts as a centralized hub that handles the communication between users. Each user communicates only with the mediator, and the mediator then relays messages to the appropriate recipients.
In below code:
The ChatMediator acts as a mediator between users (User objects), allowing them to send and receive messages without knowing the details of each other.
Below is the Code for the above problem statement:
C#
using System;
using System.Collections.Generic;
public interface IChatMediator
{
void SendMessage(User sender, string message);
}
public class ChatMediator : IChatMediator
{
private List<User> users = new List<User>();
public void AddUser(User user)
{
users.Add(user);
}
public void SendMessage(User sender, string message)
{
foreach (var user in users)
{
if (user != sender)
user.ReceiveMessage(message);
}
}
}
public class User
{
private IChatMediator mediator;
public string Name { get; }
public User(IChatMediator mediator, string name)
{
this.mediator = mediator;
Name = name;
mediator.AddUser(this);
}
public void SendMessage(string message)
{
Console.WriteLine($"{Name} sends: {message}");
mediator.SendMessage(this, message);
}
public void ReceiveMessage(string message)
{
Console.WriteLine($"{Name} receives: {message}");
}
}
class Program
{
static void Main()
{
IChatMediator mediator = new ChatMediator();
User user1 = new User(mediator, "Alice");
User user2 = new User(mediator, "Bob");
User user3 = new User(mediator, "Charlie");
user1.SendMessage("Hello, everyone!");
}
}
|
5.9. Memento Design Pattern in C sharp (C#)
Memento pattern is a behavioral design pattern. Memento pattern is used to restore state of an object to a previous state. Intent of Memento Design pattern is without violating encapsulation, capture and externalize an object’s internal state so that the object can be restored to this state later.
Let’s understand Memento Method by using an example:
Imagine a a text editor application where users can undo and redo their actions. Implementing undo and redo functionality could become complex, storing and managing the state history directly within the text editor would lead to tight coupling and increased code complexity. Each action might need custom code to handle its own undo and redo logic, making the system less maintainable.
How Memento Pattern gonna help to solve this problem:
The memento design pattern can be used to implement the undo and redo functionality. Each time a user performs an action, a snapshot (memento) of the editor’s state is created and stored. Users can then undo or redo their actions by reverting to these saved states.
In below code:
- The
TextEditor is the originator that has the content, and the History class acts as the caretaker, storing and managing the states (mementos).
- Users can undo changes by restoring the editor’s state from the history.
Below is the Code for the above problem statement:
C#
using System;
using System.Collections.Generic;
public class EditorMemento
{
public string Content { get; }
public EditorMemento(string content)
{
Content = content;
}
}
public class TextEditor
{
private string content;
public string Content
{
get => content;
set
{
content = value;
Console.WriteLine($"Current Content: {content}");
}
}
public EditorMemento Save()
{
return new EditorMemento(content);
}
public void Restore(EditorMemento memento)
{
content = memento.Content;
Console.WriteLine($"Restored Content: {content}");
}
}
public class History
{
private List<EditorMemento> states = new List<EditorMemento>();
public void SaveState(EditorMemento memento)
{
states.Add(memento);
}
public EditorMemento GetLastState()
{
if (states.Count == 0)
return null;
var lastState = states[^1];
states.RemoveAt(states.Count - 1);
return lastState;
}
}
class Program
{
static void Main()
{
TextEditor editor = new TextEditor();
History history = new History();
editor.Content = "Hello, ";
history.SaveState(editor.Save());
editor.Content += "world!";
history.SaveState(editor.Save());
editor.Restore(history.GetLastState());
}
}
|
5.10. Interpreter Design Pattern in C sharp (C#)
Interpreter design pattern is one of the behavioral design pattern. Interpreter pattern is used to defines a grammatical representation for a language and provides an interpreter to deal with this grammar. This pattern involves implementing an expression interface which tells to interpret a particular context.This pattern performs upon a hierarchy of expressions. Each expression here is a terminal or non-terminal.
- The tree structure of Interpreter design pattern is somewhat similar to that defined by the composite design pattern with terminal expressions being leaf objects and non-terminal expressions being composites.
- The tree contains the expressions to be evaluated and is usually generated by a parser. The parser itself is not a part of the interpreter pattern.
Let’s understand Interpreter Method by using an example:
Imagine you’re building a simple programming language, and you want to interpret and execute mathematical expressions written in that language. It might need to implement complex and hard-to-maintain code directly in the client program to parse and evaluate expressions. This could lead to code duplication and make it challenging to extend or modify the language grammar.
How Interpreter Pattern gonna help to solve this problem:
The Interpreter pattern is used to create a simple arithmetic expression language, allowing you to interpret and evaluate expressions.
In below code:
- Expression: There’s an abstract class representing expressions in the language. There are two types of expressions – one for numbers (
NumberExpression) and another for addition (AdditionExpression).
- NumberExpression: Represents a numeric value in the expression.
- AdditionExpression: Represents the addition operation in the expression, combining two sub-expressions.
- Client Code (Program): The client creates a specific expression, like “1 + 2”, using instances of
NumberExpression and AdditionExpression. Then, it interprets and evaluates the expression to get the result, which is printed to the console.
Below is the Code for the above problem statement:
C#
using System;
abstract class Expression
{
public abstract int Interpret();
}
class NumberExpression : Expression
{
private int number;
public NumberExpression(int number)
{
this.number = number;
}
public override int Interpret()
{
return number;
}
}
class AdditionExpression : Expression
{
private Expression left;
private Expression right;
public AdditionExpression(Expression left, Expression right)
{
this.left = left;
this.right = right;
}
public override int Interpret()
{
return left.Interpret() + right.Interpret();
}
}
class Program
{
static void Main()
{
Expression expression = new AdditionExpression(new NumberExpression(1), new NumberExpression(2));
int result = expression.Interpret();
Console.WriteLine("Result: " + result);
}
}
|
Share your thoughts in the comments
Please Login to comment...