cvs command in Linux with Examples
Last Updated :
31 Jul, 2023
In today’s digital era, where file modifications and version control are essential, the Concurrent Versions System (CVS) command in Linux emerges as a powerful tool. CVS allows users to store and track the history of files, enabling easy retrieval of previous versions and restoring corrupted files. In this article, we will delve into the intricacies of the CVS command, exploring its syntax, policy options, essential commands, and practical examples.
Syntax of `cvs` command in Linux
cvs [cvs_options] cvs_command [command_options] [command_args]
Exploring Policy Options:
CVS offers a set of policy options that enhance its functionality. These options are included.
|
Specify repository on the command line. It also specifies the legal cvsroot directory. See ‘Password authentication server’ in the CVS manual.
|
|
It uses cvs_root_directory as the directory path name of the repository. It also overrides the $CVSROOT environment variable.
|
|
It uses the editor command specified for entering log information. It also overrides $CVSEDITOR and $EDITOR environment variables.
|
|
It does not read the ~/.cvsrc file.
|
|
It displays CVS command help.
|
|
It does not make any changes to the root repository and also prints out what would happen if the “-n” flag was not used.
|
|
Quiet mode. Less verbose than normal.
|
|
Marginally quiet mode. Reports of recursion are suppressed.
|
|
Show CVS software version and copyright information.
|
|
Make new working files read-write. Overrides the setting of the $CVSREAD environment variable.
|
Essential CVS Commands
CVS encompasses a comprehensive set of commands to manage file history effectively. Some key commands are included.
|
Add a new file/directory to the repository.
|
|
Administration front-end for RCS.
|
|
Shows the last revision were
|
|
Checkout sources for editing.
|
|
Check files into the repository.
|
|
Show differences between revisions
|
|
Get ready to edit a watched file
|
|
See who is editing a watched file.
|
|
Export sources from CVS, similar to checkout.
|
|
Show repository access history.
|
|
Import sources into CVS, using vendor branches.
|
|
It creates a CVS repository if it doesn’t exist.
|
|
Print out historical information for files.
|
|
Create ‘patch’ format diffs between revisions.
|
|
Display status information on checked out files.
|
|
It adds a symbolic tag to check out version of files.
|
|
Undo an edit command.
|
|
Bring work tree in sync with repository.
|
|
Show current CS version(s).
|
|
Set watches.
|
Setting up the environment for CVS:
Set environment variables: (to add to your .bashrc file)
Syntax:
export CVSROOT='/home/linux/cvs_root'     - directory for CVS source code repository
export CVSEDITOR=/bin/vi

Setting up the environment
Set environment variables: (to add to your .cshrc file) (for csh users)
Syntax:
setenv CVSROOT  '/home/linux/cvs_root'
setenv CVSEDITOR /bin/vi
Practical Examples
To grasp the practical implementation of cvs, let’s consider some examples
Creating a Repository (-d command)
To create a Repository (-d command) to initiate a repository using CVS, you need to specify the repository directory. For instance, let’s assume the repository directory is /home/linux/cvs_root. Use the following command to create the repository
cvs -d /home/linux/cvs_root init

Creating a Repository
This command initializes the CVS repository in the specified directory, allowing you to start version controlling your files.
Adding a Project (-m command)
Once the repository is created, you can add a project to it. The import command is used for this purpose. Let’s say you want to add a project named “myfile” with a description “CVS START”. Execute the following command
cvs import -m "CVS START" cvs_file myfile start

Adding a project
This command adds the “myfile” project to the CVS repository and associates it with the “cvs_file” module.
Checking Out a Project (checkout or co command)
To work on a project, you need to create a local copy of it from the repository. This is called checking out the project. Use the checkout or co command, followed by the name of the project, like this.
cvs checkout cvs_file
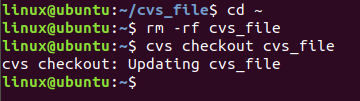
Checking Out a Project
This command retrieves the project files from the repository and creates a local working copy on your machine. Now you can make changes to the files and track their revisions.
Adding Sub-directories or Files (add command)
If you want to add new files or sub-directories to your project, use the add command. For example, let’s say you have a new file named “cvs_file_1” that you want to add. Run the following command.
cvs add cvs_file_1

Adding Sub-directories or Files
This command adds the “cvs_file_1” to your project and makes it part of the CVS repository.
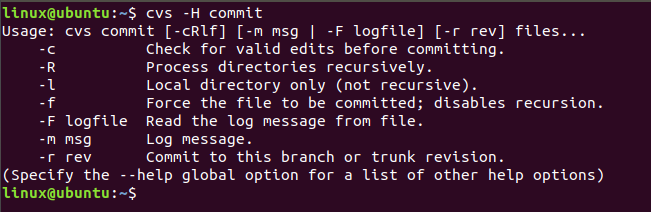
Committing the File (commit command)
After making changes to your project files, you need to commit them to the repository to permanently save the changes. Use the commit command for this purpose. For instance, to commit the changes made to the file “myfile”, execute the following command
cvs commit myfile

Committing the File
This command updates the repository with the latest version of the file “myfile” and records the changes you made.
Updating the Working Directory (update command)
To ensure your local working copy is up to date with the repository, use the update command. This command retrieves any changes made to the project in the repository and updates your local files accordingly. Simply run.
cvs update
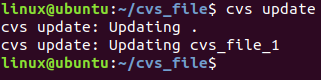
Updating the working Directory
This command synchronizes your working directory with the latest versions of files in the repository.
Removing Files from CVS (remove command)
If you no longer need certain files in your project, you can remove them from the CVS repository using the remove command. For example, to remove the file “myfile” from the repository, execute the following command.
cvs remove myfile

Removing files from CVS
This command permanently deletes the file “myfile” from the CVS repository, ensuring it is no longer tracked.
Note:
- To check for the manual page of cvs command, use the following command:
man cvs
- To check the help page of cvs command, use the following command:
cvs --help command_name
Conclusion
In this article, we have discussed the Concurrent Version System (CVS) command in Linux which is used for file version control. This article provides an overview of cvs, covering its syntax, policy option, essential command, and practical examples. We can say that by understanding cvs, users can effectively manage projects, track revisions, and synchronize with the repository. Overall, we can say that Linux users can enhance their file management capabilities and ensure the integrity of their projects.
Share your thoughts in the comments
Please Login to comment...