Create a Weather app using React and Tailwind
Last Updated :
28 Dec, 2023
React JS is a very famous library for front-end development. In this article, we will walk through the process of building a weather app using React, a popular JavaScript library for building user interfaces(UI). Here we also use Tailwind CSS, a utility-first CSS framework. Here we also use a weather API to get data from it and then display its data. At the end, we will have a functional weather app that fetches real-time weather data and displays it in a user-friendly front-end.
Prerequisite
Approach:
- State Management:
- Used the
useState hook to manage two pieces of state:
city: Stores the user-inputted city name.weatherData: Stores the fetched weather data from the API.
- API Data Fetching:
- Created an asynchronous function
fetchWeatherData to handle the API call using the fetch function.
- Constructed the API endpoint using the weatherapi.com service, including the API key and the user-inputted city.
- Used a
try-catch block to handle errors during the API call.
- Updated the
weatherData state with the fetched data if the API call was successful.
- Logged the data to the console for debugging purposes.
- User Interface (UI):
- Designed a simple UI using JSX with a flex container for centering content vertically and horizontally.
- Included an input field for users to enter the city name and a button to trigger the weather data fetching.
- Styled the UI elements using Tailwind CSS classes for a clean and responsive design.
- Displaying Weather Information:
- Conditionally rendered a section to display weather information only if
weatherData is available.
- Showed relevant weather details such as location, country, current condition, temperature, “feels like” temperature, and wind information.
- Used Tailwind CSS classes for styling to enhance the visual presentation of the weather information.
Steps to Create a React Application:
Step 1: Create a react application by using this command
npx create-react-app weather-app
Step 2: After creating your project folder, i.e. PalindromeApp, use the following command to navigate to it:
cd weather-app
Step 3: Install Tailwind CSS
By using below command we will Install the required packages for Tailwind CSS
npm install tailwindcss
Now, Let’s create the configuration files for tailwindcss
npx tailwindcss init
you will see that there is new file named “tailwind.config.js” created.
Project Structure:

Project Structure
The updated dependencies in package.json file will look like:
"dependencies": {
    "react": "^18.2.0",
    "react-dom": "^18.2.0",
    "react-scripts": "5.0.1",
    "tailwindcss": "^3.4.0",
    "web-vitals": "^2.1.4"
 }
Make below changes in this file for configuration of tailwindcss.
// File : tailwind.config.js
/** @type {import('tailwindcss').Config} */
module.exports = {
  content: ["./src/**/*.{js,jsx,ts,tsx}"],
  theme: {
    extend: {},
  },
  plugins: [],
}
Now, Open src/index.css and import Tailwind CSS in that file by adding below code in it.
/* File : Index.css */
@tailwind base;
@tailwind components;
@tailwind utilities;
Step 4: API Response
Here we used weatherapi.com API for getting weather data of different city. so for that you simply need to signup on that API platform, you will get API Key to use in project. then we will hit the url “https://api.weatherapi.com/v1/current.json?key=${API_KEY}&q=${city}” to get a specific city weather data.
as example, here I had searched for current weather data of Noida city. you will get below as response.
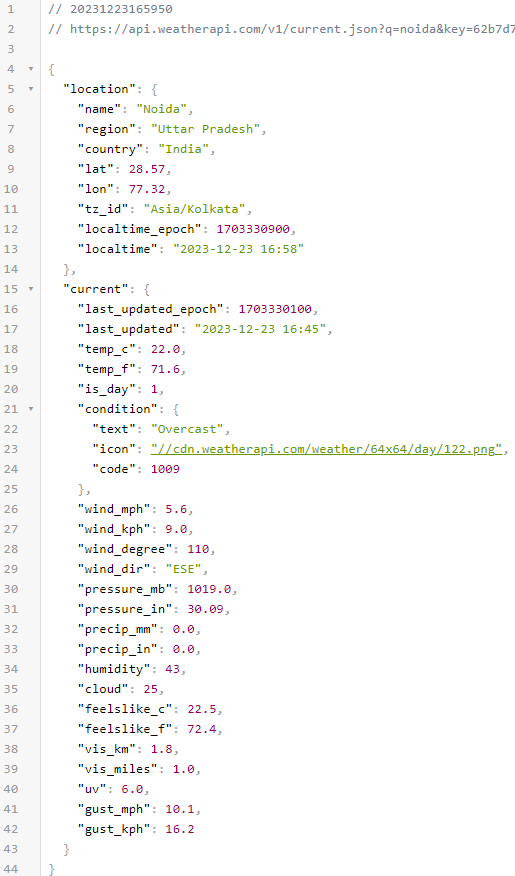
API Response
Here you can see there is different-different weather info available in the response you can use them as per your convenience.
Example: Now, let’s create our Weather components in src/App.js. It contains one search box for input of city name, and another box with shows weather of the city.
Javascript
import React, { useState } from 'react';
import './App.css';
const WeatherApp = () => {
const [city, setCity] = useState('');
const [weatherData, setWeatherData] = useState(null);
const fetchWeatherData = async () => {
const API_KEY = 'afe34ae5f71249829d955000232712';
const API_ENDPOINT =
`https:
try {
const response = await fetch(API_ENDPOINT);
const data = await response.json();
setWeatherData(data);
console.log(data);
} catch (error) {
console.error('Error fetching weather data:', error);
}
};
return (
<div className="h-screen flex flex-col
items-center justify-center bg-green-400">
<div className="bg-white p-8 rounded shadow-md mb-4">
<h2 className="text-2xl font-bold mb-4">
Weather App
</h2>
{}
<input
type="text"
placeholder="Enter city name"
className="border p-2 w-full mb-4"
value={city}
onChange={(e) => setCity(e.target.value)} />
{}
<button
className="bg-green-400 text-white p-2 rounded"
onClick={fetchWeatherData}>
Get Weather
</button>
</div>
{}
{weatherData && (
<div className="bg-white p-8 rounded shadow-md">
<div className="mt-4">
{}
<h3 className="text-xl font-semibold mb-2">
Weather in {weatherData.location.name},
{weatherData.location.country}
</h3>
{}
<p>
Condition:
{weatherData.current.condition.text}
</p>
{}
<p>
Temperature:
{weatherData.current.temp_c}°C
</p>
{}
<p>
Feels Like:
{weatherData.current.feelslike_c}°C
</p>
{}
<p>
Wind: {weatherData.current.wind_kph}
KMH in {weatherData.current.wind_dir} Direction
</p>
</div>
</div>
)}
</div>
);
};
export default WeatherApp;
|
Step to run the Application:
we can simply run our React app by using command npm start. you will able to see below as output.
npm start
Output:

Output
Share your thoughts in the comments
Please Login to comment...