Ruby on Rails, often just called Rails, is a web application framework written in the Ruby programming language. It was created by David Heinemeier Hansson and was first released in 2005. Rails are known for its “Convention over Configuration” approach, which means that it provides sensible defaults for many aspects of web development, allowing developers to focus on writing the code specific to their application. It also has a strong emphasis on “DRY” (Don’t Repeat Yourself) principles, which encourage the reuse of code and promote a more maintainable and scalable application structure.
The article focuses on discussing the steps to create a user signup form using the Ruby on Rails framework. The signup form allows users to signup by entering their email id and by creating a password. Access to the data of signed-up users can be enabled through the backend.
Prerequisites
These are the following prerequisites that should be preinstalled on your system:
- Ruby (Version – 3.1.2).
- Node (Version – 12.22.9).
- Yarn (Version – 1.22.9).
- Rails (Version – 7.0.4.2).
Implementation
Model-view-controller Architecture will be used for creating the form. Follow the steps below to create a signup form:
Step 1: Open the terminal and start a new rails application.
$ rails new User_Signup
This process will create all the necessary files and folders in the directory and will install all the essential gems for the application. In Ruby on Rails, a gem is a packaged library or plugin that provides additional functionality to a Rails application. It can extend the core framework, add new features, or simplify common development tasks.
Run the rails server from the terminal to start the development server.
$ rails s
Open http://localhost:3000/ in your browser and it will show a page like this:
Step 2: Goto config/routes.rb and add some routes such as root route and sign_up route.
A route in Ruby on Rails is a URL pattern that maps to a specific action in a controller. The routes file (config/routes.rb) is where you define the mapping between URLs and the corresponding actions in your controllers.
root to: “home#index”
get “sign_up”, to: “user#new”
post “sign_up”, to: “user#create”
In Ruby on Rails, the get and post methods are used to specify the HTTP request method in routing. get method is used to retrieve a resource and display it on the page. post method is used to submit data to the server to create a new resource.
Step 3: Generate a home controller from the terminal.
A controller is a central part of the application that handles user requests and manages the flow of data between the model and the view. Each controller in Rails corresponds to a specific set of related actions and is named after the model it works with. For example, you might have a PostsController for working with blog posts or a UsersController for working with user accounts.
rails generate controller Home
This generated action will create a file named home_controller.rb in app/controllers and a folder named the home in app/views. Now, Open app/controllers/home_controller.rb and add the index method to it
def index
end
There is no need of writing anything to the index method because we’re just going to create our home page.
Step 4: In the folder app/views/home create a new file named index.html.erb and add the following HTML code to it.
<h1> This is Home Page </h1>
Run the rails server again and this time when you will open http://localhost:3000/ the page will be like as shown below.
Step 5: An user will sign up through the form. So, we have to create a model user from the terminal.
A Model is a class that represents a specific table in the database and is used to interact with the data stored in that table. Models are the “M” in the MVC (Model-View-Controller) architecture that Rails follows and are responsible for representing and manipulating the data in the application. For example, you might have a ‘Post’ model that represents a single blog post, or a ‘User’ model that represents a user account.
$ rails generate model User
This process will create a file user.rb in app/models and a migration file in db/migrate.
Open the migration file of create_users and add two columns to the user’s table email and password_digest.
t.string :email, null: false
t.string :password_digest
After this run the following command:rails db:migrate
The rails db:migrate command is used to run database migrations. A migration in Rails is a way to make changes to the database schema, such as creating new tables, adding columns, or modifying existing columns. Migrations are stored as files in the db/migrate directory and each migration file corresponds to a specific set of changes to the database.
And add some validation for an email in app/models/user.rb and for authentication, we have to show that a user will contain its secure password.
The “valid_email_regex” is a regular expression used to validate the format of an email address in a model. This regex pattern can be used in the validation method to ensure that the email entered by a user matches the correct format before being saved to the database. The default pattern used in Ruby on Rails is the /\A[\w+\-.]+@[a-z\d\-.]+\.[a-z]+\z/i regex.
has_secure_password
VALID_EMAIL_REGEX = /\A[\w+\-.]+@[a-z\d\-.]+\.[a-z]+\z/i
validates :email, presence: true,
uniqueness: { case_sensitive: false },
length: { maximum: 105 },
format: { with: VALID_EMAIL_REGEX }
Step 7: Install bcrypt gem. Goto gemfile and activate the bcrypt gem
gem “bcrypt”, “~> 3.1.7”
And after the activation run bundle install to install the gem. bcrypt is a Ruby gem used for securely hashing and storing passwords. Bcrypt is a recommended method for storing passwords because it is slow and provides a salt to protect against dictionary attacks and rainbow table attacks.
$ bundle install
Step 7: Generate a controller user from the terminal.
rails generate controller User
Go to app/controllers/user_controller.rb and add a new and create method to it.
def new
@user = User.new
end
def create
@user = User.new(user_params)
if @user.save
redirect_to root_path, notice: “Successfully created account”
else
render :new
end
end
private
def user_params
params.require(:user).permit(:email, :password, :password_confirmation)
end
In Ruby on Rails, “params” is a special object that holds the parameters that are passed from a web browser to the server, either through the query string of a URL or through form data. The “params” hash allows you to access the values of these parameters in your Rails controller actions and views.
Step 8: Goto the app/views and create a new file new.html.erb in the user folder and write the following code for what is going to be displayed on the signup page.
<h1> Sign Up </h1>
<%= form_with model: @user, url: sign_up_path do |form| %>
<div class=”mb-3″>
<%= form.label :email, “Email” %>
<%= form.text_field :email, class: “form-control”,
placeholder: “Enter your email address” %>
</div>
<div class=”mb-3″>
<%= form.label :password, “Password”%>
<%= form.password_field :password, class: “form-control”,
placeholder: “Enter your password” %>
</div>
<div class=”mb-3″>
<%= form.label :password_confirmation, “Confirm password” %>
<%= form.password_field :password_confirmation, class: “form-control”,
placeholder: “Please enter the password again” %>
</div>
<div class=”mb-3″>
<%= form.submit “Sign Up”, class: “btn btn-primary” %>
</div>
<% end %>
Save all the changes and now open http://localhost:3000/sign_up in the browser and it will look like this:
This signup page doesn’t look good.
Step 9: For a better look and feel of the page, add some Bootstrap styling to the application. Bootstrap is a free front-end framework for faster and easier web development. It provides pre-designed HTML, CSS, and JavaScript components, such as buttons, forms, navigation, typography, and more, which can be easily customized and used to build responsive, mobile-first websites.
To activate bootstrap in our application go to app/views/layouts/application.html.erb and add the following code to it.
<link href=”https://cdn.jsdelivr.net/npm/bootstrap@5.3.0-alpha1/dist/css/bootstrap.min.css” rel=”stylesheet” integrity=”sha384-GLhlTQ8iRABdZLl6O3oVMWSktQOp6b7In1Zl3/Jr59b6EGGoI1aFkw7cmDA6j6gD” crossorigin=”anonymous”>
<script src=”https://cdn.jsdelivr.net/npm/bootstrap@5.3.0-alpha1/dist/js/bootstrap.bundle.min.js” integrity=”sha384-w76AqPfDkMBDXo30jS1Sgez6pr3x5MlQ1ZAGC+nuZB+EYdgRZgiwxhTBTkF7CXvN” crossorigin=”anonymous”></script>
And add some styling to app/vies/user/new.html.erb
<div class=”container”>
<div class=”row justify-content-center”>
<div class=”col-5″>
<div class=”mt-3″>
<h1> Sign Up </h1>
</div>
<%= form_with model: @user, url: sign_up_path do |form| %>
<div class=”form-group row mt-3″>
<%= form.label :email, “Email” %>
<%= form.text_field :email, class: “form-control”,
placeholder: “Enter your email address” %>
</div>
<div class=”form-group row mt-3″>
<%= form.label :password, “Password”%>
<%= form.password_field :password, class: “form-control”,
placeholder: “Enter your password” %>
</div>
<div class=”form-group row mt-3″>
<%= form.label :password_confirmation, “Confirm password” %>
<%= form.password_field :password_confirmation, class: “form-control”,
placeholder: “Please enter the password again” %>
</div>
<div class=” form-group row mt-3″>
<%= form.submit “Sign Up”, class: “btn btn-primary” %>
</div>
<% end %>
</div>
</div>
</div>
Refresh the page and now it the page will look good as shown below.
Step 10: Setup flash messages to show alerts and notices.
Make a new folder ‘shared’ in app/views and in the shared folder create a partial named _flash.html.erb. Write the below codes in _flash.html.erb.
<% if flash[:notice] %>
<div class=”alert alert-info mt-4″>
<%= flash[:notice] %>
</div>
<% end %>
<% if flash[:alert] %>
<div class=”alert alert-warning mt-4″>
<%= flash[:alert] %>
</div>
<% end %>
To access these flash messages go to app/views/layouts/application.html.erb and write the below line in <boody> element.
<%= render partial: “shared/flash” %>
Step 11: Creating Our first user.
Start the rails server and refresh the signup page and choose an email and enter the password.
As you will hit the Sign Up button the user will be created and you will be at your homepage with notice as shown below.
Step 12: Checking whether the user is saved or not.
Open the terminal and run the following command:
$ rails console
OR
$ rails c
Something like below will open up.
And at that point, if you will write User.all it will show all the saved users.
irb(main):001:0> User.all
As you can see there are two users. I created the first one for testing.
Step 13: Showing the errors.
When we will hit signup button without filling in the email or if there is a mismatch of passwords or the email is not according to the validation it will show the errors. Go to app/views/user/new.html.erb add the following lines
<% if @user.errors.any?%>
<div class=”alert alert-danger”>
<% @user.errors.full_messages.each do |message| %>
<div><%= message %></div>
<% end %>
</div>
<% end %>
When you try to hit signup button some errors following will happen.
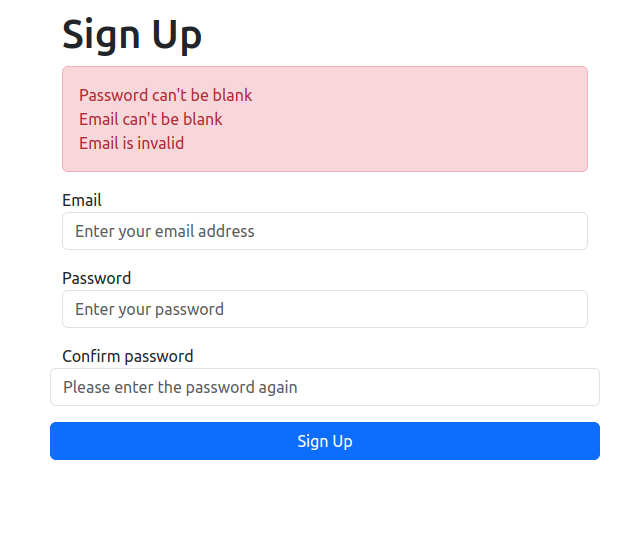
If you will try to sign up without entering any data.
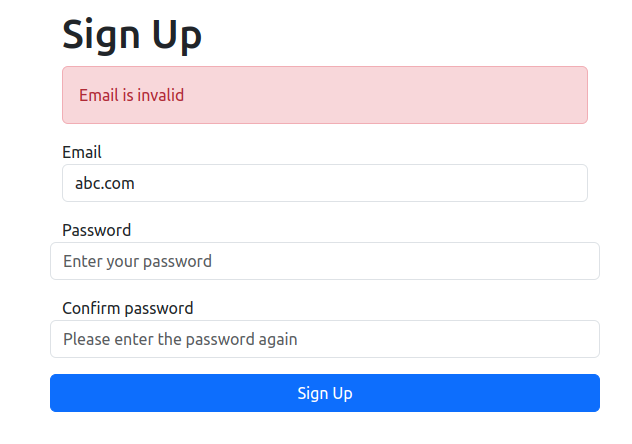
If you will try to sign up with an email that is not according to the validation.
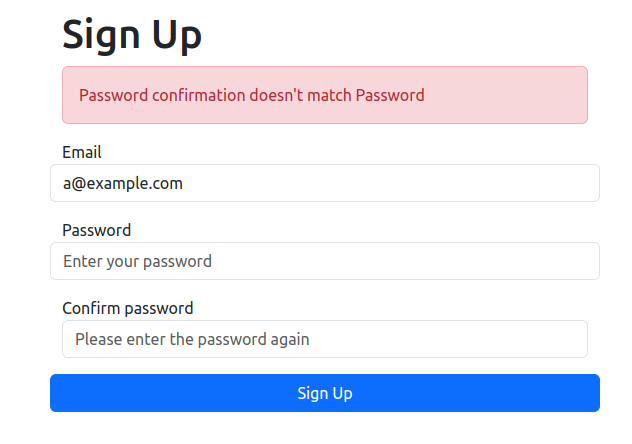
If you will try to sign up with not matching passwords.
That’s it. You’ve created a Signup page using Rails successfully.
Share your thoughts in the comments
Please Login to comment...