In Linux, the configuration of IP networking is important for maintaining unique IP addresses for each system. We configure our IP for data exchange and serving purposes. nmtui is a user-friendly tool that simplifies the configuration of IP addresses. It is a text-based interface for configuring IP addresses. While commands can be used to configure IP addresses, using nmtui provides users with more clarity. Remembering and using commands can be hard, but a text-based interface is easier to access. This article provides detailed steps to configure IP addresses using nmtui in Linux.
What is IP Networking?
IP (Internet Protocol) networking is setting up and managing IP addresses to provide communication between devices on a network. Proper configuration is required to provide effective data exchange, It is one of the foundational elements in the operating system. It is mainly used in modern internet and local area networks (LANs). It assigns a unique address to a device for data transmission.
Key Components:
- IP Address: An IP address is a numerical value assigned to each device connected to a network that uses the Internet Protocol for communication. It is used for two main purposes: host or network interface identification and location addressing.
- Subnetting: Subnetting is dividing an IP network into sub-networks that improve performance and security. It is used to manage large networks more efficiently.
- Routing: Routing is used for directing data between different networks. It determines the best path for data packets to travel from the source to the destination.
- Protocols: Protocols govern communication within an IP network. The most fundamental is the Internet Protocol itself, but others, such as Transmission Control Protocol (TCP) and User Datagram Protocol (UDP), are used to ensure efficient data transfer.
What is nmtui in Linux?
nmtui, or NetworkManager Text User Interface, is a user-friendly command-line tool in Linux used for the configuration of network settings. It is a part of the NetworkManager suite, nmtui provides a text-based interface and is used to manage network connections, making it accessible to both new and experienced users.
Key Features of nmtui:
- Text-Based Interface: nmtui works on a text-based interface, It allows users to interact with network settings using simple menus. This is highly useable for users who are not comfortable with traditional command-line interfaces.
- Menu-Driven Configuration: This tool has a menu-driven approach, It guides users through various network configuration options. This interface streamlines the process of editing, activating, or deactivating network connections.
- Connection Management: nmtui can manage both the wired and wireless network connections. Users can easily edit connection settings, activate or deactivate connections, and view information about available networks.
- IPv4 and IPv6 Configuration: nmtui supports both IPv4 and IPv6 configurations, it offers flexibility for various networking environments. Users can specify IP addresses, gateways, and DNS settings with ease.
IP Network configuring is crucial for communication between Linux systems. This article provides a step-by-step guide for Configuring IP networking using the nmtui (NetworkManager Text User Interface) tool in Linux.
How to Configure IP Networking with nmtui in Linux?
Prerequisites:
- Linux Environment: This tutorial assumes you are working in a Linux environment. The provided instructions and script are tailored for Linux systems.
- Terminal Access: You should have access to a terminal or command-line interface on your Linux system. Most Linux distributions provide this by default.
In this section, we will see the practical configuration of IP Networking in Linux using the nmtui tool suite.
Step 1: Check Network Settings (For Virtual Machine)
If you are using a virtual machine, ensure that the host network adapter is activated and connected. Open your virtual machine settings. Check if the network adapter is connected to the host network adapter. If not connected, add a host network adapter.
.png)
Choose a Host-Only Ethernet Adapter
Step 2: Open Terminal
You can usually open the terminal by pressing “Ctrl + Alt + T” or searching for “Terminal” in your application launcher.
Step 3: Check NetworkManager Status(For Linux Host)
Make sure that NetworkManager is running. Check it by running the following command:
sudo systemctl status NetworkManager
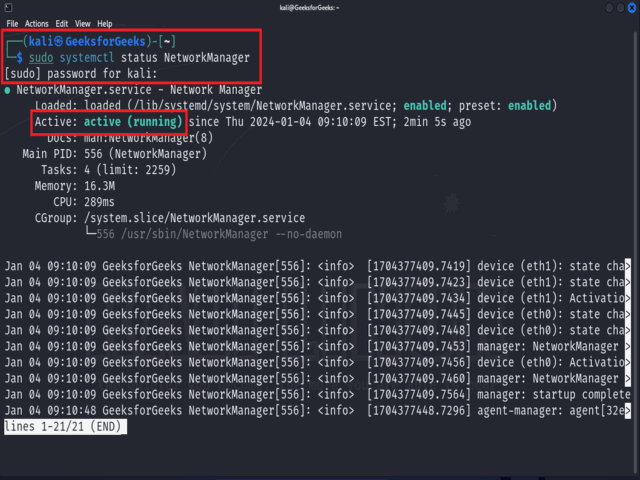
Checking Network Manager Status
If Network Manager is not running on the Linux system, then execute the below command to change its status to Active.
sudo systemctl start NetworkManager
Step 4: Open nmtui
To access the nmtui (Network Manager Text User Interface) in Linux, enter the command “sudo nmtui” in the terminal. This command opens the nmtui interface, providing a text-based tool for configuring and managing network connections with administrative privileges.
sudo nmtui
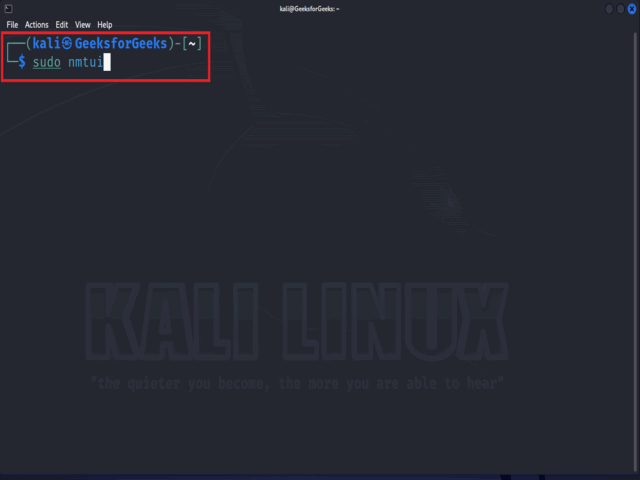
Opening nmtui interface
After executing the above command, the nmtui interface will open for usage.
nmtui Interface
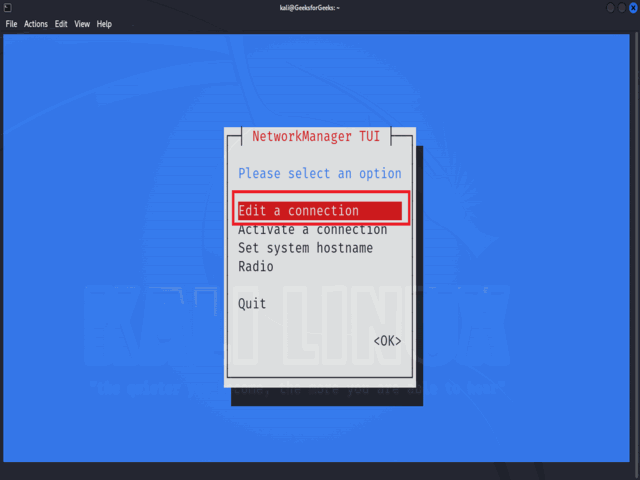
Step 5: Navigate to ‘Edit a Connection’
In the nmtui interface, navigate using arrow keys and select “Edit a connection.” Confirm your choice by pressing Enter to access the configuration options for editing network connections.
Selecting Edit a Connection option
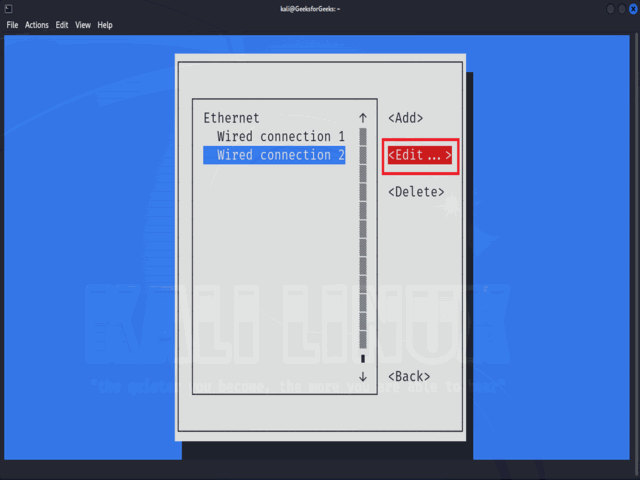
Step 6: Select Network Interface
Now, choose the specific network interface you want to configure, such as “Wired connection 1″ or “Wi-Fi,” from the provided list within the nmtui interface. This selection will direct you to the configuration settings for the chosen network connection.

Selecting the Network Interface
Step 7: Modify Connection Settings
Choose the “Edit” option for the selected network interface in the nmtui interface and press Enter. This step grants access to the configuration settings, allowing you to modify parameters such as IP address, gateway, DNS, and other connection details.
Modifying Connection Settings
To modify the IPv4 configuration, navigate to the “IPv4 CONFIGURATION” option within the network interface settings. If it currently displays “Automatic,” select it and change the setting to “Manual” to enable manual configuration of the IPv4 settings.

Modifying IPv4 Configuration
Click the “Addresses” option and type the desired IP address and subnet mask. Here we entered “192.168.54.21/24” as the IP address and subnet mask. Click “OK” to save the configuration.

Enter your desired IP address and subnet mask
Step 8: Activate the Connection
Click on the “Activate a connection” option and select the previously edited connection. First Deactivate the connection and Activate it again. Press Enter to activate the edited connection.

Activate a connection
After selecting the “Activate a Connection” option, deactivate the connection initially and once again activate it for problem-free configuration.
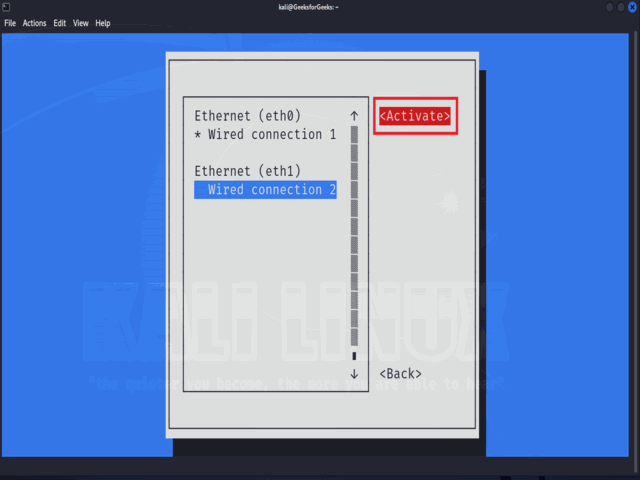
Activate the interface again
Step 9: Exit nmtui
To exit nmtui after configuring network settings, choose the “Back” option to return to the main menu. Subsequently, select “Quit” and press Enter to exit the nmtui interface.

Exiting nmtui Interface
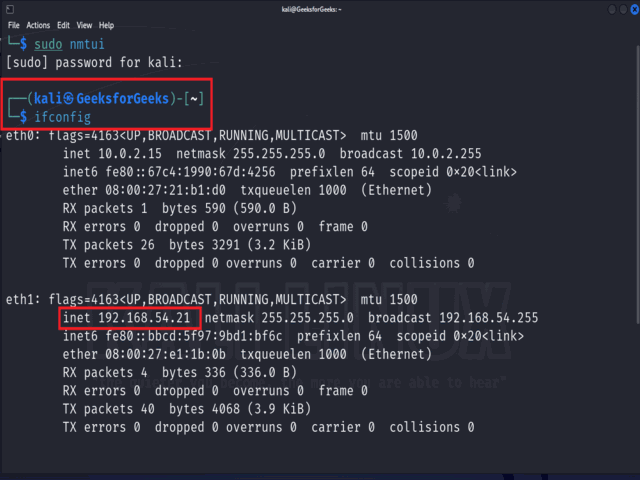
Step 10: Verify Configuration
To verify the successful configuration of the IP address, use the “ifconfig” command in the terminal. For instance, if the IP address is changed to “192.168.54.21,” running “ifconfig” will display the network interface details, confirming that the IP address has been successfully configured using nmtui.
ifconfig
Configuration is changed
Conclusion
In conclusion, configuring IP networking is important for communication and data exchange among systems in a Linux environment. It is important to ensure NetworkManager’s activity and, in the case of a virtual machine, enable the Host-only adapter. Use the ‘sudo nmtui’ command to open nmtui, where you can edit your desired interface, save the configuration, deactivate, reactivate, and then quit nmtui. This sequence of actions will change the original IP address into your desired one. This article provides a user-friendly guide to the process of configuring IP networking on Linux using the nmtui tool.
Share your thoughts in the comments
Please Login to comment...