Imagine a situation where you can generate images of cats that match your ideal vision or a landscape that adheres to a specific artistic style. CGANs is a neural network that enables the generation of data that aligns with specific properties, which can be class labels, textual descriptions, or other traits, by harnessing the power of conditions.
Conditional Generative Adversarial
A conditional generative adversarial network (CGAN) is a type of GAN model where a condition is put in place to get the output. In this article, we will discuss CGAN and its implementation.
Generative Adversarial Network
Generative Adversarial Networks (GAN) is a deep learning framework that is used to generate random, plausible examples based on our needs. It contains two essential parts that are always competing against each other in a repetitive process (as adversaries). These two essential parts are:
- Generator Network: It is the neural network responsible for creating (or generating) new data. They can be in the form of an image, text, video, sound, etc., as per the data they are trained on.
- Discriminator Network: It’s work is to distinguish between real and fake data from the dataset and data generated by the generator.
The responsibility or objective of the generator model is to create new data real enough to “fool” the discriminator so that it cannot distinguish between real and fake (generated) data, whereas the role of the discriminator is to be able to identify if the data is generated or real data.
What is Conditional Generative Adversarial Network(CGAN)?
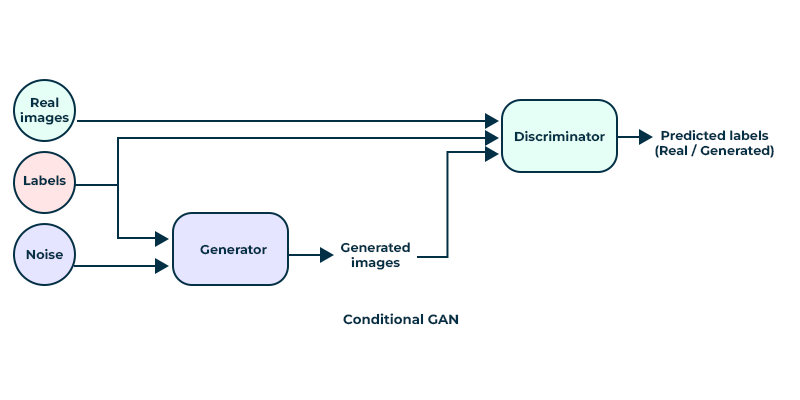
Imagine the need to generate images that are of only Mercedes cars when you have trained your model on a collection of cars. To do that, you need to provide the GAN model with a specific “condition,” which can be done by providing the car’s name (or label). Conditional generative adversarial networks work in the same way as GANs. The generation of data in a CGAN is conditional on specific input information, which could be labels, class information, or any other relevant features. This conditioning enables more precise and targeted data generation.
Architecture and Working of CGANs
Conditioning in GANs:
- GANs can be extended to a conditional model by providing additional information (denoted as y) to both the generator and discriminator.
- This additional information (y) can be any kind of auxiliary information, such as class labels or data from other modalities.
- In the generator, the prior input noise (z) and y are combined in a joint hidden representation.
Generator Architecture:
- The generator takes both the prior input noise (z) and the additional information (y) as inputs.
- These inputs are combined in a joint hidden representation, and the generator produces synthetic samples.
- The adversarial training framework allows flexibility in how this hidden representation is composed.
Discriminator Architecture:
- The discriminator takes both real data (x) and the additional information (y) as inputs.
- The discriminator’s task is to distinguish between real data and synthetic data generated by the generator conditioned on y.
Loss Function:
The objective function for the conditional GAN is formulated as a two-player minimax game:
![min_G max_D V(D,G) = \mathbb{E}_{x \sim p_{data} (x)}[logD(x|y)] + \mathbb{E}_{z \sim p_{z}}(z)[log(1- D(G(z∣y)))]](https://quicklatex.com/cache3/48/ql_3d0926adc9dffceb23cb8919b6fac348_l3.png "Rendered by QuickLaTeX.com")
Here,
 represents the expected operator. It is used to denote the expected value of a random variable. In this context,
  represents the expected value with respect to the real data distribution
  , and
, and  represents the expected value with respect to the prior noise distribution
  .
. - The objective is to simultaneously minimize the generator’s ability to fool the discriminator and maximize the discriminator’s ability to correctly classify real and generated samples.
- The first term
 encourages the discriminator to correctly classify real samples.
 - The second term
 encourages the generator to produce samples that are classified as real by the discriminator.
This formulation creates a balance in which the generator improves its ability to generate realistic samples, and the discriminator becomes more adept at distinguishing between real and generated samples conditioned on y.
Conditional Generative Adversarial Network
Implementing CGAN on CiFAR-10
Let us see the working of CGAN on CIFAR-10 Dataset. Follow along these steps to have a better understanding about how the CGAN model works.
Import libraries
We will start with importing the necessary libraries.
Python3
import tensorflow as tf
from tensorflow.keras.models import Model
from tensorflow.keras.optimizers import Adam
from tensorflow.keras.datasets import cifar10
from keras.preprocessing import image
import keras.backend as K
import matplotlib.pyplot as plt
import numpy as np
import time
from tqdm import tqdm
|
Loading the data and variable declaring
After this, we will first load the dataset and then declare some necessary global variables for the CGAN modelling. (that includes variables like epoch counts, image size, batch size, etc.)
Python3
batch_size = 16
epoch_count = 50
noise_dim = 100
n_class = 10
tags = ['Airplane', 'Automobile', 'Bird', 'Cat', 'Deer', 'Dog', 'Frog', 'Horse', 'Ship', 'Truck']
img_size = 32
(X_train, y_train), (_, _) = cifar10.load_data()
X_train = (X_train - 127.5) / 127.5
dataset = tf.data.Dataset.from_tensor_slices((X_train, y_train))
dataset = dataset.shuffle(buffer_size=1000).batch(batch_size)
|
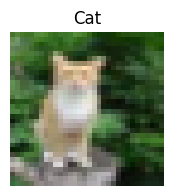
Visualizing the data
Now we will visualize the images from the dataset loaded in tf.data.Dataset .
Python3
plt.figure(figsize=(2,2))
idx = np.random.randint(0,len(X_train))
img = image.array_to_img(X_train[idx], scale=True)
plt.imshow(img)
plt.axis('off')
plt.title(tags[y_train[idx][0]])
plt.show()
|
Output:
Defining Loss function and Optimizers
In the next step, we need to define the Loss function and optimizer for the discriminator and generator networks in a Conditional Generative Adversarial Network(CGANS).
- Binary Cross-Entropy Loss (bce loss) is suitable for distinguishing between real and fake data in GANs.
- The discriminator loss function take two arguments, real and fake.
- The binary entropy calculates two losses:
- real_loss: the loss when the discriminator tries to classify real data as real
- fake_loss : the loss when the discriminator tries to classify fake data as fake
- The total loss is the sum of real_loss and fake_loss which represents how well the discriminator is at distinguishing between real and fake data
- The generator_loss function calculates the bce loss for the generator. The aim of the generator is discriminate real and fake data.
- d_optimizer and g_optimizer are used to update the trainable parameters of the discriminator and generator during training. Adam optimizer is employed to update the trainable parameters.
Python3
bce_loss = tf.keras.losses.BinaryCrossentropy()
def discriminator_loss(real, fake):
real_loss = bce_loss(tf.ones_like(real), real)
fake_loss = bce_loss(tf.zeros_like(fake), fake)
total_loss = real_loss + fake_loss
return total_loss
def generator_loss(preds):
return bce_loss(tf.ones_like(preds), preds)
d_optimizer=Adam(learning_rate=0.0002, beta_1 = 0.5)
g_optimizer=Adam(learning_rate=0.0002, beta_1 = 0.5)
|
Building the Generator Model
Now, let us begin with building the generator model. The generator takes a label and noise as input and generates data based on the label. Since we are giving a condition, i.e., our label, we will use an embedding layer to change each label into a vector representation of size 50. And after building the model, we will check the architecture of the model.
- the input layer is used to provide the label as input to the generators
- the embedding layer converts the label (i.e., single value) into vector representation of size 50
- the input layer is used to provide the noise (latent space input) to the generator. The latent space input goes through a series of dense layers with large number of nodes and LeakyRelu activation function.
- the label are reshaped and the concatenated with the processed latent space.
- the merged data goes to a series of convolution transpose layers:
- the first ‘Conv2DTranspose’ layer doubles the spatial size to ‘ 16x16x128’ and LeakyReLU activation is applied.
- the second ‘Conv2DTranspose’ layer double the spatial size to ’32x32x128′, and LeakyReLU activation is applied.
- The final output layer convolutional layer with 3 channels (for RGB color), using a kernel size (8,8) and activation function ‘tanh’. it produces an image with size ’32x32x3′ as the desired output.
Python3
def build_generator():
in_label = tf.keras.layers.Input(shape=(1,))
li = tf.keras.layers.Embedding(n_class, 50)(in_label)
n_nodes = 8 * 8
li = tf.keras.layers.Dense(n_nodes)(li)
li = tf.keras.layers.Reshape((8, 8, 1))(li)
in_lat = tf.keras.layers.Input(shape=(noise_dim,))
n_nodes = 128 * 8 * 8
gen = tf.keras.layers.Dense(n_nodes)(in_lat)
gen = tf.keras.layers.LeakyReLU(alpha=0.2)(gen)
gen = tf.keras.layers.Reshape((8, 8, 128))(gen)
merge = tf.keras.layers.Concatenate()([gen, li])
gen = tf.keras.layers.Conv2DTranspose(
128, (4, 4), strides=(2, 2), padding='same')(merge)
gen = tf.keras.layers.LeakyReLU(alpha=0.2)(gen)
gen = tf.keras.layers.Conv2DTranspose(
128, (4, 4), strides=(2, 2), padding='same')(gen)
gen = tf.keras.layers.LeakyReLU(alpha=0.2)(gen)
out_layer = tf.keras.layers.Conv2D(
3, (8, 8), activation='tanh', padding='same')(gen)
model = Model([in_lat, in_label], out_layer)
return model
g_model = build_generator()
g_model.summary()
|
Output:
Model: "model"
__________________________________________________________________________________________________
 Layer (type)                Output Shape                 Param #   Connected to
==================================================================================================
 input_2 (InputLayer)        [(None, 100)]                0         []

 input_1 (InputLayer)        [(None, 1)]                  0         []

 dense_1 (Dense)             (None, 8192)                 827392    ['input_2[0][0]']

 embedding (Embedding)       (None, 1, 50)                500       ['input_1[0][0]']

 leaky_re_lu (LeakyReLU)     (None, 8192)                 0         ['dense_1[0][0]']

 dense (Dense)               (None, 1, 64)                3264      ['embedding[0][0]']

 reshape_1 (Reshape)         (None, 8, 8, 128)            0         ['leaky_re_lu[0][0]']

 reshape (Reshape)           (None, 8, 8, 1)              0         ['dense[0][0]']

 concatenate (Concatenate)   (None, 8, 8, 129)            0         ['reshape_1[0][0]',
                                                                     'reshape[0][0]']

 conv2d_transpose (Conv2DTr  (None, 16, 16, 128)          264320    ['concatenate[0][0]']
 anspose)

 leaky_re_lu_1 (LeakyReLU)   (None, 16, 16, 128)          0         ['conv2d_transpose[0][0]']

 conv2d_transpose_1 (Conv2D  (None, 32, 32, 128)          262272    ['leaky_re_lu_1[0][0]']
 Transpose)

 leaky_re_lu_2 (LeakyReLU)   (None, 32, 32, 128)          0         ['conv2d_transpose_1[0][0]']

 conv2d (Conv2D)             (None, 32, 32, 3)            24579     ['leaky_re_lu_2[0][0]']

==================================================================================================
Total params: 1382327 (5.27 MB)
Trainable params: 1382327 (5.27 MB)
Non-trainable params: 0 (0.00 Byte)
__________________________________________________________________________________________________
Now we will do the same for Discriminator model as well.
We have defined the discriminator model for CGAN, the discriminator takes both an image and a label as input and is responsible for distinguishing between and generated data.
- Input layer takes single value, which represents a label or class information. It’s embedded into a 50-dimensional vector using an embedded layer
- The label input is embedded into vector and embedding allows the discriminator to take into account the class information during the discrimination process
- The label is reshaped then concatenated with the input. The combination of label information with the image is a way to provide conditional information to the discriminator
- Two convolutional layers are applied to concatenated input. LeakyReLU activation is used with an alpha value of 0.2 after each convolutional layer. These layers extract the features.
- The feature maps are flattened and dropout layer is applied to prevent overfitting. The flattened and dropout processed features are connected to the dense layer with a single neuron and a sigmoid activation function. The output is the probability score representing the input data is real or fake.
- A model is created using TensorFlow API, considering both image and label as input and producing the discriminator’s output as the final layer.
Python3
def build_discriminator():
in_label = tf.keras.layers.Input(shape=(1,))
li = tf.keras.layers.Embedding(n_class, 50)(in_label)
n_nodes = img_size * img_size
li = tf.keras.layers.Dense(n_nodes)(li)
li = tf.keras.layers.Reshape((img_size, img_size, 1))(li)
in_image = tf.keras.layers.Input(shape=(img_size, img_size, 3))
merge = tf.keras.layers.Concatenate()([in_image, li])
fe = tf.keras.layers.Conv2D(128, (3,3), strides=(2,2), padding='same')(merge)
fe = tf.keras.layers.LeakyReLU(alpha=0.2)(fe)
fe = tf.keras.layers.Conv2D(128, (3,3), strides=(2,2), padding='same')(fe)
fe = tf.keras.layers.LeakyReLU(alpha=0.2)(fe)
fe = tf.keras.layers.Flatten()(fe)
fe = tf.keras.layers.Dropout(0.4)(fe)
out_layer = tf.keras.layers.Dense(1, activation='sigmoid')(fe)
model = Model([in_image, in_label], out_layer)
return model
d_model = build_discriminator()
d_model.summary()
|
Output:
Model: "model_1"
__________________________________________________________________________________________________
 Layer (type)                Output Shape                 Param #   Connected to
==================================================================================================
 input_3 (InputLayer)        [(None, 1)]                  0         []

 embedding_1 (Embedding)     (None, 1, 50)                500       ['input_3[0][0]']

 dense_2 (Dense)             (None, 1, 1024)              52224     ['embedding_1[0][0]']

 input_4 (InputLayer)        [(None, 32, 32, 3)]          0         []

 reshape_2 (Reshape)         (None, 32, 32, 1)            0         ['dense_2[0][0]']

 concatenate_1 (Concatenate  (None, 32, 32, 4)            0         ['input_4[0][0]',
 )                                                                   'reshape_2[0][0]']

 conv2d_1 (Conv2D)           (None, 16, 16, 128)          4736      ['concatenate_1[0][0]']

 leaky_re_lu_3 (LeakyReLU)   (None, 16, 16, 128)          0         ['conv2d_1[0][0]']

 conv2d_2 (Conv2D)           (None, 8, 8, 128)            147584    ['leaky_re_lu_3[0][0]']

 leaky_re_lu_4 (LeakyReLU)   (None, 8, 8, 128)            0         ['conv2d_2[0][0]']

 flatten (Flatten)           (None, 8192)                 0         ['leaky_re_lu_4[0][0]']

 dropout (Dropout)           (None, 8192)                 0         ['flatten[0][0]']

 dense_3 (Dense)             (None, 1)                    8193      ['dropout[0][0]']

==================================================================================================
Total params: 213237 (832.96 KB)
Trainable params: 213237 (832.96 KB)
Non-trainable params: 0 (0.00 Byte)
__________________________________________________________________________________________________
Now we will create a train step function for training our GAN model together using Gradient Tape. Gradient Tape allows use to use custom loss functions, update weights or not and also helps in training faster.
The code provided below defines a complete training step for a GAN, where the generator and discriminator are updated alternately.
The tf.function makes sure the training step can be executed efficiently in a TensorFlow graph.
Python3
@tf.function
def train_step(dataset):
real_images, real_labels = dataset
random_latent_vectors = tf.random.normal(shape=(batch_size, noise_dim))
generated_images = g_model([random_latent_vectors, real_labels])
with tf.GradientTape() as tape:
pred_fake = d_model([generated_images, real_labels])
pred_real = d_model([real_images, real_labels])
d_loss = discriminator_loss(pred_real, pred_fake)
grads = tape.gradient(d_loss, d_model.trainable_variables)
d_optimizer.apply_gradients(zip(grads, d_model.trainable_variables))
random_latent_vectors = tf.random.normal(shape=(batch_size, noise_dim))
with tf.GradientTape() as tape:
fake_images = g_model([random_latent_vectors, real_labels])
predictions = d_model([fake_images, real_labels])
g_loss = generator_loss(predictions)
grads = tape.gradient(g_loss, g_model.trainable_variables)
g_optimizer.apply_gradients(zip(grads, g_model.trainable_variables))
return d_loss, g_loss
|
Also we will create a helper code for visualizing the output after each epoch ends for each class. The examples of images generated for each class. demonstrating how well the generator can produce images conditioned on specific labels or classes.
Python3
def show_samples(num_samples, n_class, g_model):
fig, axes = plt.subplots(10,num_samples, figsize=(10,20))
fig.tight_layout()
fig.subplots_adjust(wspace=None, hspace=0.2)
for l in np.arange(10):
random_noise = tf.random.normal(shape=(num_samples, noise_dim))
label = tf.ones(num_samples)*l
gen_imgs = g_model.predict([random_noise, label])
for j in range(gen_imgs.shape[0]):
img = image.array_to_img(gen_imgs[j], scale=True)
axes[l,j].imshow(img)
axes[l,j].yaxis.set_ticks([])
axes[l,j].xaxis.set_ticks([])
if j ==0:
axes[l,j].set_ylabel(tags[l])
plt.show()
|
Training the model and Visualize the output
At the final step, we will start training the model.
Python3
def train(dataset, epochs=epoch_count):
for epoch in range(epochs):
print('Epoch: ', epochs)
d_loss_list = []
g_loss_list = []
q_loss_list = []
start = time.time()
itern = 0
for image_batch in tqdm(dataset):
d_loss, g_loss = train_step(image_batch)
d_loss_list.append(d_loss)
g_loss_list.append(g_loss)
itern=itern+1
show_samples(3, n_class, g_model)
print (f'Epoch: {epoch} -- Generator Loss: {np.mean(g_loss_list)}, Discriminator Loss: {np.mean(d_loss_list)}\n')
print (f'Took {time.time()-start} seconds. \n\n')
train(dataset, epochs=epoch_count)
|
Output:
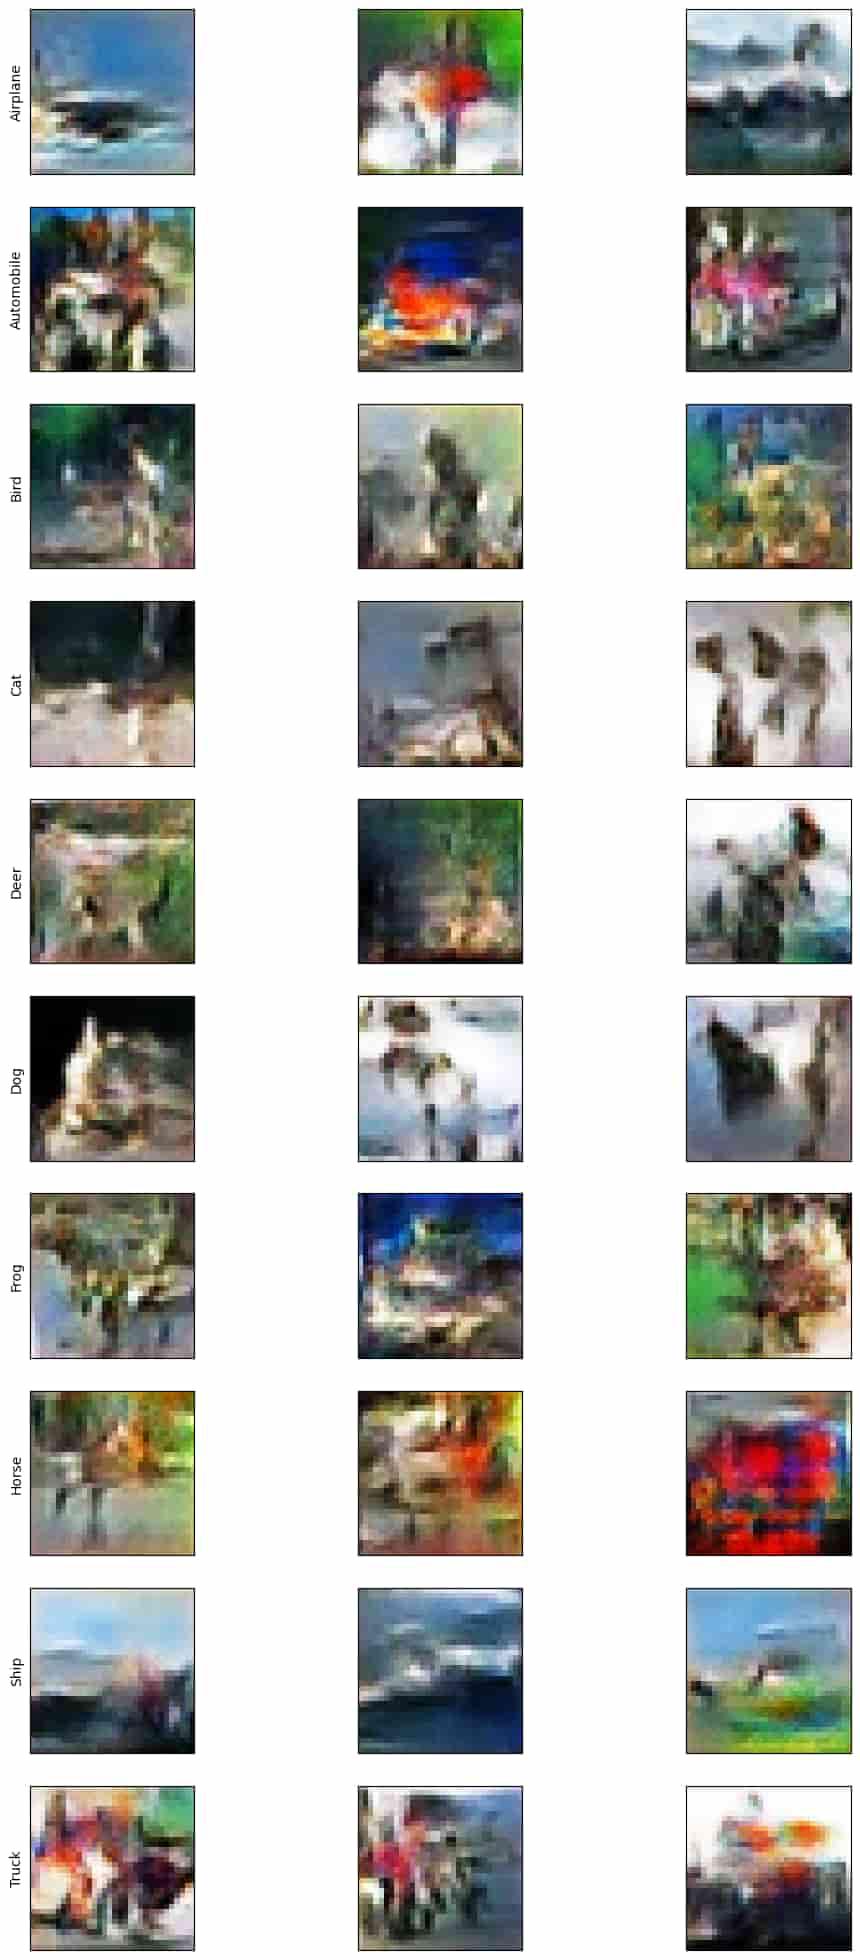
We can see some details in these pictures. For better result, we can try to run this for more epochs.
Conclusion
In this article, we have provided an comprehensive overview of implementing CGANs with TensorFlow, from loading data to model architecture to the training process. We have also covered fundamental concept of GANs and Conditional GANs. GANs is a field that continues to advance that has the potential for generating highly specific, conditional images.
Share your thoughts in the comments
Please Login to comment...